Plant Overview
Often called the Black Iris or Gold-veined Iris, this moody beauty is a standout in any garden for its near-velvet, midnight-purple petals. Originating from the high-altitude meadows of China and Myanmar, it brings an air of mystery and Gothic elegance to the landscape. Unlike the bright, flashy colors of typical irises, this species is prized for its "dark and stormy" aesthetic.
🔍 How to Identify
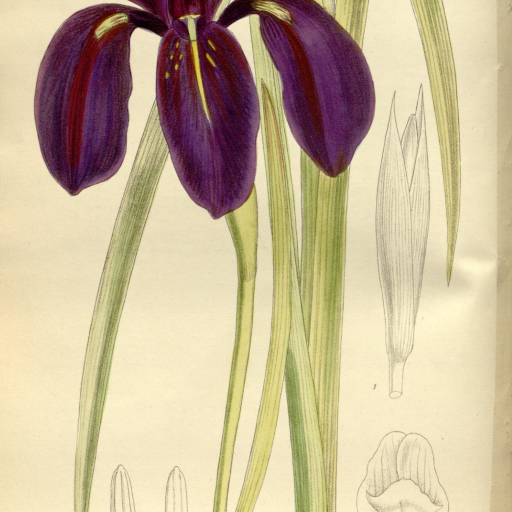
- 🖤 Petal Color: The flowers are famous for being so deep purple they appear truly black, often with a rich, velvety texture that absorbs light.
- 🖋️ Golden Markings: Look closely at the "falls" (the drooping petals); they feature delicate, intricate streaks of bright gold or yellow, which give the plant its name—chrysographes means "written in gold."
- 🌿 The Foliage: The leaves are slender, grayish-green, and sword-like, forming an elegant clump that remains attractive even when the plant isn't in bloom.
🏡 In Your Garden
- 💧 Thirst for Moisture: Unlike many irises that prefer to bake in the sun, the Black Iris is a "Sino-Himalayan" species. It thrives in damp (but not soggy) soil and will quickly pout and wither if left in dry, parched earth during the summer.
- ⛰️ Cooler Roots: This plant prefers a slightly acidic soil rich in organic matter. Because of its mountain heritage, it appreciates a spot where its "feet" stay cool, making a heavy mulch of leaf mold or compost very beneficial.
- 🌱 Low Intervention: It is generally a slow-growing, well-behaved clump-former. It doesn't need frequent division like other irises; in fact, it prefers to be left undisturbed once it has settled into its favorite spot.
⚠️ Safety & Toxicity
- 🐾 Mildly Toxic: Like all members of the Iris family, this plant contains the toxin irisin. While it is rarely fatal, it can cause significant issues if ingested.
- 🤢 The Symptoms: If eaten by pets or curious children, it can lead to stomach upset, drooling, or vomiting. The rhizome (the thick root-like stem) contains the highest concentration of toxins.
- 🧤 Skin Sensitivity: The sap can cause mild skin irritation or dermatitis for some gardeners, so wearing gloves during division is a smart move.
✨ Fun Fact
The name Iris chrysographes is a perfect literal description. In Greek, chrysos means "gold" and graphes means "writing." When you look at the golden lines on its dark petals, it truly looks as though a calligrapher has painted gold ink onto black velvet.

Detailed Care Instructions
To grow an Iris Chrysographes plant, also known as the black iris or golden-eyed iris, follow these steps:
- Choose the right location: Iris Chrysographes prefer a sunny spot with at least six hours of direct sunlight per day. Ensure the soil is well-draining as these plants do not tolerate waterlogged soil.
- Prepare the soil: Dig a hole about twice as wide and deep as the plant's root ball. Mix organic matter, such as compost or well-rotted manure, into the soil to improve its fertility and drainage.
- Planting: Place the Iris Chrysographes rhizomes (underground stems) in the prepared hole, positioning them horizontally just below the soil surface. Cover the rhizomes with soil, and gently firm it around them.
- Watering: After planting, water the Iris Chrysographes thoroughly to settle the soil and ensure good root contact. Then, water regularly to keep the soil consistently moist, but not waterlogged. Reduce watering during the dormant period.
- Mulching: Apply a layer of organic mulch, such as straw or wood chips, around the base of the plants to help conserve moisture, suppress weed growth, and regulate soil temperature.
- Fertilizing: Iris Chrysographes are not heavy feeders. Apply a balanced, slow-release fertilizer or a low-nitrogen organic fertilizer in early spring when new growth appears. Avoid high-nitrogen fertilizers, as they can encourage leafy growth but inhibit flower production.
- Maintenance: Remove any weeds regularly to prevent competition for nutrients and light. Cut back the foliage to ground level in late fall or early winter, as the Iris Chrysographes goes dormant during colder months.
- Division: Iris Chrysographes tend to form dense clumps over time. To maintain vigorous growth and promote blooming, divide the plants every three to four years, preferably in late summer after flowering. Dig up the rhizomes, separate them into smaller sections with healthy roots, and replant them.
- Pests and diseases: The black iris is generally quite resistant to pests and diseases. However, keep an eye out for snails, slugs, or iris borers, which can damage the plants. Treat any infestations promptly using organic or chemical methods.
- Enjoy the blooms: With proper care, your Iris Chrysographes should reward you with stunning dark purple or black flowers in late spring or early summer. Admire their beauty, cut some for flower arrangements if desired, and share the joy with others.

Place in a bright room that is sun drenched almost all day. Or directly in a south-facing window.

To properly water the plant, it is important to first consider the soil and environment it is in. The plant requires a moist but well-draining soil, so it is important to ensure that excess water is not sitting in the soil. Watering should be adjusted depending on the temperature and humidity of the environment. It is recommended to water the plant deeply but infrequently, allowing the soil to dry out slightly between watering sessions. Additionally, it is suggested to avoid watering the leaves and flowers of the plant directly, as this can promote the growth of fungi and other plant diseases. Instead, aim to water the soil around the base of the plant.
For optimal growth of this plant, fertilize it with a balanced fertilizer in early spring before new growth begins. Apply it at a rate of 1 pound per 100 square feet of soil surface, or as directed on the fertilizer label. During the growing season, supplement the plant with a 0-10-10 fertilizer to promote blooming. Apply it at a rate of 1 pound per 100 square feet of soil surface every two months. Avoid over-fertilizing, as it may cause leaf burn and damage the plant.
The ideal soil for a certain plant species from the Iris family with deep blue-black flowers (scientific name Iris chrysographes) should be a well-draining soil with a balanced pH level of 6.0 to 7.5. It needs to be rich in organic matter and have good moisture retention while allowing proper drainage. The soil should have a good amount of nutrition with a mix of essential minerals and elements. A sandy loam soil with peat moss or compost mixed in can work well for these plants. However, it's important to note that the specific soil requirements may vary slightly depending on the region and climate where the plant is grown.
To propagate this plant, you can utilize division. First, prepare a potting mix by mixing peat moss, perlite, and sand in equal parts. Then, carefully remove the iris from its pot and shake the excess soil. Remove the rhizomes that are at least 2-3 inches long, ensuring that each rhizome has a good set of roots. Cut off the dead and rotten parts.
Then, plant the rhizomes about an inch deep into the soil and water the pot thoroughly. Place the pot in a well-lit, warm location and continue to water as needed to ensure the soil remains moist.
After several weeks, new growth should begin to emerge from the rhizomes. Once the roots are established, you can transplant the new plants into larger pots or into your garden.


