Plant Overview
Tucked away in the dappled sunlight of Northern California’s coastal woodlands, Fernald’s Iris is a subtle gem of the Pacific Coast Iris group. Named after the famed botanist Merritt Lyndon Fernald, this plant is cherished for its elegant, creamy-yellow blossoms that seem to glow in shaded environments. It is a favorite for "wildlife gardens" because it perfectly bridges the gap between a rugged woodland survivor and a delicate ornamental flower.
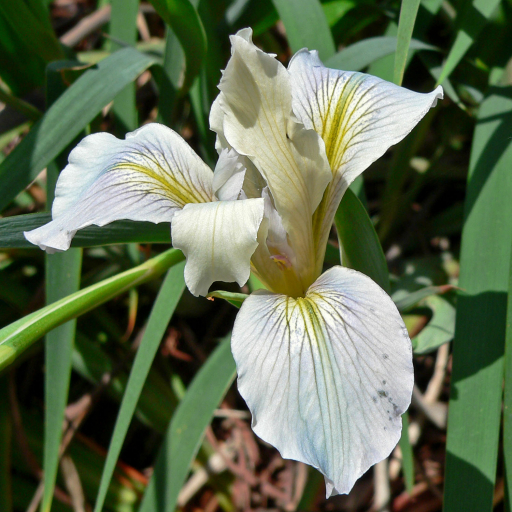
🔍 How to Identify
- 🎨 The Blooms: Flowers are typically creamy-yellow, pale buff, or very light lavender. They are often adorned with intricate purple or deep gold veins that act as "nectar guides" for visiting bees.
- 🌿 The Foliage: Its leaves are long, narrow, and grass-like. They often display a grayish-green tint and have a characteristic reddish-purple staining at the very base where the leaves meet the soil.
- 📏 The Stature: This is a relatively low-growing species, usually reaching about 8 to 16 inches in height. It grows in modest, non-invasive clumps that blend beautifully into natural landscapes.
🏡 In Your Garden
- 🌳 The Oak Connection: This iris thrives best under the canopy of deciduous trees. In the wild, it is often found near California Oaks; it loves the cool, acidic mulch provided by fallen leaves, which keeps its "feet" protected during the dry summer months.
- 🚫 Root Sensitivity: Like many Pacific Coast Irises, Fernald’s Iris is notorious for hating "wet feet" in the summer and resenting transplanting. It develops a specialized root system that does not like to be disturbed, so it is best to plant it from a small container and leave it to settle permanently.
⚠️ Safety & Toxicity
- 🚫 Toxic Status: All parts of the plant are considered toxic if ingested by humans, cats, dogs, or horses.
- 🐾 The Rhizome Danger: The underground rhizomes contain the highest concentration of irisin. If a pet digs them up and consumes them, it can lead to digestive upset, drooling, and lethargy.
- 🧤 Skin Irritation: The sap can cause mild skin irritation or "contact dermatitis" in sensitive individuals. It is always a good idea to wear gardening gloves when dividing the clumps or trimming the foliage.
✨ Fun Fact
While most garden irises are sun-worshippers, Iris fernaldii is a true shade-seeker. It is one of the few iris species that will bloom reliably in deep, filtered light, making it a "holy grail" for gardeners trying to add sophisticated color to the dark, dry corners of a woodland garden.

Detailed Care Instructions
Growing Iris Fernaldii requires some preparation and attention, but it can be a rewarding experience. Here are the steps to grow Iris Fernaldii:
- Climate and soil: Iris Fernaldii is native to wetlands and bog areas, so it thrives in moist and acidic soil. Make sure you have the appropriate conditions in your garden or consider growing it in a container.
- Sunlight: Iris Fernaldii prefers partial shade to full sun. Place it in an area that receives at least 4-6 hours of sunlight daily.
- Planting: Start with healthy rhizomes, which are usually available from specialized nurseries or online. Choose rhizomes that are plump and firm. Plant them in early spring or fall, as this allows them to establish in mild temperatures. Dig a hole, roughly 2-3 inches deep, and place the rhizome horizontally in the hole with the top exposed.
- Soil preparation: Before planting, amend your soil with organic matter such as compost or peat moss to improve drainage and enhance acidity. You can also add sphagnum moss to retain moisture. Avoid heavy clay soils, as Iris Fernaldii prefers well-draining soil.
- Watering: Iris Fernaldii requires moist soil to thrive, so water it regularly. However, be careful not to overwater, as this can lead to root rot. Maintain a balance and ensure the soil remains damp, but not waterlogged.
- Mulching: Apply a layer of organic mulch around the base of the plant to retain moisture, suppress weeds, and keep the soil cool.
- Fertilizing: Iris Fernaldii doesn't require heavy feeding. Apply a balanced, slow-release fertilizer in early spring or incorporate compost into the soil to provide necessary nutrients.
- Maintenance: Remove dead leaves and flowers regularly to promote healthy growth. After blooming, allow the foliage to die back naturally, as it provides nutrients to the rhizome for future growth.
- Division: Every 3-4 years, divide the rhizomes in early fall or spring. Carefully dig up the plant, separate the healthy rhizomes, and replant them in well-prepared soil. This helps prevent overcrowding and rejuvenates the plants.
By following these steps and giving proper care, your Iris Fernaldii should flourish and provide beautiful blooms in its preferred moist and acidic environment.

Place in a bright room that is sun drenched almost all day. Or directly in a south-facing window.

To water the Iris Fernaldii plant, it is important to ensure that it receives the appropriate amount of moisture for healthy growth. Here are some guidelines to follow:
1. Understand the plant's watering needs: Iris Fernaldii plants require consistently moist soil. However, it is crucial to avoid overwatering, which can lead to root rot. Adequate drainage is essential to prevent excess moisture from accumulating around the roots.
2. Check the soil: Before watering, check the moisture level in the soil. Stick your finger or a moisture meter about 1-2 inches deep to determine if the soil is dry. If it feels dry, it is time to water the plant.
3. Watering frequency: The frequency of watering will largely depend on environmental conditions, such as temperature, humidity, and sunlight exposure. During periods of active growth, usually in spring and summer, the plant may require more frequent watering. However, be cautious not to let the soil become waterlogged.
4. Watering method: To avoid waterlogging the soil and causing potential damage to the plant, it is recommended to use a gentle watering method. A watering can with a narrow spout or a drip irrigation system is suitable for delivering water directly to the base of the plant, allowing it to soak into the soil gradually.
5. Watering technique: Water the Iris Fernaldii plant thoroughly until the soil is evenly moist. Avoid excessive misting, as it may not provide enough moisture for the roots. Aim to moisten the soil to a reasonable depth while allowing excess water to drain away.
6. Timing: Water the plant early in the morning or late in the evening when the temperatures are cooler. This allows the water to be absorbed more effectively before evaporating and helps to prevent fungal diseases that can occur in damp conditions.
7. Monitor the plant: Regularly observe the Iris Fernaldii plant for signs of over or under watering. Wilting, yellowing leaves, or a moldy smell indicate that adjustments to the watering routine may be necessary.
Remember, while watering is vital for plant health, it is crucial to consider other factors such as proper sunlight exposure, temperature, and fertilization to provide optimum care for the Iris Fernaldii plant.
Fertilizing instructions for Iris Fernaldii plant:
- Use a balanced, slow-release fertilizer specifically formulated for flowering plants.
- During the growing season, apply fertilizer once every four to six weeks.
- Follow the instructions on the fertilizer package for appropriate dilution ratios.
- Prior to applying fertilizer, water the soil thoroughly to prevent root burn.
- Scatter the fertilizer evenly around the base of the plant, avoiding direct contact with the foliage.
- Gently work the fertilizer into the top layer of soil using a hand cultivator.
- Water the plant immediately after fertilizing to help activate the nutrients and prevent any potential harm to the roots.
- Avoid excessive fertilization, as this can result in weak growth or damage to the plant.
- Monitor the plant's response to fertilization and adjust the frequency or amount as needed to promote healthy growth.
- During the dormant period, typically in late fall or winter, withhold fertilization to allow the plant to rest.
When growing Iris Fernaldii, it is important to choose the right type of soil to provide optimal conditions for its growth and development. The ideal soil for Iris Fernaldii is well-draining and rich in organic matter. This type of soil allows water to permeate easily and prevents excess moisture from accumulating around the plant's roots, which can lead to rot.
The soil should have a slightly acidic to neutral pH level, ranging from 6.0 to 7.0. This pH range ensures that the plant can efficiently absorb nutrients from the soil. If the soil has a high alkaline content, adding organic matter such as compost or well-rotted manure can help lower the pH.
Iris Fernaldii prefers a soil that is loose and loamy, with a good balance of sand, silt, and clay. This texture allows for proper aeration and drainage without becoming overly compacted. Adding organic matter such as peat moss or leaf mold can improve soil structure, enhance water retention, and provide essential nutrients.
It is important to note that Iris Fernaldii is a mountain-dwelling perennial plant. Therefore, replicating its natural habitat by creating a rocky or gravelly soil can be beneficial. Including these elements in the soil mix can improve drainage and mimic the conditions that the plant is accustomed to.
Overall, the best soil for Iris Fernaldii should be well-draining, rich in organic matter, slightly acidic to neutral in pH, and have a loose and loamy texture. Creating these optimal soil conditions will help ensure the healthy growth and longevity of the Iris Fernaldii plant in your garden.
To propagate Iris fernaldii plants, you can follow the steps outlined below:
- Preparation: Begin by gathering the necessary materials, including clean pots or trays, well-draining potting mix, a sharp knife or garden shears, and rooting hormone (optional).
- Division: The most common method of propagating Iris fernaldii is through division. Start by carefully lifting the plant from the ground, taking care not to damage the roots. Gently shake off any excess soil to expose the rhizomes.
- Separation: Identify healthy rhizomes with a good number of visible bud-like growth points. These are the parts that will develop into new plants. Separate these rhizomes from the main clump by cutting them away using a sharp knife or garden shears.
- Cleaning: Remove any dead or damaged parts from the separated rhizomes, ensuring that each division has enough healthy roots attached.
- Potting: Fill clean pots or trays with well-draining potting mix. Plant the rhizomes horizontally, ensuring that the bud-like growth points are facing upwards. Cover the rhizomes with a thin layer (about half an inch) of potting mix.
- Rooting hormone (optional): If desired, you can dip the cut edges of the rhizomes into a rooting hormone, available at garden centers, to encourage root growth and hasten the establishment of new plants.
- Watering: After potting, water the newly planted rhizomes thoroughly, ensuring that the soil is evenly moist. Avoid overwatering, as excessive moisture can lead to rot.
- Location: Place the potted divisions in a sunny location or an area with partial shade, depending on the needs of the specific Iris fernaldii variety.
- Care: Regularly monitor the moisture level of the soil and water when necessary to keep it slightly moist. Avoid allowing the soil to dry out completely or become waterlogged. Provide the plants with adequate ventilation to prevent fungal diseases.
- Transplanting: Allow the newly propagated plants to establish roots in their pots for at least one growing season (typically until the following spring). Once the rhizomes have developed a healthy root system, you can transplant them into their permanent location in the garden.
By following these steps, you should be able to successfully propagate Iris fernaldii plants without mentioning their common names.


