Plant Overview
Commonly known as the Fringed Iris or Butterfly Iris, this elegant evergreen perennial brings a touch of woodland magic to the garden. Unlike its sun-loving cousins, Iris japonica thrives in the dappled shadows, unfurling delicate, orchid-like blossoms that look as though they were crafted from fine lace. Native to the forest floors of China and Japan, it has been a staple of traditional East Asian gardens for centuries.
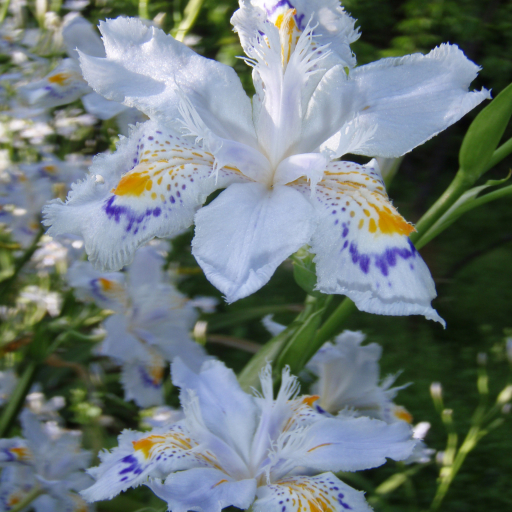
🔍 How to Identify
- 🌸 The Bloom: Features pale lavender to white petals with deeply fringed edges. The center of the flower is marked by a striking "crest" of bright orange or yellow dots, resembling a butterfly's wing.
- 🍃 The Foliage: Unlike many irises that die back, this species maintains glossy, sword-shaped leaves year-round. They grow in fan-like clusters that arch gracefully toward the ground.
- 🌱 The Habit: It spreads via slender, creeping rhizomes (underground stems) that often sit right on the surface of the soil, quickly forming a dense, lush green carpet.
🏡 In Your Garden
- 🌳 The Shade Specialist: This is one of the few irises that genuinely prefers shade. In a sunny spot, its leaves may turn yellow or scorch; it is happiest tucked under the canopy of large trees or on the north side of a building.
- 💧 Moisture & Spreading: It loves rich, moist soil. Because it spreads through surface rhizomes, it can become a very effective groundcover, but keep an eye on it—in ideal conditions, it can wander further than you might expect!
- ✂️ Low Maintenance: Because it is evergreen, it requires very little grooming. Simply snip away the spent flower stalks in late spring to keep the "fans" looking tidy.
⚠️ Safety & Toxicity
- 🐾 Pet Warning: Like most members of the Iridaceae family, Iris japonica is toxic to cats, dogs, and horses if ingested.
- 🧪 The Rhizome: The highest concentration of toxins (iridin) is found in the rhizomes. Ingestion can cause drooling, vomiting, or lethargy in pets.
- 🧤 Skin Sensitivity: The sap can cause mild skin irritation or "contact dermatitis" in sensitive individuals. It is a good idea to wear gloves when dividing the clumps.
✨ Fun Fact
Most Iris japonica plants found in gardens are "triploid," meaning they have three sets of chromosomes. Because of this genetic quirk, they are sterile and cannot produce seeds—every plant you see is essentially a clone of its parent, spread entirely by the movement of its creeping roots!

Detailed Care Instructions
To grow Iris Japonica plants, you can follow these steps:
- Choose a suitable location: Iris Japonica prefers partial shade to full shade, although they can tolerate some sun. Ensure the site has well-draining soil.
- Prepare the soil: Amend the soil with organic matter, such as compost, to improve drainage and add nutrients. Remove any weeds or grass from the planting area.
- Planting: Dig a hole slightly larger than the rootball of the plant. Place the Iris Japonica in the hole, ensuring the top of the rootball is level with the soil surface. Space multiple plants around 12-18 inches apart.
- Watering: Give the plant a thorough watering after planting to settle the soil and help establish the roots. Water regularly during the first growing season to keep the soil consistently moist but not waterlogged.
- Mulching: Apply a layer of organic mulch, such as wood chips or straw, around the plant to help retain moisture, suppress weed growth, and regulate soil temperature.
- Fertilizing: Iris Japonica usually doesn't require additional fertilizer. However, if you choose to fertilize, use a balanced, slow-release fertilizer in early spring, following the label instructions. Avoid over-fertilizing, as it may lead to excessive foliage growth and fewer blooms.
- Pruning: Remove any spent flowers and trim back any dead or damaged foliage as needed. Trim the foliage to the ground in late fall or early spring to promote new growth.
- Overwintering: Iris Japonica is hardy in zones 5-9. Apply a layer of mulch over the plant in late fall to protect it from extreme cold temperatures.
- Propagation: Iris Japonica can be propagated by dividing the rhizomes every 3-4 years in late summer or early fall. Dig up the plant, carefully separate the rhizomes, and replant them in a suitable location.
By following these steps, you should be able to successfully grow Iris Japonica plants. Remember to provide regular care, including watering and occasional maintenance, to ensure healthy growth and bloom.

Place in a bright room that is sun drenched almost all day. Or directly in a south-facing window.

To water this plant, make sure to use room temperature water and avoid letting any water accumulate in the pot or container. Only water when the top inch of soil feels dry to the touch and avoid overwatering. It's also important to water the plant at the base of the stem and avoid getting water on the leaves to prevent any possible fungal growth.
To fertilize this plant, use a balanced fertilizer with an NPK ratio of 10-10-10 or 20-20-20. Apply the fertilizer in early spring before new growth begins and then again in early summer. Use a granular fertilizer and sprinkle it evenly around the base of the plant, being careful not to let it touch the foliage. Water the fertilizer in thoroughly after application. Avoid fertilizing in late summer or fall as this can encourage new growth that may not survive the winter.
For Iris Japonica plants, it is recommended to use well-draining soil that is rich in organic matter. A mix of loamy soil and sand is ideal for this plant, as it provides good drainage and prevents waterlogging. Additionally, a slightly acidic soil pH of 5.5 to 6.5 is optimal for this plant. It is also important to ensure that the soil is consistently moist, but not waterlogged, to promote healthy growth and flowering. Adding compost or other organic matter to the soil can improve its overall quality and fertility, which can further support the growth and development of Iris Japonica plants.
One way to propagate this plant is through division. Start by digging up the existing plant and carefully separating the rhizomes into smaller sections with a clean, sharp knife or pruner. Each section should have at least one healthy shoot and an adequate root system.
Once the sections have been separated, prepare the planting area by loosening the soil and adding compost or other organic matter to improve soil quality. Plant the sections at the same depth they were previously planted, making sure to space them appropriately to allow for future growth.
Water the newly planted divisions thoroughly and continue to keep the soil moist. The plants should establish roots and begin to grow within a few weeks.
Another method of propagation is through seed. Allow the plant to form seed pods, which will dry out and split open when mature. Collect the seeds and sow them in a prepared planting area during the fall or early spring. Seeds should be planted at a depth of about 1/4 inch and watered regularly until they germinate. It may take several years for seedlings to reach maturity and produce flowers.
Common pests of the butterfly-flower include Spider mites, aphids, whiteflies. Make a habit of checking your butterfly-flower frequently for pests so that any infestations can be caught and managed early.


