Plant Overview
Commonly known as the "Blue Star Creeper" or "Laurentia," Isotoma axillaris is a delicate-looking Australian native that is far tougher than it appears. This charming perennial creates a shimmering carpet of pale blue or violet stars that can bloom continuously from late spring until the first frost. Often used in "moonlight gardens," its pale petals seem to catch the fading light at dusk, giving the plant an almost ethereal, glowing quality.
🔍 How to Identify
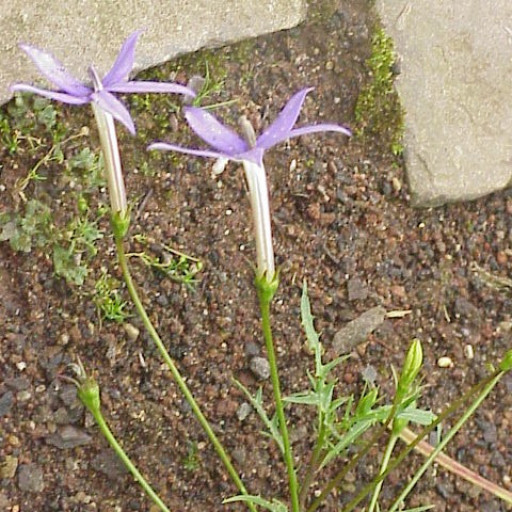
- 🌸 Starry Blooms: The most striking feature is the five-petaled, star-shaped flowers that sit atop thin stems, appearing in shades of sky blue, lavender, or white.
- 🍃 Fine-Textured Foliage: The leaves are narrow, deeply lobed, and almost needle-like, giving the plant a feathery, fern-like appearance even when it isn't blooming.
- 💧 Milky Sap: If you break a leaf or stem, the plant will exude a thin, milky white sap (latex), which is a characteristic trait of its botanical family.
🏡 In Your Garden
- 🪨 Rock Garden Specialist: Hailing from the rocky outcrops of Australia, this plant thrives in the "in-between" spaces. It is perfect for filling gaps between paving stones or cascading over the edges of containers.
- ✂️ Low-Maintenance Beauty: Unlike many garden stars, Isotoma is largely "self-cleaning." This means the spent flowers fall off on their own, so you won't need to spend your weekends deadheading to keep it looking tidy.
- ☀️ Heat Resilience: While it looks soft, it is surprisingly heat-tolerant. However, it appreciates a bit of afternoon shade in scorching climates to prevent the lacy foliage from drying out.
⚠️ Safety & Toxicity
- 🧤 Skin Irritant: The milky sap contains alkaloids that can cause significant skin irritation or "contact dermatitis." It is highly recommended to wear gloves when pruning or handling the plant.
- 👁️ Eye Warning: Be extremely careful not to touch your eyes after handling a broken stem, as the sap can cause painful inflammation.
- 🐾 Pet Safety: The plant is considered toxic if ingested. Keep an eye on curious pets or toddlers, as eating the foliage can lead to vomiting or stomach upset.
✨ Fun Fact
The name Isotoma comes from the Greek words "isos" (equal) and "toma" (a section), referring to the fact that all the petals are of equal size—a geometric rarity that gives the "Blue Star" its perfectly symmetrical, celestial look!

Detailed Care Instructions
To grow Isotoma Axillaris (also known as Laurentia or blue star creeper), follow these steps:
- Choose a suitable location: Isotoma Axillaris thrives in partial shade to full sun. Select a spot with well-draining soil, as this plant does not tolerate waterlogged conditions.
- Prepare the soil: Mix organic matter, such as compost or peat moss, into the soil to enhance drainage and fertility. Remove any weeds or rocks from the planting area.
- Planting: Dig a hole that is slightly larger than the plant's root ball. Place the Isotoma Axillaris into the hole and fill it with soil, gently patting it down to remove any air pockets. Space the plants about 6-9 inches apart, as they will spread and form a dense carpet.
- Watering: Water the newly planted Isotoma Axillaris thoroughly after planting to help establish its roots. Keep the soil consistently moist but not waterlogged. Water deeply and regularly during dry spells, especially in the first year.
- Mulching: Apply a layer of organic mulch, such as wood chips or straw, around the base of the plant to help retain moisture, suppress weeds, and regulate soil temperature. Ensure the mulch does not directly touch the plant's stems.
- Fertilizing: Use a balanced, slow-release fertilizer in the spring or early summer. Follow the package instructions for application rates. Avoid excessive fertilization, as it can lead to weak growth or rot.
- Pruning: Trim any dead or wilted leaves to maintain the plant's appearance and encourage new growth. However, Isotoma Axillaris generally requires minimal pruning.
- Controlling weeds: Regularly check for weeds and remove them promptly to prevent competition for nutrients and space.
- Propagation: Isotoma Axillaris can be propagated through divisions or stem cuttings. Divide the plants in early spring or take cuttings during the growing season, ensuring each division or cutting has roots attached. Plant them in separate pots or directly in the garden.
- Winter care: Isotoma Axillaris is cold-hardy but may benefit from a layer of mulch or straw during harsh winter conditions to protect the roots. Mulch should be applied after the first frost.
By following these steps, you can successfully grow and enjoy the beauty of Isotoma Axillaris in your garden.

Place in a bright room that is sun drenched almost all day. Or directly in a south-facing window.

To water this plant, it is important to provide adequate moisture without overwatering. It is best to monitor the soil moisture level and only water when the top inch of soil feels dry to the touch. When watering, provide enough water for it to soak into the soil, but avoid saturating the soil. It is also important to avoid getting water on the leaves, as this can increase the risk of disease and pest problems. Watering in the morning or early evening will help ensure the plant has time to absorb moisture before the hot sun dries it out. In general, this plant prefers evenly moist soil and may require more frequent watering during periods of hot weather or drought.
To fertilize the Isotoma Axillaris plant, follow these instructions:
- Choose a mild, balanced water-soluble fertilizer that contains equal proportions of nitrogen, phosphorus, and potassium.
- Dilute the fertilizer according to the package instructions. Usually, a dilution ratio of 1 teaspoon of fertilizer per 1 gallon of water is recommended.
- Water the plant thoroughly before applying the fertilizer to ensure the soil is adequately moist.
- Pour the diluted fertilizer solution evenly around the base of the plant, aiming to avoid getting it on the leaves.
- Repeat the fertilization process every four to six weeks during the growing season, which typically ranges from spring to early fall.
- As the plant's growth slows down during the winter months, suspend fertilization until the following spring.
- Monitor the plant's response to the fertilizer. If the foliage becomes excessively lush or shows signs of burning, adjust the dilution ratio and reduce the frequency of fertilization.
- Always read and follow the specific instructions provided with your chosen fertilizer brand for accurate dosage and application guidelines.
When planting Isotoma Axillaris, it is recommended to use a well-draining, nutrient-rich soil that is high in organic matter. It is advised to mix garden soil with compost or well-rotted manure to improve the soil structure and provide nutrients for the plant. The soil pH should be between 6.0 to 7.5, and the soil should be moist but not waterlogged. Avoid using heavy clay soils or soils that hold too much water, as this can lead to root rot and other diseases. Additionally, it's important to ensure the soil is free of weeds, rocks, and debris before planting.
Isotoma Axillaris can be propagated through stem cuttings or division of the root system.
For stem cuttings, select a healthy stem that is free of any diseases or pests. Cut a 4 to 6-inch section of the stem with a sharp, sterilized knife. Remove the leaves from the lower 2 inches of the cutting and dip the cut end in rooting hormone. Plant the cutting in a pot filled with moist, well-draining soil and cover it with a plastic bag to create a humid environment. Place the pot in bright, indirect light and keep the soil moist. The cutting should root in about 4 to 6 weeks.
To propagate through division, carefully lift the plant out of the soil and gently separate the root system into smaller sections using a sterilized knife or garden fork. Make sure each section has a healthy root system and replant them into pots or directly into the soil.
It is important to note that propagation should always be done with clean tools to prevent any disease or fungal infections from spreading.
Common pests of the australian harebell include Spider mites, larvae. Make a habit of checking your australian harebell frequently for pests so that any infestations can be caught and managed early.


