Plant Overview
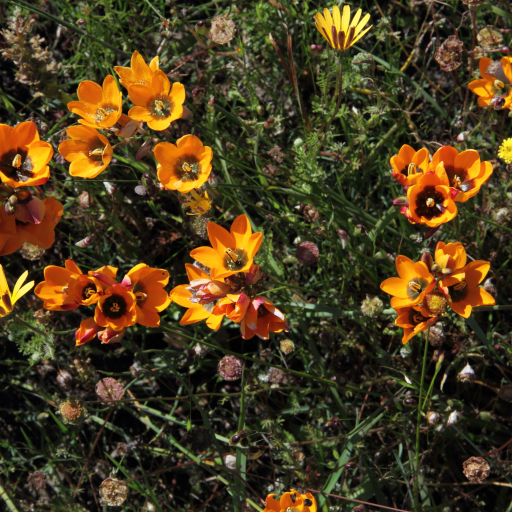
Known affectionately as the African Corn Lily or the Spotted Ixia, this South African native brings a splash of dramatic symmetry to the spring garden. With its vibrant petals and distinct dark "eyes," it looks almost like a collection of painted stars perched on wire-thin stems. These hardy corms have been a staple of the Cape Floristic Region for centuries, evolving to thrive in sun-drenched, sandy landscapes.
🔍 How to Identify
- 🎨 The Dark "Eye": The most striking feature is the dark purple or black center (the macula) that creates a sharp contrast against the orange, yellow, or cream petals.
- 📏 Wiry Stems: It grows on exceptionally slender, "wand-like" stems that can reach up to 18 inches, giving the plant a delicate, airy appearance in the wind.
- 🗡️ Sword-Shaped Foliage: The leaves are narrow, grassy, and fan out from the base, typical of its relatives in the Iris family.
🏡 In Your Garden
- ☀️ Sun Worshipper: This plant is strictly heliotropic, meaning the blooms only fully open on bright, sunny days. If it is cloudy, rainy, or nighttime, the Ixia will keep its petals tightly tucked away.
- 🏜️ The Summer Sleep: Unlike many garden favorites that crave water in the heat, Ixia enters a deep dormancy after blooming. Do not panic when the foliage withers in late summer; it is simply retreating into its corm to survive the dry season and should be kept relatively dry during this time.
⚠️ Safety & Toxicity
- 🐾 Low Risk: Ixia is generally considered non-toxic to humans and common household pets. It is a much safer choice for gardens with curious dogs than its cousin, the Lily.
- 🤢 Digestive Caution: While not "poisonous," the underground corms can cause mild stomach upset or nausea if ingested in large quantities by pets who enjoy digging.
✨ Fun Fact
In the Victorian language of flowers, the Ixia symbolized "steadfastness." This is likely due to the plant's incredible resilience; it can survive in parched, nutrient-poor soil for years, waiting for the perfect spring rains to stage its colorful comeback.

Detailed Care Instructions
To grow Ixia Maculata plant, follow these steps:
- Climate and Soil: Ixia Maculata thrives in a Mediterranean-like climate with dry summers and wet winters. It prefers well-draining soil that is slightly acidic or neutral. Make sure the planting location receives full sun or partial shade.
- Planting: Plant the Ixia Maculata bulbs in the fall, around 4-6 weeks before the first frost. The bulbs should be placed about 4-6 inches apart and buried to a depth of 3-4 inches. Make sure to water the bulbs after planting.
- Watering: During the growing season, water the Ixia Maculata regularly to keep the soil moist but not saturated. In winter, reduce the watering to allow for dormancy.
- Mulching: Apply a layer of organic mulch around the planted area. This helps retain moisture, suppress weeds, and keeps the soil temperature stable.
- Fertilization: Ixia Maculata does not require heavy fertilization. You can add a balanced slow-release fertilizer during the growing season to provide essential nutrients.
- Support: As the Ixia Maculata grows, it may require some support to prevent it from falling over. You can use stakes or plant it near other sturdier plants that can offer support.
- Pruning: After the blooms fade, you can deadhead the flowers to encourage further blooming. Once the foliage turns yellow and dies back, it can be gently removed.
- Overwintering: In areas with mild winters, Ixia Maculata may not require any special care during the winter. However, if you live in an area with harsh winters, you can cover the area around the bulbs with a layer of mulch to protect them.
By following these steps, you should be able to successfully grow Ixia Maculata and enjoy its beautiful blooms.

Place in a bright room that is sun drenched almost all day. Or directly in a south-facing window.

To water this plant, it is important to first check the soil moisture level. Place your finger about an inch deep into the soil and see if it feels dry to the touch. If so, it is time to water.
When watering, use a gentle stream of water and aim for the soil at the base of the plant, rather than directly on the foliage. Water until you see excess water flowing out of the drainage holes at the bottom of the pot.
It is important not to overwater this plant as it can be susceptible to root rot. Allow the top inch of soil to dry out before watering again.
In general, this plant prefers consistent moisture but not soggy conditions. In the winter months, it may require less frequent watering as it enters a period of dormancy.
To fertilize this plant, use a standard balanced fertilizer with a ratio of 10-10-10 or 20-20-20. Apply the fertilizer every 2-3 weeks during the active growing season, which is typically in the spring and summer months. Make sure to follow the instructions on the fertilizer package and do not over-fertilize, as this can be harmful to the plant. Water the plant after fertilizing to help the nutrients absorb into the soil.
The ideal soil to use with this plant is a well-draining soil that is rich in nutrients. It should be slightly acidic with a pH between 6.0 and 7.0. The soil texture should be a mixture of sand, loam, and organic matter to ensure proper water retention and aeration. The plant prefers moist but not waterlogged soil and should be planted in a location that receives full sun to partial shade. It is recommended to add a layer of mulch around the plant to help retain moisture and suppress weeds.
To propagate this plant, you will need to gather a sterile cutting from a healthy specimen. This cutting should be approximately 3-5 inches in length, and you should remove any lower leaves or branches from the stem. You should then dip the cut end of the cutting into rooting hormone powder to encourage successful rooting.
Next, fill a small pot with a well-draining soil mix. You can then insert the cutting into the soil, making sure that the cut end is buried at least an inch deep. Water the soil well, and cover the pot with a clear plastic bag to create a mini greenhouse for the cutting.
Place the pot in a warm, bright location but out of direct sunlight. Keep the soil moist but not waterlogged, and make sure to remove any condensation that forms inside the plastic bag. Within a few weeks, you should start to see new growth on the cutting, which is a sign that it has rooted.
After a few more weeks, when the new growth has begun to be more established, you can remove the plastic bag and move the young plant to a larger pot or out into your garden. Keep the new plant well-watered and protected from pests and extreme temperatures as it gets established.


