Plant Overview
Known as the Arctic Rush, this elegant, architectural plant is a rugged survivor from the frozen reaches of the Northern Hemisphere. Often mistaken for a simple grass, it is actually a true rush, characterized by its "round" stems. With its dark, needle-like silhouette, it brings a minimalist, almost prehistoric aesthetic to modern water gardens and marshy landscapes.
🔍 How to Identify
- 🎋 The Stems: Look for smooth, stiff, cylindrical stems that grow straight up. They are deep green to brownish-green and lack the "joints" found in grasses.
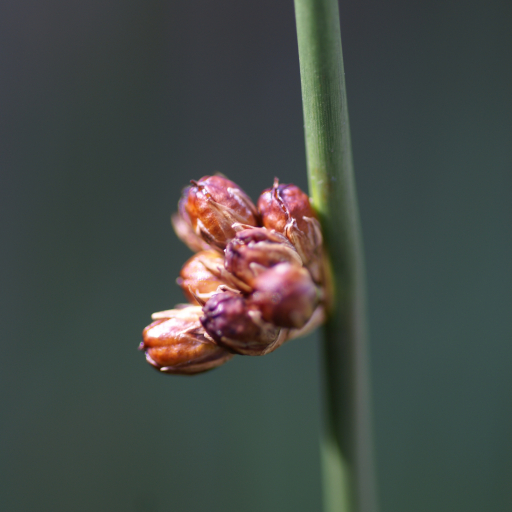
- 🌾 The "Side" Bloom: Interestingly, the flowers don't grow at the very tip. Instead, they sprout from the side of the stem, a few inches from the top, appearing as small, brownish starbursts.
- 🍂 Invisible Leaves: You won't find traditional broad leaves here. The leaves are reduced to tiny, papery sheaths at the very base of the plant, giving it a clean, "wire-like" appearance.
🏡 In Your Garden
- 💧 The Soggy Specialist: Unlike most garden plants that fear "wet feet," the Arctic Rush thrives in standing water. It is the perfect choice for the edge of a pond or a "rain garden" where water naturally pools after a storm.
- 🧱 Erosion Control: Because it spreads via thick underground rhizomes, it acts like a living rebar for your soil. It is exceptionally good at holding pond banks together and preventing soil from washing away.
- 🧊 Cold Hardiness: True to its name, this plant is incredibly frost-tolerant. While other ornamental grasses might turn brittle and grey, the Arctic Rush maintains its structure and deep color well into the freezing months.
⚠️ Safety & Toxicity
- ✅ Status: Generally considered non-toxic.
- 🐾 Details: There are no known records of Juncus arcticus being poisonous to cats, dogs, or humans. However, because of its tough, fibrous texture, it isn't particularly tasty, and curious pets might experience mild stomach upset if they manage to chew through the wiry stems.
✨ Fun Fact
In many northern indigenous cultures, the flexible and durable stems of the Arctic Rush were traditionally harvested and dried to be used as weaving material for intricate baskets and floor mats!

Detailed Care Instructions
If you want to grow Juncus arcticus, also known as Arctic rush, here are some steps to follow:
- Choose the right location: Juncus arcticus prefers moist to wet soils and can tolerate full sun to partial shade. Select a spot in your garden that provides these conditions.
- Prepare the soil: This plant prefers slightly acidic to neutral soil with good drainage. Amend the soil with organic matter, such as compost, to improve its fertility and drainage.
- Sow the seeds: Juncus arcticus can be grown from seeds. Sow the seeds directly into the prepared soil or in seed trays indoors, depending on your preference. Cover the seeds lightly with soil and keep them moist until germination.
- Maintain moist conditions: This plant requires consistently moist soil, and it thrives in wet areas. Water regularly, especially during dry periods or if the soil starts to dry out.
- Fertilize sparingly: Juncus arcticus does not require heavy fertilization, especially if grown in nutrient-rich soil. However, you can apply a slow-release, balanced fertilizer once or twice during the growing season to promote healthy growth.
- Control weeds: Keep the area around the Juncus arcticus plant free from weeds, as they can compete for nutrients and water.
- Mulch: Apply a layer of organic mulch around the plants to help retain moisture, suppress weeds, and protect their roots.
- Prune if necessary: Juncus arcticus does not require much pruning, but you can trim any damaged or dead foliage to maintain the plant's overall appearance.
- Winter protection: Depending on your climate, Juncus arcticus may need protection during the winter. Consider covering the plant with a layer of mulch or straw to insulate it from cold temperatures.
- Divide the plant: After a few years, Juncus arcticus may become overcrowded or lose vigor. It can be divided in the early spring or fall by carefully digging up the clump and separating it into smaller sections. Replant the divisions in desired locations and water them well.
Remember to research and understand the specific requirements of Juncus arcticus in your region, as certain guidelines may vary depending on local conditions.
The best way to water this plant is to keep the soil consistently moist but not waterlogged. Ensure that the pot has good drainage and avoid letting it sit in standing water. Water thoroughly when the top inch of soil feels dry to the touch, but be careful not to overwater as it can lead to root rot. During the winter months when the plant is dormant, reduce watering frequency. It is also important to avoid getting water on the leaves as it can cause fungal diseases.
To fertilize the Juncus Arcticus plant, follow these instructions:
- Choose a slow-release or organic fertilizer specifically formulated for wetland or bog plants.
- Dilute the fertilizer according to the package instructions, usually mixing with water.
- Apply the diluted fertilizer to the soil around the base of the plant, avoiding direct contact with the foliage.
- Water the plant thoroughly after fertilizing to ensure the nutrients are absorbed into the soil.
- Monitor the plant's growth and health, adjusting the fertilization schedule as needed to maintain optimal nutrition.
The soil that is recommended for the Juncus Arcticus plant is a well-draining soil that is slightly acidic. It should be a mix of peat moss, perlite, and sand to provide proper drainage and aeration for the plant. The soil should not be overly rich in nutrients as this can cause the plant to become leggy and prone to disease. Additionally, the soil should be moist but not waterlogged, as this can lead to root rot. It is recommended to use a pot with drainage holes to ensure proper drainage of excess water.
Juncus Arcticus, also known as the Arctic rush, is propagated through a variety of methods such as division and seed germination. Here is detailed information on how to propagate this plant:
- Division: This method involves dividing an established plant into smaller sections, each with its own root system and growing shoots. It is typically done during the plant's active growth period, which is spring or early summer.
- Prepare a new planting area with well-draining soil that is similar to the plant's original growing conditions.
- Carefully dig up the mature Juncus Arcticus plant, ensuring that the root ball remains intact.
- Gently separate the plant into smaller sections, making sure that each section has a sufficient root mass and several healthy shoots.
- Plant the divided sections into the new prepared area, spacing them adequately to allow for growth. Ensure that the crown (base of the plant where the roots and shoots meet) is at or slightly below the soil surface.
- Water the newly transplanted sections generously to help them establish and adapt to their new environment.
- Prepare a new planting area with well-draining soil that is similar to the plant's original growing conditions.
- Seed Germination: This method involves collecting and sowing the plant's seeds to grow new Juncus Arcticus plants. It is usually done in late summer or early fall, allowing ample time for the seeds to develop and mature before winter dormancy.
- Locate mature seed heads on the Juncus Arcticus plant. These can be identified as clusters of small, brownish capsules.
- Collect the seed heads by carefully cutting or snipping them off the plant using clean and sharp gardening tools.
- Place the collected seed heads in a paper bag or envelope, allowing them to dry and ripen further for about a week or until the capsules open up and release the seeds.
- Gently separate the seeds from the opened capsules.
- Prepare a seed tray or small pots with a suitable seed starting mix, which should be well-draining and rich in organic matter.
- Sow the Juncus Arcticus seeds evenly on the prepared surface, pressing them slightly into the soil or covering them lightly with a thin layer of the seed starting mix.
- Moisten the soil with water, either using a misting spray or by bottom watering, ensuring the soil remains consistently damp but not soggy throughout the germination process.
- Place the seed tray or pots in a location with indirect light and temperatures around 60-70°F (15-21°C).
- Keep an eye on the moisture levels and water whenever the surface soil begins to dry out.
- Germination typically occurs within 2-4 weeks, but it can vary depending on the seed freshness and conditions. Be patient and continue to provide proper care for the emerging seedlings.
- Once the seedlings have developed several sets of true leaves and are large enough to handle, they can be transplanted into individual pots or directly into the garden, following the guidelines for division mentioned earlier.
Please note that while these propagation methods are generally effective for Juncus Arcticus, success rates can vary depending on various factors such as environmental conditions, seed quality, and plant health.
- Locate mature seed heads on the Juncus Arcticus plant. These can be identified as clusters of small, brownish capsules.


