Plant Overview
Often referred to as the Six-angled Kalanchoe or the Bush Red Kalanchoe, this striking succulent is a master of transformation. Native to the rocky slopes of South Africa, it is beloved by gardeners for its ability to turn from a deep, waxy green to a brilliant ruby red when exposed to bright sunlight or cool temperatures. It acts as a living thermometer for your garden’s light levels, blushing more intensely the more sun it receives.
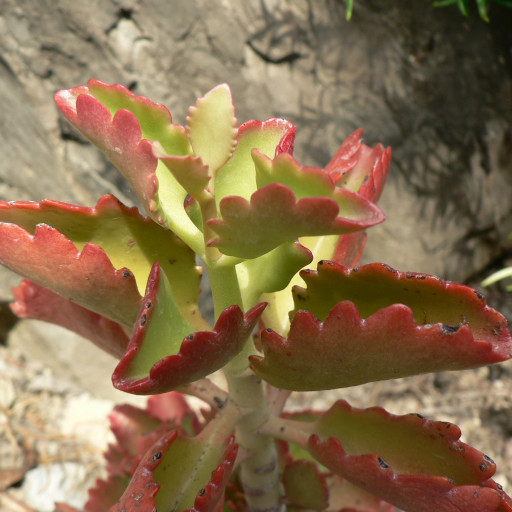
🔍 How to Identify
- 🌿 The Stems: Its most defining feature is the squared or "six-angled" stems that give the plant its scientific name. They are sturdy and upright, providing a strong architectural look.
- 🍃 The Leaves: Look for broad, fleshy leaves with deeply scalloped or "toothed" edges. In the shade, they are green with red margins, but in full sun, the entire leaf turns a deep, wine-red.
- 🌼 The Flowers: During late winter and early spring, it produces tall branched stalks topped with clusters of small, tubular, bright yellow flowers that contrast beautifully against the red foliage.
🏡 In Your Garden
- ☀️ The Sun-Stress Secret: While many plants suffer in direct sun, this Kalanchoe thrives on it. If your plant stays green, it’s telling you it wants more light; the red pigment is actually a natural "sunscreen" the plant produces to protect itself.
- 💧 Drought Strategy: Because it stores a massive amount of moisture in its thick, scalloped leaves, it is highly sensitive to "wet feet." It prefers a "soak and dry" method, meaning you should wait until the soil is bone-dry before watering again to avoid root rot.
- 🪴 Winter Protection: While it is tough, it is not frost-hardy. If you live in a cold climate, it makes an excellent windowsill plant, though it may lose some of its red intensity indoors.
⚠️ Safety & Toxicity
- 🐾 Toxic to Pets: Like most members of the Kalanchoe family, this plant contains cardiac glycosides.
- 🚫 Risk Level: It is toxic to dogs, cats, and even livestock if ingested. Keeping it on a high shelf or in a hanging basket is recommended if you have curious nibblers at home. It can cause vomiting, diarrhea, and in rare cases, abnormal heart rhythms.
✨ Fun Fact
The name Sexangularis isn't as "spicy" as it sounds—it is derived from the Latin words sex (six) and angularis (cornered), referring specifically to the unique hexagonal shape of its stems!

Detailed Care Instructions
To grow Kalanchoe sexangularis, you can follow these steps:
- Propagation: Kalanchoe sexangularis can be propagated from stem or leaf cuttings. Choose a healthy and mature plant to take cuttings from. Make a clean cut just below a leaf node, and remove any lower leaves. Allow the cuttings to dry for a couple of days before planting them.
- Potting: Use a well-draining potting mix, such as a cactus/succulent mix or a mixture of perlite and peat moss. Fill a pot with the mixture and make a hole or trench for the cutting.
- Planting: Insert the cutting into the potting mix, ensuring that at least one node is buried in the soil. Firmly press the soil around the cutting to secure it.
- Placement: Place the pot in a bright location that receives indirect sunlight. Kalanchoe sexangularis prefers bright light but can be damaged by direct sunlight.
- Watering: Allow the soil to dry out slightly between waterings. Overwatering can lead to root rot. Water the plant thoroughly and allow excess water to drain out completely.
- Temperature and Humidity: Kalanchoe sexangularis prefers temperatures between 60-75°F (15-24°C) and a slightly higher humidity level. It can tolerate lower temperatures temporarily but may suffer if exposed to frost.
- Fertilizing: Fertilize the plant once a month during the growing season with a balanced fertilizer diluted to half strength. Avoid fertilizing during the dormant period.
- Pruning: Trim any leggy or overgrown stems to encourage compact growth. You can also remove faded or dying leaves to maintain the plant's appearance.
- Repotting: As the plant grows, you may need to repot it into a larger container. Repotting is best done during the active growing season.
- Dormancy: Kalanchoe sexangularis goes through a dormancy period during winter. During this time, reduce watering and allow the soil to dry out more between waterings. Provide cool temperatures (50-55°F or 10-13°C) to promote blooming in the following growing season.
By following these care instructions, you should be able to successfully grow Kalanchoe sexangularis.

Place in a window with dappled sun or a spot in the middle of a room. Or directly in a window facing west or east.

Kalanchoe Sexangularis is a plant that requires moderate watering. The frequency and amount of water needed will depend on factors such as the size of the plant, its location, and the temperature and humidity levels. When watering the plant, it is essential to prevent waterlogging, as it can lead to root rot and other issues.
To water the plant, fill a watering can with room temperature water and pour it into the soil around the base of the plant. Avoid getting water on the leaves or flowers. Allow the water to be absorbed by the soil, and then discard any excess water that collects in the saucer underneath the plant. It is crucial to let the soil dry out partially before watering the plant again, as overly wet soil can cause significant damage.
During the winter months, when the plant is dormant, it will require less water than during the growing season. It is also essential to take into account the humidity levels in the room where the plant is located. If the air is dry, the plant may require more frequent watering.
It is recommended to check the soil regularly, using a moisture meter or by testing the soil with your finger. If the soil is dry to the touch, it is time to water the plant again. Avoid overwatering the plant, as it can negatively impact its health and appearance. With proper watering and care, Kalanchoe Sexangularis can thrive and add beauty to any indoor or outdoor space.
To fertilize this plant, you should apply a balanced liquid fertilizer once a month during the growing season. Dilute the fertilizer to half strength and apply it to the soil around the base of the plant. Be careful not to get the fertilizer on the leaves or stem, as it can burn them. During the dormant season, reduce or stop fertilization. Always follow the package instructions for the specific fertilizer you are using.
Kalanchoe Sexangularis plant requires a well-draining soil mixture to grow. The soil should be rich in nutrients and organic matter to support healthy growth. A combination of sand, perlite, and peat moss is an ideal soil mixture for this plant. The soil pH should be slightly acidic to neutral, with a range between 6.0 and 7.5. It is important to avoid using heavy or compacted soils, as they can prevent proper drainage and lead to root rot. Additionally, the plant prefers soil that is slightly moist, but not waterlogged, so it is important to maintain proper watering habits to ensure healthy growth.
To propagate this plant, first gather a healthy stem cutting from the plant. Choose a stem that is at least four inches long and has several leaves attached. Make sure the plant is not flowering at the time of cutting.
Using a clean and sharp pair of scissors or pruning shears, cut the stem at an angle just below a node, which is where leaves are attached to the stem. Remove the lower leaves on the stem, leaving only the top two or three leaves.
Let the cuttings dry for a few hours to prevent infection and promote callus formation. Then, dip the cut end in rooting hormone and plant it in a well-draining potting mix. Water thoroughly and place the pot in a warm, bright location but out of direct sunlight.
Keep the soil moist but not waterlogged by misting the plant with water regularly. After a few weeks, the cutting should start to grow roots and new growth. Once the roots have established, you can transplant the new plant into a larger pot or into the garden.
Common pests of the bushveld kalanchoe include Scale insect, mealybugs, aphids, thrips. Make a habit of checking your bushveld kalanchoe frequently for pests so that any infestations can be caught and managed early.


