Plant Overview
Known affectionately as the Western Bog Laurel, this petite alpine beauty is a master of survival in the chilly, acidic wetlands of western North America. Despite its delicate, candy-pink blossoms that resemble tiny parasols, it is a hardy evergreen shrub that thrives where other plants might drown. It often forms dense, colorful mats in mountain meadows, earning it a reputation as one of the most enchanting sights for high-altitude hikers and nature photographers.
🔍 How to Identify
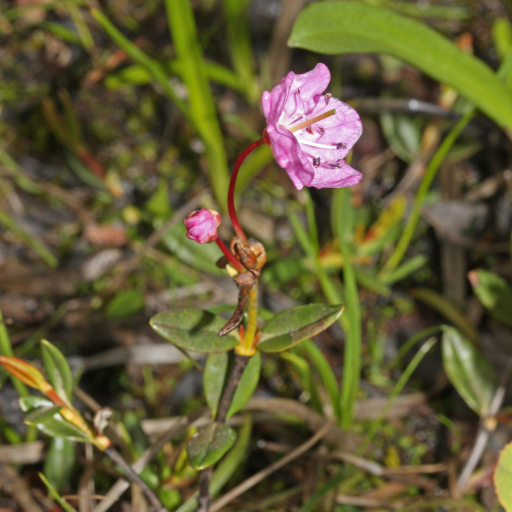
- 🌸 The Blooms: Features clusters of five-lobed, saucer-shaped flowers ranging from pale pink to deep rose-purple, usually appearing in early to mid-summer.
- 🍃 The Foliage: Small, leathery evergreen leaves are dark green on top and silvery underneath, with edges that characteristically curl downward (revolute) toward the stem.
- 🌱 Growth Habit: A low-growing, spreading shrub that rarely exceeds one foot in height, often looking like a bonsai version of its larger cousin, the Mountain Laurel.
🏡 In Your Garden
- 💧 Soil & Moisture: This plant is a specialist; it requires peat-rich, highly acidic soil and "wet feet." It is perfect for a dedicated bog garden or the edges of a backyard pond, provided the soil never fully dries out.
- 🏔️ Climate Nuance: Because it originates from alpine and subarctic regions, it demands cool root zones. It will struggle in high-heat urban environments or regions with scorching summers unless it is heavily mulched and shaded from the afternoon sun.
⚠️ Safety & Toxicity
- 🚫 High Toxicity: Every part of the Western Bog Laurel—leaves, stems, and flowers—is highly toxic if ingested.
- 🤢 The Risk: It contains grayanotoxins, which can cause severe digestive upset, slowed heart rate, and respiratory distress. It is famously dangerous to livestock (sometimes called "Sheep Laurel") and should be kept away from curious pets and children.
✨ Fun Fact
The Kalmia genus has a "mechanical" surprise! Its stamens (the pollen-bearing parts) are tucked into tiny pockets in the petals under high tension. When a heavy bee lands on the flower, the stamen "triggers" and snaps upward like a tiny catapult, dusting the insect with a burst of pollen to ensure it carries the payload to the next bloom.

Detailed Care Instructions
To grow Kalmia Microphylla, also known as Alpine Laurel or Western Mountain Laurel, you can follow these steps:
- Choose the right location: Kalmia Microphylla prefers partial shade to full sun. It is best to provide some protection from intense afternoon sun in hotter climates. Make sure the soil is well-draining and rich in organic matter.
- Prepare the soil: If your soil is heavy clay or sandy, amend it by adding organic matter such as compost or well-rotted manure. You can also mix in some peat moss to increase acidity, as Alpine Laurel prefers slightly acidic soil with a pH range of 5.0 to 6.5.
- Planting: Dig a hole that is slightly larger than the root ball of the plant. Place the plant in the hole, ensuring that the crown is level with the soil surface or slightly above. Backfill the hole with soil, gently firming it around the roots. Water thoroughly after planting.
- Watering: Keep the soil consistently moist but not waterlogged. Water deeply whenever the top inch of soil feels dry. However, avoid overwatering or letting the plant sit in standing water, as it can lead to root rot.
- Mulching: Apply a layer of organic mulch around the base of the plant, such as bark chips or leaf compost. Mulching helps conserve moisture, suppress weeds, and maintain a more even soil temperature.
- Pruning: Kalmia Microphylla generally does not require heavy pruning. However, you can trim back any dead or damaged branches in late winter or early spring. Additionally, light shaping or thinning can be done after the plant finishes flowering.
- Fertilizing: If your soil lacks nutrients, you can apply a slow-release, balanced fertilizer in early spring before new growth begins. Avoid using high-nitrogen fertilizers, as they can promote excessive foliage growth at the expense of flowers.
- Pests and diseases: Alpine Laurel is generally resistant to most pests and diseases. However, keep an eye out for common garden pests such as aphids or spider mites. If detected, treat them with appropriate organic or chemical insecticides.
By following these steps, you should be able to successfully grow and maintain a Kalmia Microphylla plant in your garden.

Place in a window with dappled sun or a spot in the middle of a room. Or directly in a window facing west or east.

Kalmia Microphylla is a plant that requires regular watering to retain its beauty and health. To properly water this plant, you should follow the following steps:
1. Check the soil: Before watering the plant, check the soil's moisture level to ensure it needs to be watered. You can do this by inserting your finger into the soil to a depth of 2-3 inches. If the soil feels dry, it's time to water the plant.
2. Watering frequency: Kalmia Microphylla usually requires watering every 2-3 days during the growing season. However, the frequency may vary depending on the plant's location, breed, and surrounding climate.
3. Watering amount: When watering Kalmia Microphylla, ensure that you provide adequate water to reach the root system. The amount of water is usually determined by the plant's size and surrounding climate.
4. Water temperature: The water you use to water Kalmia Microphylla should be at room temperature. Cold water can shock the plant and damage the roots.
5. Use the right watering method: It is essential to use the right watering method when watering Kalmia Microphylla. Avoid overwatering the plant as this can lead to waterlogging and root rot. Instead, use a watering can or soaker hose to provide a slow and steady flow of water to the root zone.
6. Mulch the soil: After watering, ensure that you mulch the soil around the plant to retain moisture and prevent evaporation.
By following the above tips on how to properly water Kalmia Microphylla, you can ensure that your plant thrives and remains healthy.
To fertilize this plant, use a slow-release fertilizer with balanced nutrients in the spring before new growth appears. Apply the fertilizer according to the manufacturer's instructions, being careful not to over-fertilize. Avoid fertilizing after mid-summer to prevent stimulating new growth that may not harden off before winter. In addition to fertilizer, ensure the plant has well-drained soil and regular watering to promote healthy growth.
Kalmia Microphylla prefers a well-draining, acid soil with a pH range of 4.5 to 6.0. The soil should be rich in organic matter and have good water-holding capacity. The plant thrives in a soil that is moist but not waterlogged, so it is essential to ensure proper drainage. Additionally, the soil should be airy and loose to promote healthy root growth. Providing a layer of mulch around the base of the plant can help to maintain soil moisture levels and protect the roots from excessive heat and cold. It is recommended to avoid using heavy, compacted soils or those with a high clay content, as they can impede drainage and cause root rot.
The first step in propagating this plant is to gather fresh cuttings from healthy parent plants. It is important to choose stems that are free from disease and damage.
The cuttings should be taken during the early morning hours before the heat of the day sets in. Using a sharp and sterile pair of scissors, cut a 4-6 inch length of stem with several leaves.
Remove all but the top two leaves on the cutting, and then dip the cut end into rooting hormone powder to encourage rapid rooting.
Fill a well-draining pot with a mixture of equal parts perlite and peat moss. Water the potting mixture until it is moist but not waterlogged.
Using a dibble or pencil, make a hole in the potting mix and carefully insert the cutting into it. Firm the soil around the stem to ensure it is secure.
Cover the pot with a clear plastic bag to create a mini greenhouse and keep the cutting out of direct sunlight. Check the cutting every few days to ensure moisture levels are consistent and remove condensation from the bag.
After several weeks, roots should begin to form on the cutting and the leaves will start to grow. Once the plant has established roots, it can be transplanted to a larger pot or outdoors in a suitable spot.


