Plant Overview
Often called the "Fernleaf Lavender," this Mediterranean native breaks all the rules of what you might expect from a traditional lavender plant. Instead of the typical silvery needles, it boasts intricate, lacy foliage that looks more like a garden fern or a sprig of parsley. It is a high-speed grower, prized by gardeners in warmer climates for its ability to produce vibrant violet blooms almost year-round.
🔍 How to Identify
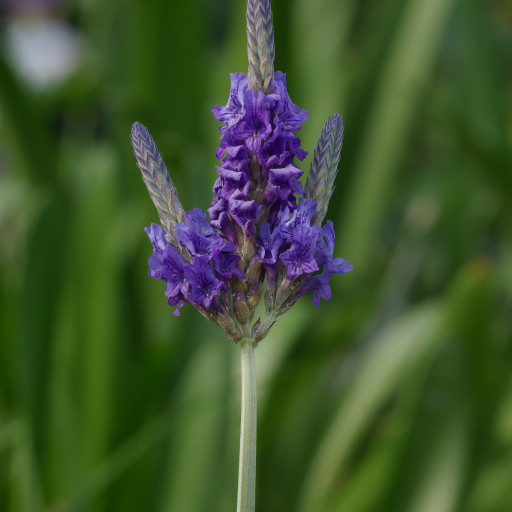
- 🌿 The Foliage: The leaves are deeply lobed and feathery (bipinnate), giving the plant a soft, fern-like texture that remains green-grey throughout the year.
- 🔱 The Bloom Spikes: The flower heads are unique because they often branch into three-pronged "tridents" at the top of long, leafless stems.
- 👃 The Scent: Unlike the sweet, soapy scent of English lavender, this variety has a sharp, herbal aroma more akin to oregano or rosemary when the leaves are crushed.
🏡 In Your Garden
- ☀️ Sun Seeker: This plant is a dedicated sun-worshipper; it will quickly become "leggy" and weak if it doesn't receive at least six to eight hours of direct light daily.
- 💧 Drainage is Vital: Hailing from the rocky slopes of North Africa and Southern Europe, it hates "wet feet." It is far more likely to die from overwatering than from a drought.
- 🐝 Pollinator Magnet: Because it blooms so frequently, it serves as a vital "gas station" for bees and butterflies, providing nectar even when other garden plants have gone dormant.
⚠️ Safety & Toxicity
- 🐾 Pet Caution: While beautiful, it contains linalool and linalyl acetate. If ingested in large quantities by cats or dogs, it can cause vomiting or lethargy.
- 👶 Kid Friendly: It is generally considered non-toxic to humans, though the concentrated essential oils in the leaves can occasionally cause mild skin redness in children with very sensitive skin.
✨ Fun Fact
Unlike most lavender species that take a year or two to settle in, Lavandula multifida is so fast-growing that it is often treated as an annual in cold climates—it can go from a tiny seed to a full-blooming shrub in just one season!

Detailed Care Instructions
| Humidity | Normal |
| Lighting | Full Sun |
| Difficulty | Medium |
| Hibernation | Cold Period |
| Temperature | Min 10°C |
| Hardiness Zones | 5 - 9 |
To grow Lavandula Multifida, commonly known as Fernleaf Lavender, follow these steps:
- Climate and soil requirements: Lavandula Multifida prefers a warm Mediterranean climate. It grows well in full sun and well-draining sandy soil. If your climate is humid, make sure you choose a location with good air circulation to prevent fungal diseases.
- Seed selection and sowing: Purchase high-quality Lavandula Multifida seeds from a reputable nursery or online store. Start seeds indoors 6-8 weeks before the last frost date in your area. Sow the seeds in seed trays or pots filled with seed-starting mix. Lightly cover the seeds with a thin layer of soil and keep the soil consistently moist until germination, which usually takes 2-4 weeks.
- Transplanting: After the danger of frost has passed, and the seedlings have reached a height of 2-3 inches, they can be transplanted outdoors. Choose a sunny location with well-draining soil. Space the plants about 12-18 inches apart to allow for good air circulation.
- Watering and irrigation: After the plants are established, water them deeply but infrequently. Lavender plants are drought-tolerant, so avoid over-watering, as excessive moisture can lead to root rot. Water them when the top inch of soil feels dry, providing about 1 inch of water per week.
- Pruning: To encourage compact growth and prevent legginess, prune your Lavandula Multifida plant regularly. After the blooming season, trim the spent flowers and prune back any straggly or woody growth. Avoid cutting into the woody stems, as it may hinder future growth.
- Fertilization: Lavender plants generally do not require much fertilizer. If your soil is poor, you can apply a slow-release, balanced fertilizer once or twice a year in early spring or late autumn. Follow the fertilizer package instructions for proper application rates.
- Pest and disease control: Lavender is generally resistant to pests and diseases. However, keep an eye out for aphids, spider mites, and fungal diseases such as root rot and powdery mildew. If needed, treat pest infestations with organic insecticidal soap or neem oil, and ensure good air circulation to prevent fungal issues.
- Harvesting: Lavandula Multifida produces lovely purple flowers with fern-like foliage. Harvest the flowers just as they begin to open fully for use in potpourris, sachets, or herbal preparations. Cut the stems just above the leaves and hang them upside down in a cool, dry place to dry fully.
By following these guidelines, you can successfully grow Lavandula Multifida and enjoy its vibrant blooms and aromatic foliage.

Place in a bright room that is sun drenched almost all day. Or directly in a south-facing window.

Lavandula Multifida is a plant that requires moderate watering. It is important to let the topsoil dry out partially before watering again, as this plant does not tolerate waterlogged soil. When watering, it is suggested to water deeply so that the roots can receive adequate moisture. However, it's important to note that excessive watering can lead to root rot. Therefore, it's best to water this plant from the base rather than from the top to ensure that water reaches the roots. Additionally, this plant is drought-tolerant so it is essential not to overwater it.
To fertilize this plant, mix a slow-release fertilizer into the soil around the base of the plant, being careful not to get any on the leaves or stems. Water the plant immediately after fertilizing and continue to water consistently throughout the growing season. Avoid over-fertilizing as this can result in excessive growth and a weaker plant.
Lavandula Multifida is a type of plant that requires specific soil conditions to thrive. It requires well-drained soil that has good aeration and contains a moderate amount of nutrients. The pH level should be neutral to slightly alkaline, which means a range of 7.0 to 8.5 is suitable. Additionally, the soil for Lavandula Multifida should not be too heavy or waterlogged, as the plant is vulnerable to root rot. To provide a good soil environment, it's recommended to mix in organic matter such as compost or aged manure to improve soil health. Overall, a sandy or loamy soil type with good drainage and a moderate nutrient level is suitable for Lavandula Multifida.
One way to propagate this plant is by taking semi-hardwood cuttings from a healthy parent plant. This can be done during the growing season, typically in late spring to early summer.
To do this, select a healthy stem that has not yet bloomed and is approximately 4-6 inches long. Using sharp, clean pruning shears, make a diagonal cut just below a node (a small bump on the stem where leaves grow from). Remove the leaves from the bottom half of the cutting.
Dip the bottom of the cutting in rooting hormone powder, and gently tap off any excess. Place the cutting in a small pot filled with a well-draining soil mix, and water lightly.
Cover the pot with a clear plastic bag or container, and place it in a bright, warm location, out of direct sunlight. Mist the cutting occasionally to keep it moist.
After a few weeks, the cutting should start to develop roots. You can gently tug on the cutting to feel if it has rooted. Once the roots are established, remove the plastic cover and gradually expose the plant to more sunlight.
After a few more weeks, once the plant has grown a bit, it can be transplanted into a larger, well-draining pot or directly into the ground.
Common pests of the fern-leaf lavender include Spider mites, thrips, whiteflies. Make a habit of checking your fern-leaf lavender frequently for pests so that any infestations can be caught and managed early.


