Plant Overview
Known as the Kellogg's Lily, this rare and elegant wildflower is a jewel of the Pacific Northwest. Named after the early California botanist Albert Kellogg, it is famous for its "Turk’s cap" shape and its ability to change color as it ages. Often found hiding in the cool, dappled light of redwood forests, it brings a touch of delicate, high-mountain grace to any woodland-style garden.
🔍 How to Identify
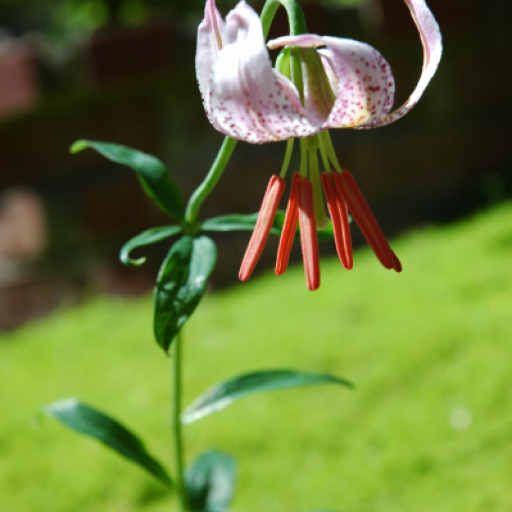
- 🌸 The Bloom: Look for nodding, pendulous flowers with petals that strongly curve backward (recurved). They start out a pale pink or creamy white with a central yellow stripe and darken to a deep mauve or purple as they mature.
- 🍃 The Leaves: The lance-shaped leaves are arranged in several neat "whorls" (circles) around the tall, slender green stem, rather than being scattered randomly.
- 👃 The Scent: Unlike some lilies that can be overpowering, Kellogg’s Lily has a remarkably sweet, spicy fragrance that often hints of honey or citrus.
🏡 In Your Garden
- 🌱 Root Stability: This lily grows from a deep, scaly bulb and absolutely hates being disturbed. Once you plant it, avoid moving it at all costs, as the "taproot-like" behavior of its bulb system makes transplanting very risky.
- 🌲 Soil Nuance: In its natural habitat, it often grows in serpentine soils. In a garden, it requires exceptional drainage; it enjoys having "cool feet" (shaded roots) but "warm shoulders" (filtered sunlight on the flowers).
- 💧 Moisture Balance: It thrives on the coastal fog of its native range. While it needs regular water during the spring growing season, it prefers to stay relatively dry during its dormant summer period to prevent bulb rot.
⚠️ Safety & Toxicity
- 🐱 Lethal for Cats: Like many true lilies, Lilium kelloggii is highly toxic to cats. Even a small amount of pollen licked off their fur or water from a vase can cause fatal kidney failure.
- 👶 Human & Dog Safety: While not as dangerous to humans or dogs as it is to felines, ingesting the bulb or flowers can still cause stomach upset, vomiting, or lethargy. It is best kept out of reach of curious nibblers.
✨ Fun Fact
The Kellogg's Lily is a "chameleon" flower. A single stem can host flowers of multiple different shades at the same time because the older blossoms deepen in color while the new buds open in pale pastel tones!

Detailed Care Instructions
To successfully grow Lilium kelloggii, also known as Kellogg's lily, you can follow the steps below:
- Select a suitable location: Choose a spot that receives partial shade to full sun, as Kellogg's lily enjoys bright, indirect light. The soil should be well-draining and rich in organic matter.
- Prepare the soil: Loosen the soil and remove any weeds or debris. Amend the soil with compost or well-rotted manure to improve its fertility.
- Plant the bulbs: In autumn, dig a hole that is deep enough to accommodate the bulbs. Place the bulbs in the hole with the pointed ends facing up. Space the bulbs at least 6-8 inches apart. Cover them with soil and gently firm it to eliminate air pockets.
- Watering: Water the bulbs thoroughly after planting to ensure proper moisture penetration. After that, water the plants regularly, keeping the soil moist but not waterlogged. During dry periods, increase the frequency of watering.
- Mulching: Apply a layer of organic mulch around the plants to conserve moisture, suppress weeds, and maintain a cool root environment. Keep the mulch a few inches away from the stems to prevent rotting.
- Fertilization: In early spring, apply a balanced, slow-release fertilizer to provide essential nutrients. Follow the package instructions for proper dosage based on the size of your planting area.
- Support: Consider using stakes or a plant support system to protect the lilies from strong winds and heavy rain, as they can become top-heavy.
- Pruning: Deadhead the flowers after they fade to encourage the plant to put more energy into bulb development. In autumn, allow the foliage to die back naturally before cutting it down to ground level. This helps the bulb store energy for the next growing season.
- Pest and disease control: Monitor the plants regularly for signs of pests such as aphids or lily leaf beetles. If detected, use appropriate organic pest control methods to address the issue. Maintaining good air circulation can help prevent the occurrence of fungal diseases.
By following these steps and providing sufficient care, you can grow and enjoy the beautiful Lilium kelloggii in your garden.

Place in a bright room that is sun drenched almost all day. Or directly in a south-facing window.

Lilium Kelloggii, or the plant in question, requires regular watering to maintain healthy growth. When watering, it is important to thoroughly saturate the soil and allow excess water to drain away. This can be achieved by watering deeply, but less frequently, rather than daily light watering. In addition, the plant prefers moist but well-draining soil, so it is important not to overwater and create standing water that can lead to root rot.
To determine when watering is necessary, it is helpful to monitor the soil moisture level by touching the soil with your finger. If the soil feels dry to the touch, it is time to water. In addition, the plant may begin to show signs of stress such as wilting or yellowing leaves if it is not receiving adequate water.
It is recommended to use room temperature water, rather than cold water, when watering the plant to prevent shock to the roots. During the growing season, which is typically from spring to summer, the plant may require more frequent watering due to increased heat and sunlight.
Overall, proper watering is essential for the health and growth of Lilium Kelloggii, and a consistent watering schedule should be established to ensure optimal conditions for the plant.
Lilium Kelloggii plants require annual fertilization to maintain their health and growth. Feed the plant with a balanced, slow-release fertilizer in the spring. Make sure to apply the fertilizer at the base of the plant and water thoroughly after feeding. Avoid over-fertilizing, as this can lead to excessive growth and weak stems. Monitor the plant closely for any signs of nutrient deficiencies, such as yellowing leaves or stunted growth, and adjust your fertilizing routine accordingly.
When planting Lilium Kelloggii, it is important to use a well-draining soil that is rich in organic matter. A soil pH range of 5.0-6.5 is optimal for this plant. The soil should be moist but not waterlogged, and should be kept consistently moist throughout the growing season. Providing up to 1 inch of water per week, either through rain or irrigation, is recommended. Avoid planting in heavy clay soils as these can lead to root rot. Instead, opt for loamy soils that are rich in nutrients and have good drainage. Additionally, adding a layer of mulch around the base of the plant can help retain moisture and provide additional nutrients for the plant.
One method to propagate Lilium Kelloggii plant is through bulb division. Mature bulbs should be dug up and inspected for healthy bulb scales. These scales can be carefully detached from the bulb and then planted in well-draining soil at a depth of 2-3 times the scale's thickness. The soil should be kept consistently moist, but not waterlogged, until new growth emerges.
Another method is through seed propagation. The seeds can be harvested from mature seed pods, which should be allowed to dry out on the plant before being collected. The seeds can then be sown in a mixture of sand and peat moss at a depth of twice their thickness. The soil should be kept consistently moist and the trays should be kept in a warm location with indirect sunlight until the seeds germinate.
Lastly, Lilium Kelloggii can also be propagated through stem cuttings. Select a healthy stem and then make a clean cut below a leaf node. The lower leaves should be removed and the cutting should be placed in well-draining soil, with the lowest leaf node just below the soil surface. The soil should be kept consistently moist and the cutting should be kept in a warm and humid environment until new growth emerges.


