Plant Overview
Often called the Texas Yellow Star or "Star Daisy," this cheerful wildflower paints the roadsides and prairies of the American Southwest in brilliant gold every spring. Named in honor of Ferdinand Lindheimer, known as the "Father of Texas Botany," this plant is a quintessential Texan beauty that looks exactly like a child’s drawing of a perfect, five-pointed star.
🔍 How to Identify
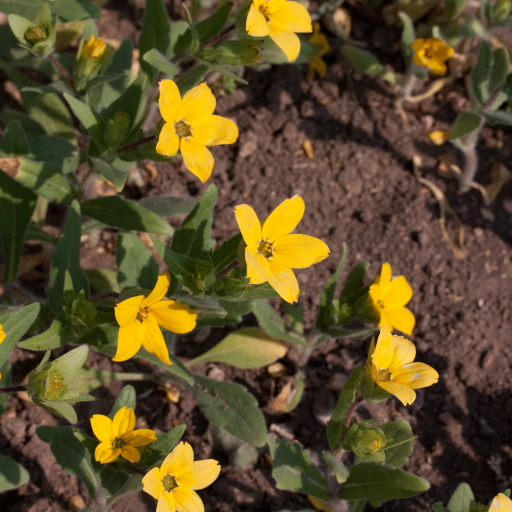
- ⭐ Petal Count: Unlike most daisies that have dozens of petals, this species almost always has exactly five broad, yellow ray petals.
- ✂️ Notched Tips: Each petal features a distinct "V" or "U" shaped notch at the outer edge, giving the bloom a slightly scalloped, geometric look.
- 🌿 Hairy Foliage: The stems and leaves are covered in fine, soft hairs (pubescence), which give the plant a slightly silver-green cast and help it retain moisture.
🏡 In Your Garden
- 🌱 Sun Worshipper: These plants are true sun-lovers. If planted in the shade, they will become "leggy" as they stretch toward the light, eventually falling over.
- 🏜️ Limestone Lover: It thrives in the poor, rocky, or alkaline soils often found in the Hill Country. It is a fantastic choice for "rock gardens" or areas where the soil is too thin for thirstier perennials.
- 🦋 Pollinator Support: Because it blooms early in the spring, it provides a vital nectar source for native bees and early-emerging butterflies when other food is scarce.
⚠️ Safety & Toxicity
- ✅ Non-Toxic: The Texas Yellow Star is generally considered safe and non-toxic for humans, dogs, and cats.
- 🦌 Deer Resistance: While no plant is truly "deer-proof," the fuzzy, hairy texture of the leaves makes it less appetizing to deer than smoother garden plants, though they may still snack on the blooms.
✨ Fun Fact
While most members of the Aster family (like sunflowers or daisies) have a seemingly infinite number of petals, Lindheimera texana is botanically unique for its consistency—it is one of the few wildflowers you can reliably use to play "He loves me, he loves me not" and always know the answer will be the same!

Detailed Care Instructions
To grow Lindheimera Texana, also known as Texas yellowstar, follow these steps:
- Choose a suitable location: Lindheimera Texana thrives in full sun to partial shade. Ensure the soil is well-draining to prevent root rot.
- Prepare the soil: Before planting, amend the soil with organic matter, such as compost or aged manure, to improve fertility and drainage.
- Planting: Dig a hole that is twice the size of the plant's root ball. Gently loosen the roots and place the plant in the hole. Backfill the hole, lightly pressing down the soil around the roots.
- Watering: Provide regular watering, especially during the establishment period. Keep the soil consistently moist but not soggy. Once the plant is established, reduce the frequency of watering, as Lindheimera Texana is relatively drought-tolerant.
- Mulching: Mulch around the base of the plant to conserve moisture, suppress weed growth, and insulate the roots during extreme temperatures.
- Pruning: Trim back any dead or damaged stems in early spring or after flowering to maintain the plant's shape and encourage new growth.
- Fertilizing: Lindheimera Texana generally doesn't require fertilization, as it can obtain sufficient nutrients from the soil. However, if the plant appears weak or lacks vigor, you may apply a balanced slow-release fertilizer in early spring.
- Pests and diseases: Texas yellowstar is generally resistant to most pests and diseases. However, it may occasionally be susceptible to aphids or powdery mildew. Monitor the plant regularly and treat with appropriate organic insecticides or fungicides if necessary.
- Propagation: You can propagate Lindheimera Texana from seeds or by division. If collecting seeds, wait until the petals fall and the seed heads turn brown. Store the seeds in a cool, dry place until planting in the spring. If dividing the plant, do so in early spring by carefully separating the root clumps and replanting them.
By following these steps, you can successfully grow Lindheimera Texana and enjoy its beautiful yellow flowers throughout the growing season.

Place in a bright room that is sun drenched almost all day. Or directly in a south-facing window.

To water this particular plant, it is important to ensure that the soil remains consistently moist but not waterlogged. It is recommended to water deeply once a week, allowing the soil to dry out slightly between watering sessions. Avoid watering from overhead, as this can lead to fungal diseases. Instead, water at the base of the plant to ensure the roots receive the necessary moisture. In times of extreme drought or high temperatures, it may be necessary to increase the frequency of watering to twice a week. Be sure to use well-draining soil and allow excess water to drain away from the plant to prevent root rot.
To fertilize this plant, you will want to use a balanced fertilizer with equal parts nitrogen, phosphorus, and potassium. Apply the fertilizer in the spring before new growth appears, and again in early summer. Be sure to dilute the fertilizer according to the package instructions, and avoid getting it on the leaves or stem of the plant. Water the plant thoroughly after fertilizing to help distribute the nutrients evenly.
Lindheimera Texana plants prefer well-draining soil that is sandy or loamy in texture. It is important that the soil is not too wet or compacted, as this can lead to root rot and other issues. A soil pH level of around 6.0 to 7.5 is ideal for these plants. Adding organic matter, such as compost or peat moss, can help improve the soil structure and fertility. It is also recommended to mulch around the base of the plant to help retain moisture and keep the soil temperature consistent.
To propagate this plant, you will need scissors, a clean and sharp knife, rooting hormone, a container, and well-draining soil. First, take a healthy stem cutting from the plant, ensuring that it is at least 6 inches long and has some leaves attached to it. Use the scissors to remove any leaves from the bottom third of the stem. Then, use the knife to make a clean cut just below a node on the stem. Dip the cut end of the stem into rooting hormone, making sure to shake off any excess.
Next, select a container and fill it with soil, leaving enough space at the top for the cutting. Use your finger or a pencil to create a hole in the soil and place the cutting in it, pressing the soil around it gently. Water the cutting thoroughly, making sure to moisten the soil around it.
Cover the container with a plastic bag or foil to create a greenhouse-like environment. This will help to retain moisture and create a humid atmosphere for the cutting. Place the container in a warm, bright location, but out of direct sunlight. Check the soil regularly to ensure it stays moist, but not waterlogged.
After a few weeks, check for roots by gently tugging on the stem. If there is resistance, roots have begun to form. Once roots have formed, remove the plastic bag and gradually expose the new plant to more light. Once the plant has grown a few inches tall and has several leaves, it is ready to be transplanted into a larger container or into the ground.


