Plant Overview
Often called the Jewel Orchid, Ludisia discolor is a rebel in the orchid world. While most orchids are prized for their dramatic, long-lasting blooms, this Southeast Asian native is grown primarily for its luxurious, velvety foliage. It looks more like a piece of high-end Victorian upholstery than a typical flower, making it a favorite for indoor "plant parents" who love a dark and moody aesthetic.
🔍 How to Identify
- 🍃 The Foliage: The leaves are the main attraction—deep, dark maroon or brownish-black with a soft, velvet-like texture that feels like fabric to the touch.
- ⚡ The Veining: Each leaf is etched with intricate, copper or gold pinstripes that run vertically, giving the plant a shimmering, "electrified" appearance when it catches the light.
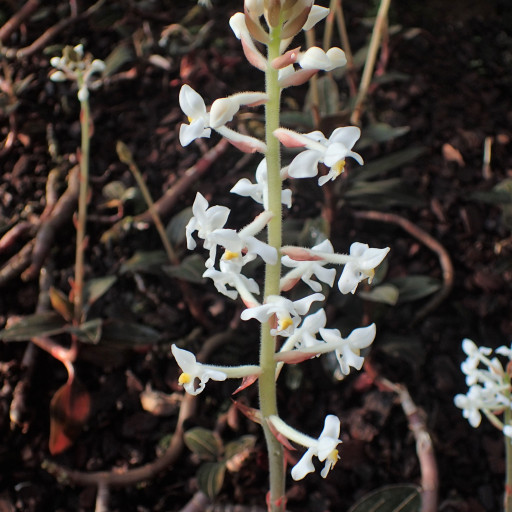
- 🕯️ The Blooms: During the winter, it sends up tall, white flower spikes. The individual blossoms are small and snowy with a tiny yellow "lip," providing a bright contrast to the dark leaves.
🏡 In Your Garden
- ☁️ Shadow Seeker: Unlike many orchids that crave bright light, Ludisia is a forest-floor resident. It thrives in low to medium indirect light. Direct sunlight is its enemy; it will scorch the velvet leaves and cause the deep colors to fade.
- 🌱 Earthbound Roots: Most orchids are "epiphytes" (living on trees), but Ludisia is "terrestrial." It grows in the leaf litter on the ground. This means it needs a specialized potting mix—something that holds more moisture than bark but still breathes, like a mix of peat and perlite.
- 💧 Humidity Lover: It prefers a humid environment. If the air is too dry, the edges of those beautiful leaves may crisp up. It’s an ideal candidate for a glass terrarium or a humid bathroom shelf.
⚠️ Safety & Toxicity
- ✅ Status: Non-toxic and safe.
- 🐾 Details: This orchid is generally considered safe for cats, dogs, and humans. However, the stems are quite succulent and brittle; they snap easily if a curious pet decides to play with them, so it’s best kept on a stable surface.
✨ Fun Fact
Unlike the "Diva" orchids that many people struggle to keep alive, the Jewel Orchid is surprisingly resilient. It is often called the "Beginner’s Orchid" because it is much more forgiving of slightly damp soil and lower light levels than its cousins, the Phalaenopsis or Cattleya.

Detailed Care Instructions
| Humidity | Normal |
| Lighting | Shade |
| Difficulty | Medium |
| Temperature | 16°C - 23°C |
| Hardiness Zones | 10B - 11B |
To successfully grow Ludisia Discolor, also known as the jewel orchid, you will need to provide the following growing conditions:
- Light: Ludisia Discolor prefers bright, indirect light. Place the plant near a north or east-facing window to ensure it receives filtered sunlight. Avoid exposing it to direct sunlight as it can scorch the leaves.
- Temperature: This orchid species prefers temperatures between 60-75°F (16-24°C), making it suitable for indoor cultivation. Avoid exposing it to draughts or extreme temperature fluctuations.
- Humidity: Ludisia Discolor requires high humidity levels to thrive. To provide moisture, place the pot on a tray filled with water and pebbles or use a humidifier. You can also mist the foliage regularly to increase humidity.
- Watering: Keep the potting mix consistently moist but not waterlogged. Allow the top inch of soil to dry out slightly before watering again. Avoid letting the roots sit in standing water as it can lead to root rot.
- Potting mix: Ludisia Discolor prefers a well-draining potting mix. Orchid bark, sphagnum moss, perlite, or a mix of these will work well. A high-quality orchid potting mix is recommended.
- Fertilizer: Feed the plant with a balanced, water-soluble orchid fertilizer diluted to half strength every two to four weeks during the growing season (spring and summer). Do not fertilize during the dormant period (fall and winter).
- Repotting: Repot Ludisia Discolor every 1-2 years, preferably in the spring. Choose a slightly larger pot and use fresh orchid potting mix. Repotting helps prevent the plant from becoming root-bound.
- Pruning: Trim any yellow or damaged leaves with sterilized shears. Pruning can help maintain a more compact and healthy plant.
- Dormant period: During the fall and winter, Ludisia Discolor may enter a dormant period. During this time, reduce watering and stop fertilizing. Provide slightly cooler temperatures (around 60-65°F or 15-18°C) to encourage dormancy.
By following these care tips, you should be able to successfully grow and enjoy a healthy Ludisia Discolor plant.

Place in a window with dappled sun or a spot in the middle of a room. Or directly in a window facing west or east.

1. Understand the water requirements of the plant: Before watering the plant, it is important to understand the water requirements of the Ludisia Discolor plant. This plant prefers to be kept moist but not waterlogged.
2. Check the soil moisture: Before watering, check the soil moisture by inserting your finger about an inch deep into the soil. If it feels dry, it's time to water.
3. Water slowly and deeply: When watering, do it slowly and deeply to ensure that the water reaches the roots. Water until the excess water starts to drain out of the drainage holes at the bottom of the pot.
4. Use room temperature water: It's important to use room temperature water when watering the Ludisia Discolor plant. Avoid using cold or hot water as it can shock the roots.
5. Consider the humidity level: Ludisia Discolor plants like humid environments. If the indoor air is dry, consider using a humidifier or placing the plant on a tray containing pebbles and water. The pebbles will elevate the plant above the water, creating a humid microclimate.
6. Water less in winter: In the winter season, the plant will require less frequent watering as it enters a period of dormancy. Check the soil moisture level weekly and adjust watering accordingly.
7. Avoid overwatering: Overwatering can cause root rot, which can be fatal for the plant. Always ensure the soil is draining properly and avoid leaving standing water in the saucer.
To fertilize this plant, use a balanced fertilizer with equal amounts of nitrogen, phosphorus, and potassium. Apply the fertilizer every 2-3 weeks during the growing season, which is typically spring and summer. Do not over-fertilize as this can cause damage to the plant. It is best to water the plant thoroughly before applying fertilizer to avoid burning the roots.
The ideal soil for this plant should be a well-draining mixture, rich in organic matter and with a slightly acidic pH. It should also be able to retain moisture without becoming waterlogged. A good soil blend would consist of equal parts of peat moss, perlite, and vermiculite, with some sterilized garden soil and coarse sand added in small amounts. This soil mix will provide the necessary nutrients and air circulation to promote healthy growth and prevent root rot, which can be fatal to this plant. It is important to avoid using a heavy clay-based soil or one that is too nutrient-rich, as this can lead to over-fertilization and negatively impact the plant's health.
To propagate this plant, you will need to prepare a pot with well-draining soil and a shallow tray of water. Take a healthy stem cutting from the mother plant that has at least two nodes. Use a clean, sharp pair of scissors or shears to make a clean cut just below a node.
Remove any lower leaves or flowers from the stem cutting, leaving only a few leaves at the top. Dip the cut end of the stem into rooting hormone powder or gel to encourage root growth. Gently insert the stem into the soil and firm it in place. Water the cutting thoroughly and place the pot in a bright, but indirect light.
Ensure that the soil stays moist but not water-logged as the cutting establishes roots. You can mist the leaves occasionally to maintain humidity. After a few weeks, the cutting should start to develop new growth and roots. Once the roots have developed, you can transplant the new plant into a larger pot with fresh soil and continue to care for it as you would for the mother plant.
Common pests of the jewel-orchid include Mealybugs, spider mites, fungus gnats, thrips. Make a habit of checking your jewel-orchid frequently for pests so that any infestations can be caught and managed early.


