Plant Overview
Often called the Chilean Myrtle or Arrayán, this tree is famous for its smooth, "cold to the touch" cinnamon-colored bark. Native to the temperate rainforests of the Andes, it creates enchanting, winding groves that look like they were plucked straight from a fairytale. It is a slow-growing evergreen that adds a touch of ancient elegance to any landscape.
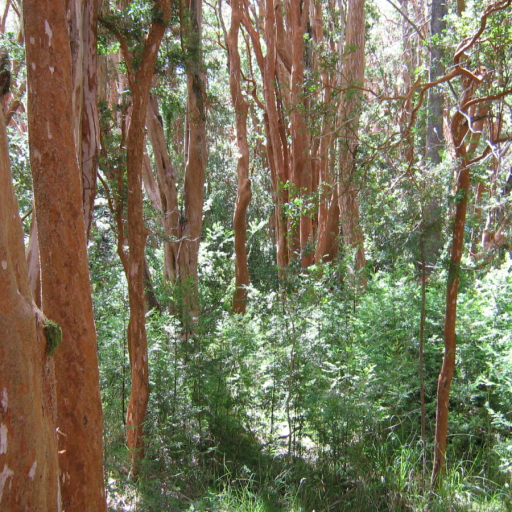
🔍 How to Identify
- 🍂 The Bark: Its most striking feature; the bark is a warm cinnamon-orange color that peels away in paper-thin patches to reveal creamy-white wood beneath.
- 🌿 The Foliage: Small, oval-shaped leaves that are glossy, dark green, and end in a tiny point (the "apiculata" in its name). They release a pleasant, spicy scent when crushed.
- 🌸 The Blooms: In late summer, the tree is covered in delicate, four-petaled white flowers with a "puff" of prominent stamens in the center.
🏡 In Your Garden
- 💧 Moisture Balance: While it loves a humid environment and consistent moisture, its roots are sensitive to stagnant water. It thrives best in well-draining, slightly acidic soil.
- ✂️ Shape & Form: Because it grows slowly and responds beautifully to pruning, it is a favorite for creating "living sculptures," formal hedges, or even intricate bonsai specimens.
- 🛡️ Shelter Needs: It prefers a spot sheltered from harsh, drying winds, which can damage its delicate new growth and drying out its ornamental bark.
⚠️ Safety & Toxicity
- ✅ General Status: Luma apiculata is generally considered non-toxic to humans and common household pets like cats and dogs.
- 🫐 The Berries: The dark purple-black berries are technically edible and are traditionally used in Chile to make jams or fermented drinks, though they are not commonly sold as commercial fruit.
- 🧤 Skin Sensitivity: While not toxic, the sap can occasionally cause very mild irritation in individuals with highly sensitive skin during heavy pruning.
✨ Fun Fact
- 🦌 Local legend in Argentina suggests that the famous Arrayanes Forest in Neuquén served as the visual inspiration for the magical woodland settings in Walt Disney’s classic film, Bambi.

Detailed Care Instructions
To successfully grow Luma apiculata, also known as Chilean myrtle or arrayán, you can follow these steps:
- Climate and sun exposure: Luma apiculata thrives in temperate climates and prefers full sun to partial shade. Ensure the plant is placed in an area that receives at least 6 hours of direct sunlight per day.
- Soil: The ideal soil for Luma apiculata is well-draining, loamy soil. If your soil is heavy or clay-like, incorporate organic matter such as compost or leaf mulch to improve drainage and nutrient content.
- Watering: Water the plant deeply and regularly during the first year after planting to establish a strong root system. Once established, Luma apiculata has moderate water requirements and can tolerate dry periods. However, it is best to water the plant during prolonged dry spells to maintain healthy growth.
- Mulching: Apply a layer of organic mulch around the base of the plant to help retain moisture, suppress weeds, and insulate the roots during extreme temperatures.
- Pruning: Prune Luma apiculata lightly to maintain its shape and remove dead, damaged, or crowded branches. Ideally, prune in late winter or early spring before new growth begins.
- Fertilizer: Luma apiculata is not a heavy feeder, so it doesn't require regular fertilization. However, applying a balanced slow-release fertilizer during early spring can promote healthy growth.
- Pests and diseases: Generally, Luma apiculata is relatively pest and disease resistant. However, keep an eye out for common garden pests like aphids, scale insects, or powdery mildew. Treat any pest or disease issues promptly using appropriate organic pest control methods if necessary.
- Propagation: Luma apiculata can be propagated through seeds or semi-hardwood cuttings. For seeds, collect fresh berries and sow them in a pot filled with well-draining compost. Keep the pot moist and place it in a warm location. For cuttings, take semi-hardwood cuttings in late summer or early autumn and root them in a well-draining propagation mix.
By following these care guidelines, you should be able to grow a healthy Luma apiculata plant.

Place in a bright room that is sun drenched almost all day. Or directly in a south-facing window.

Luma Apiculata plant requires regular watering for its healthy growth. The plant should not be allowed to completely dry out between waterings, as it prefers moist soil. However, overwatering can cause root rot and other issues.
The watering frequency and amounts can vary depending on the climate and environmental conditions. In general, the plant should be watered deeply once or twice a week during the growing season. During the winter months, when the plant becomes dormant, it should be watered less frequently.
The best way to water a Luma Apiculata plant is to make sure the soil is evenly moist. This can be achieved by watering directly at the base of the plant, avoiding getting any water on the leaves or stem. The plant should also be allowed to drain fully after each watering, as the plant does not like to sit in a pool of water.
It's important to note that Luma Apiculata plant can tolerate short periods of drought, but it's best to avoid completely drying out the soil. Monitoring the soil moisture, especially during hot and dry periods, is recommended to make sure the plant is getting adequate water.
To fertilize this plant, use a balanced fertilizer with equal parts nitrogen, phosphorus, and potassium. Apply the fertilizer once in the early growing season and once in midsummer. Use a granular or liquid fertilizer and dilute according to package instructions. Keep the fertilizer away from the plant's trunk and spread it evenly around the root zone. Water the plant thoroughly after applying fertilizer. Avoid fertilizing during the plant's dormant season.
The ideal soil for Luma Apiculata plants is a well-draining, slightly acidic soil with a pH level between 5.5 and 6.5. The soil should be rich in organic matter and nutrients, and should have a good balance of sand, silt, and clay particles. The plant prefers a soil that is moist but not waterlogged, as excess water can lead to root rot. To ensure optimal growth and health, it is recommended to use a soil mixture that is specifically formulated for acid-loving plants. Additionally, the plant may benefit from regular fertilization with a balanced, slow-release fertilizer.
To propagate this plant, you will need to gather cuttings from a healthy parent plant. Choose a stem that is about 6-8 inches long and has several nodes.
Using a sharp and sterilized pair of pruning shears, make a clean cut about ½ inch below a node. Remove any leaves from the bottom 1-2 inches of the cutting.
Next, dip the cut end of the cutting into rooting hormone powder. This will help stimulate root growth.
Insert the cutting into a pot filled with moist potting soil, making sure that at least one node is buried below the surface. Cover the pot with a plastic bag to create a humid environment for the cutting to root.
Place the pot in a bright, indirect light spot and keep the soil moist but not soaking wet. In about 4-6 weeks, the cutting should begin to develop roots. You can gently tug on the cutting to see if it has rooted.
Once the new plant has established roots, you can remove the plastic bag and move the pot to a brighter light spot. Feed the plant with a balanced fertilizer to encourage healthy growth.


