Plant Overview
Often called the Harlequin Lupine, this vibrant wildflower is a jewel of the California landscape. Unlike many of its solid-colored relatives, the Harlequin Lupine looks like it has been dipped in two different paint buckets—bright magenta and sunshine yellow. It is an annual plant that brings a sudden, spectacular burst of color to rocky slopes and pine forests in the late spring.
🔍 How to Identify
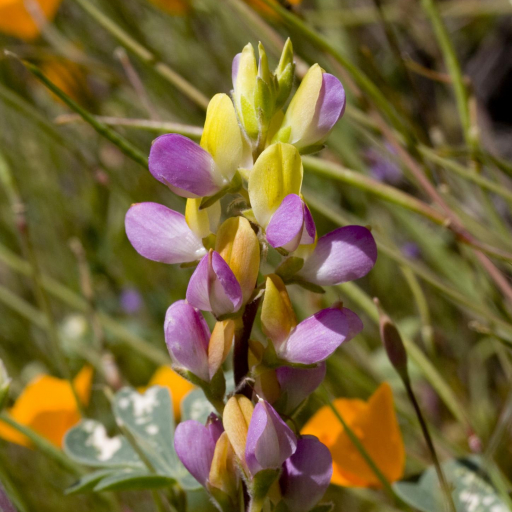
- 🎨 The Bicolor Bloom: The most striking feature is the "pea-like" flower. The upper petal (banner) is a deep pink or magenta, while the lower petals (wings) are a brilliant, contrasting yellow.
- ✋ Palm-Shaped Leaves: Like other lupines, the leaves are "palmate," meaning they look like the palm of a hand with 6 to 9 slender leaflets radiating from a central point.
- 📏 Compact Growth: This is a smaller, daintier lupine compared to the shrubby garden varieties, typically reaching only 4 to 18 inches in height.
🏡 In Your Garden
- ⛰️ The Rocky Specialist: In its natural habitat, this plant thrives in granitic or sandy soils. If you try to grow it at home, it requires exceptional drainage; it will quickly rot in heavy, wet clay.
- 🌱 The Annual Lifecycle: Because it is an annual, it puts all its energy into one season of glory. It relies on its seeds to return the following year, so gardeners should avoid "deadheading" (cutting off faded flowers) if they want it to return.
- ☀️ Sun Seeker: It prefers the bright, unfiltered light of mountain foothills. It is often found in "disturbed" areas, such as the edges of trails or areas recently cleared by fire, where it doesn't have to compete for sunlight.
⚠️ Safety & Toxicity
- 🚫 Toxic if Ingested: Like most members of the Lupinus genus, the Harlequin Lupine contains various alkaloids, including lupinine and sparteine.
- 🐾 Pet & Livestock Warning: These toxins are particularly dangerous to sheep, cattle, and horses, but they are also toxic to dogs and cats if the seeds or pods are chewed.
- 👶 Keep Away from Kids: The seed pods can look like small green beans or peas, making them tempting to children. Ingestion can cause digestive upset, slowed heart rate, and respiratory issues.
✨ Fun Fact
The Harlequin Lupine was named in honor of Charles Austin Stivers, a military doctor and amateur botanist who first collected the plant in the 1860s while stationed in California. It is a "California Endemic," meaning it grows wild almost nowhere else on Earth!

Detailed Care Instructions
Growing Lupinus stiversii, commonly known as Harlequin Lupine, can be a rewarding experience since it produces beautiful ornamental flowers. Here are some detailed steps and tips for successfully cultivating this plant:
1. Choose the Right Location
- Sunlight: Lupinus stiversii prefers full sun to partial shade. Ensure it receives at least 6-8 hours of direct sunlight daily.
- Soil: They thrive in well-drained, slightly acidic to neutral soils. If your soil is heavy clay or has poor drainage, consider amending it with sand or grit to improve drainage.
2. Soil Preparation
- Testing Soil: Test the soil pH to ensure it falls within the ideal range (pH 6.0-7.0).
- Amending Soil: Add organic matter like compost to enrich the soil. This helps improve soil structure and provides necessary nutrients.
3. Planting Seeds
- Seed Collection: Collect seeds from mature pods in late summer or early fall. Seeds can be stored until planting time.
- Scarification: Lupinus seeds have a tough outer coating. Lightly scarify (scratch) the seeds with sandpaper or soak them in warm water for 24 hours before planting to improve germination rates.
- Sowing: Sow seeds directly into the prepared garden bed in the fall or early spring, placing them about 1/4 inch deep. Space the seeds about 18-24 inches apart to give them ample room to grow.
4. Watering
- Initial Watering: Water the seeds lightly after planting to help establish the seedlings.
- Established Plants: Once Lupinus stiversii is established, it is fairly drought-tolerant, but regular watering during dry spells will promote better growth and flowering. Ensure the soil stays moist but not waterlogged.
5. Mulching
- Benefits: Mulching around the plants helps retain soil moisture, suppress weeds, and maintain a stable soil temperature.
- Application: Apply a layer of organic mulch, like straw or shredded bark, around the base of the plants, leaving some space around the stem to prevent rot.
6. Fertilization
Lupines generally do not need much fertilizer as they can fix their own nitrogen. If your soil is particularly poor, you might add a balanced, slow-release fertilizer at planting time.
7. Pruning and Deadheading
- Deadheading: Remove spent flowers to encourage further blooming and prevent the plant from putting energy into seed production.
- Pruning: Lightly prune the plants to maintain their shape and remove any dead or diseased foliage.
8. Pest and Disease Management
- Pests: Keep an eye out for common pests like aphids or slugs. Hand-picking or using organic insecticidal soap can help manage them.
- Diseases: Ensure good air circulation around the plants to prevent fungal diseases. Water plants at the base to avoid wetting the foliage.
9. Support and Maintenance
- Staking: Some taller varieties might need staking to prevent them from falling over, especially in windy conditions.
- Monitoring: Regularly check the plants for any signs of stress or disease and take action promptly.
10. Propagation
- Division: Lupinus stiversii can also be propagated by division in early spring. Carefully dig up the plant, separate the root clumps, and replant them immediately.
By following these steps, you should be able to successfully grow and enjoy the vibrant blooms of Lupinus stiversii in your garden. Happy gardening!

Place in a bright room that is sun drenched almost all day. Or directly in a south-facing window.

Watering *Lupinus stiversii* requires careful attention to replicate its natural habitat conditions. Here are detailed steps to ensure the plant thrives:
1. Frequency: This species prefers a consistent watering schedule but can tolerate periods of dryness. Water when the top inch of the soil feels dry to the touch.
2. Amount: Apply enough water to moisten the root zone thoroughly, ensuring you saturate the soil without causing waterlogging. Allow excess water to drain away to prevent root rot.
3. Method: Watering at the base of the plant is best to avoid wetting the foliage, which can lead to fungal diseases. Use a watering can or a hose with a sprinkler attachment to control the flow and direct it to the root area.
4. Time of Day: Early mornings or late afternoons are ideal for watering, as lower temperatures reduce evaporation and allow better absorption. Avoid late evening watering to minimize the risk of fungal issues.
5. Seasonal Adjustments:
- Spring/Summer: Increase watering frequency, typically once or twice a week, depending on your climate and soil drainage.
- Fall/Winter: Reduce watering frequency as the plant's growth slows down. During dormant periods, water sparingly, just enough to keep the soil from completely drying out.
6. Soil Requirements: Ensure the soil is well-draining. Amend with sand or gravel if necessary to enhance drainage. Avoid heavy, clayey soils that retain too much moisture.
7. Container vs. Ground:
- In Containers: Requires more frequent watering than those planted in the ground due to quicker soil drying. Check moisture levels closely.
- In Ground: Adjust based on rain and soil type; established plants are more drought-tolerant but still appreciate consistent moisture.
8. Mulching: Apply a layer of mulch around the base to retain soil moisture and keep the root zone cool. Organic mulches like wood chips or straw work well.
9. Monitoring and Adjusting: Continuously monitor the plant’s response to watering. Yellowing leaves or stunted growth can indicate overwatering or poor drainage, while wilted leaves can signal underwatering.
By following these detailed guidelines, you can provide optimal watering conditions to support healthy growth and vibrant blooms for your *Lupinus stiversii*.
Lupinus stiversii requires careful fertilization to thrive. Here’s a step-by-step guide:
- Soil Preparation:
- Ensure the soil is well-draining and preferably slightly acidic to neutral (pH 6.0-7.0).
- Incorporate organic matter, such as compost or well-aged manure, into the soil before planting to improve fertility and drainage.
- Ensure the soil is well-draining and preferably slightly acidic to neutral (pH 6.0-7.0).
- Initial Planting:
- At the time of planting, mix a slow-release, balanced fertilizer (such as a 10-10-10 formulation) into the soil. Follow the manufacturer’s guidelines for the amount per square foot.
- At the time of planting, mix a slow-release, balanced fertilizer (such as a 10-10-10 formulation) into the soil. Follow the manufacturer’s guidelines for the amount per square foot.
- Seasonal Fertilization:
- Apply a balanced fertilizer once yearly, preferably in early spring as new growth starts. A good option is using a complete fertilizer with a slightly lower nitrogen content, such as a 5-10-10 formulation, to encourage blooming rather than excessive foliage growth.
- Apply a balanced fertilizer once yearly, preferably in early spring as new growth starts. A good option is using a complete fertilizer with a slightly lower nitrogen content, such as a 5-10-10 formulation, to encourage blooming rather than excessive foliage growth.
- Organic Options:
- If you prefer organic fertilizers, use bone meal or fish emulsion, which are rich in phosphorus and potassium, necessary for root development and flowering.
- Compost tea can be applied every 4-6 weeks during the growing season to provide a slow release of nutrients and improve soil microbial health.
- If you prefer organic fertilizers, use bone meal or fish emulsion, which are rich in phosphorus and potassium, necessary for root development and flowering.
- Application Tips:
- Apply fertilizers around the base of the plant, avoiding direct contact with the stems or leaves to prevent burning.
- Water the plants thoroughly after fertilizing to help distribute nutrients into the soil.
- Apply fertilizers around the base of the plant, avoiding direct contact with the stems or leaves to prevent burning.
- Additional Care:
- Avoid over-fertilizing, which can lead to poor flowering and excessive vegetative growth.
- Monitor the plants for yellowing leaves, which can indicate a nutrient deficiency, and adjust fertilization practices accordingly.
By following these guidelines, you can ensure that your Lupinus stiversii receives the appropriate nutrients for healthy growth and vibrant blooming.
- Avoid over-fertilizing, which can lead to poor flowering and excessive vegetative growth.
Lupinus stiversii thrives best in well-drained soils. Here's a detailed guide on the soil conditions suitable for this plant:
Soil Composition:
- Texture: Opt for sandy loam or loam soil which provides good drainage while retaining sufficient moisture. Sand helps in drainage, while loam offers a balanced texture with good nutrient-holding capacity.
- Drainage: Excellent drainage is crucial since waterlogged conditions can lead to root rot. Ensure the soil does not remain soggy for extended periods.
- pH Level: The plant prefers slightly acidic to neutral pH levels, ideally ranging from 6.0 to 7.0. It's important to maintain this pH range to ensure optimal nutrient availability.
- Organic Matter: Incorporate organic matter like compost or well-rotted manure to improve soil fertility, structure, and moisture retention without compromising on drainage.
- Nutrient Content: The soil should be moderately fertile. While high fertility is not necessary, ensuring the presence of essential nutrients like nitrogen, phosphorus, and potassium aids in healthy growth.
Soil Preparation:
- Site Selection: Choose a location with full sunlight to partial shade, ensuring the plant receives adequate light for robust growth.
- Soil Testing: Conduct a soil test to determine pH levels and nutrient content. Amend the soil based on test results to achieve the desired pH and nutrient balance.
- Amendments: Add sand or gravel to improve drainage if the native soil is overly clayey or compacted. Conversely, incorporate organic matter if the soil is too sandy to enhance moisture and nutrient retention.
Planting Tips:
- Bed Preparation: Prepare the planting bed by loosening the soil to a depth of about 12-15 inches. This encourages root expansion and proper drainage.
- Mulching: Apply a thin layer of organic mulch, such as straw or bark chips, around the base of the plant. Mulching helps retain soil moisture, suppresses weed growth, and adds organic matter as it decomposes.
By ensuring these soil conditions are met, Lupinus stiversii will have an optimal environment to develop strong roots and vibrant blooms.
Propagating Lupinus stiversii, commonly known by its botanical name, can be a gratifying experience. Here's a detailed guide on how to do so:
Seed Collection and Preparation
- Seed Collection:
- Collect seeds from mature plants once the seed pods have dried but before they have split open. Timing is crucial to avoid losing seeds.
- Place the collected seed pods in a paper bag and allow them to dry completely. The pods will naturally split, releasing the seeds.
- Collect seeds from mature plants once the seed pods have dried but before they have split open. Timing is crucial to avoid losing seeds.
- Seed Scarification:
- Lupinus stiversii seeds have a hard outer coating that needs to be scarified to enhance germination.
- Gently rub the seeds with sandpaper or nick them with a small knife, being careful not to damage the inner seed. This will allow water to penetrate and promote germination.
- Lupinus stiversii seeds have a hard outer coating that needs to be scarified to enhance germination.
- Soaking Seeds:
- After scarification, soak the seeds in warm water for 12-24 hours. This further softens the seed coat and encourages quicker germination.
Sowing the Seeds
- After scarification, soak the seeds in warm water for 12-24 hours. This further softens the seed coat and encourages quicker germination.
- Soil Preparation:
- Choose a well-draining soil mix. A combination of potting soil, sand, and perlite works well.
- Fill seed trays or pots with the prepared soil mix.
- Choose a well-draining soil mix. A combination of potting soil, sand, and perlite works well.
- Planting Seeds:
- Sow the soaked seeds about ½ inch deep in the soil. Space them about 2-3 inches apart if planting in trays.
- Lightly cover the seeds with soil and mist with water.
- Sow the soaked seeds about ½ inch deep in the soil. Space them about 2-3 inches apart if planting in trays.
- Germination Conditions:
- Place the seed trays or pots in a location with bright, indirect light.
- Maintain a consistent temperature around 60-70°F (15-21°C).
- Keep the soil consistently moist but not waterlogged.
Transplanting Seedlings
- Place the seed trays or pots in a location with bright, indirect light.
- Initial Growth:
- Seeds should germinate within 2-4 weeks. Once seedlings are about 2-3 inches tall and have developed a few sets of true leaves, they are ready for transplanting.
- Seeds should germinate within 2-4 weeks. Once seedlings are about 2-3 inches tall and have developed a few sets of true leaves, they are ready for transplanting.
- Hardening Off:
- Gradually acclimate the seedlings to outdoor conditions by exposing them to a few hours of sunlight each day over a week. Increase the duration gradually to avoid shock.
- Gradually acclimate the seedlings to outdoor conditions by exposing them to a few hours of sunlight each day over a week. Increase the duration gradually to avoid shock.
- Transplanting:
- Choose a sunny, well-drained location. Lupinus stiversii prefers slightly acidic to neutral soil.
- Dig small holes spaced about 12-24 inches apart, depending on the variety and final size of the plants. Gently remove the seedlings from pots or trays, taking care not to damage the roots.
- Place each seedling in a hole, backfill with soil, and water well.
Care and Maintenance
- Choose a sunny, well-drained location. Lupinus stiversii prefers slightly acidic to neutral soil.
- Watering:
- Water the newly transplanted seedlings regularly until established. Once established, they are relatively drought-tolerant.
- Allow the soil to dry out between waterings to prevent root rot.
- Water the newly transplanted seedlings regularly until established. Once established, they are relatively drought-tolerant.
- Mulching:
- Apply a thin layer of mulch around the base of the plants to help retain soil moisture and control weeds.
- Apply a thin layer of mulch around the base of the plants to help retain soil moisture and control weeds.
- Fertilizing:
- Lupinus stiversii typically doesn’t require much fertilization. If desired, a light application of a balanced, slow-release fertilizer in early spring can promote growth.
By following these steps, you can successfully propagate Lupinus stiversii from seeds, ensuring a thriving and vibrant garden display.
- Lupinus stiversii typically doesn’t require much fertilization. If desired, a light application of a balanced, slow-release fertilizer in early spring can promote growth.


