Plant Overview
Known as the Lowveld Milkberry, this resilient tree is a true survivor of the African savanna. It is beloved for its "weeping" silhouette and its small, sugary fruits that provide a vital snack for both humans and wildlife during the dry season. In local folklore, its presence often indicates a nearby water source or a hidden underground pocket of moisture in the bushveld.
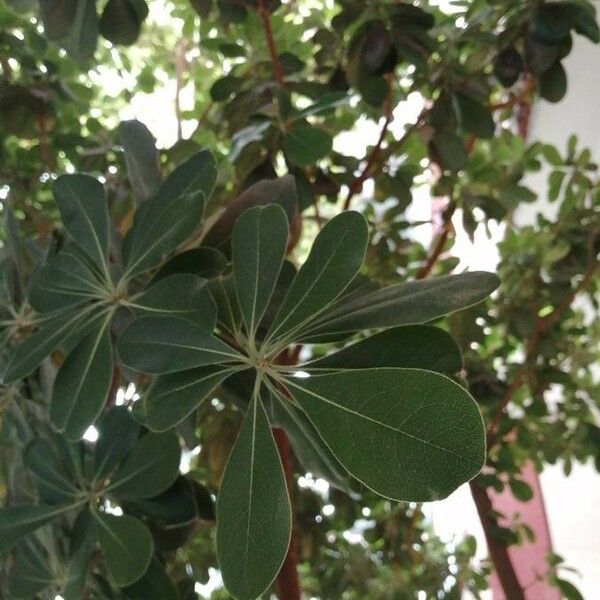
🔍 How to Identify
- 🍃 The Leaves: Look for spoon-shaped, leathery leaves that grow in tight, spiral clusters at the very tips of stubby, horizontal side-branches.
- 🪵 The Bark: The trunk is covered in dark grey to blackish bark that is deeply fissured into a distinctive "crocodile skin" pattern of small, rough squares.
- 🍒 The Fruit: It produces small, oval berries (about 1–2cm) that transition from green to a yellowish-red. When bitten, they release a signature sticky, white milky latex.
🏡 In Your Garden
- 🌱 Root Stability: The Lowveld Milkberry is notorious for its deep taproot. It hates being moved once it has settled in, so it is best to plant it in its "forever home" while it is still a young sapling.
- 🐘 Wildlife Magnet: If you are looking to bring life to your landscape, this tree is a powerhouse. It attracts a wide array of birds, baboons, and monkeys who feast on the sweet pulp of the berries.
⚠️ Safety & Toxicity
- ✅ Status: Non-toxic and generally safe.
- 🖐️ Sticky Sap: While the fruit is edible and sweet, the white latex found in the bark and unripe fruit is incredibly sticky. It can be difficult to wash off the skin and may cause mild irritation to those with very sensitive skin or latex allergies.
- 🐾 Pet Friendly: There are no known toxic effects for dogs or cats, making it a safe shade tree for pet owners.
✨ Fun Fact
The wood of the Manilkara mochisia is exceptionally dense and heavy—so heavy, in fact, that it often sinks in water! Because of this durability, it has historically been used to craft high-quality tool handles and traditional walking sticks.

Detailed Care Instructions
To grow Manilkara mochisia plant, also known as caimito or star apple, you can follow the steps below:
- Choose a suitable location: Caimito plants prefer full sun, so find a spot in your garden where they will receive at least 6-8 hours of direct sunlight each day.
- Soil preparation: The plant thrives in well-draining soil that is rich in organic matter. Prepare the soil by incorporating compost or well-rotted manure to improve fertility and drainage.
- Propagation: There are two main methods of propagation: by seed or grafting. Caimito seeds can be obtained from ripe fruits. Directly plant the seeds in containers or directly in the ground 1-2 inches deep. Grafting offers a faster way to grow the plant. For this, obtain a caimito rootstock and graft a scion from a healthy caimito tree onto it.
- Watering: Water the plant regularly, especially during dry spells. Keep the soil moist but not waterlogged. Avoid letting the soil dry out completely between waterings.
- Fertilization: Apply a balanced slow-release fertilizer or organic matter every 2-3 months to provide nutrients to the plant. Follow the manufacturer's instructions to determine the appropriate amount.
- Mulching: Apply a layer of organic mulch around the base of the plant to retain moisture, suppress weeds, and help maintain even soil temperature.
- Pruning: Caimito trees usually require minimal pruning. Remove any dead, diseased, or damaged branches to promote healthy growth. Also, thin out any overcrowded branches to improve air circulation and light penetration.
- Pests and diseases: Caimito plants can be susceptible to various pests and diseases, including aphids, scales, fruit flies, and fungal infections. Monitor your plant regularly and take appropriate measures if you notice any signs of infestation or disease.
- Harvesting: Caimito fruits can be harvested when they are fully ripe, which is usually indicated by a change in color from green to purple or yellow. Harvest them carefully to avoid bruising. The fruits are typically consumed fresh or used in various culinary preparations.
Remember to check for any specific growing requirements and conditions suitable for your specific region, as some adjustments might be necessary depending on your climate.
Manilkara Mochisia is a tropical plant that requires frequent watering to thrive. The soil should be kept moist but not overly saturated, as too much water can lead to root rot. The frequency of watering should be adjusted based on the temperature, humidity, and sunlight in the plant's environment. During the summer months, when temperatures are high and humidity is low, it may be necessary to water the plant several times per week. In the winter, when temperatures are cooler and the air is more humid, less frequent watering may be required. When watering, it is important to water directly at the base of the plant to avoid getting water on the leaves, which can lead to fungal growth. Allow the soil to dry out slightly between waterings, but do not let it become completely dry. It is also important to use a well-draining soil mix to ensure that excess water can drain away from the roots.
To fertilize your Manilkara Mochisia plant, you can follow these instructions:
- Choose a slow-release granular fertilizer with a balanced ratio of nitrogen (N), phosphorous (P), and potassium (K). A general recommendation is a ratio of 10-10-10 or a similar formula.
- Apply the fertilizer during the growing season, which is typically spring and summer. Avoid fertilizing during the dormant winter period.
- Determine the dosage of the fertilizer according to the instructions on its packaging. The dosage may depend on the size and age of your Manilkara Mochisia plant.
- Sprinkle the granules evenly around the base of the plant, avoiding direct contact with the stems or/trunk. If possible, spread the fertilizer a few inches away from the plant's drip line.
- Gently work the fertilizer into the top layer of soil using a hand tool or rake. Be careful not to damage the plant's roots during this process.
- Water the plant thoroughly after fertilizing to help dissolve the nutrients and transport them to the roots. Ensure that the water reaches deep into the soil.
- Monitor the plant's response to the fertilizer. If you notice any signs of over-fertilization, such as burnt or yellowing leaves, reduce the fertilizer dosage or frequency of application.
- Repeat the fertilization process every 4-6 weeks during the growing season, following the same dosage and application guidelines.
Remember, it's essential to consider the specific requirements and preferences of the Manilkara Mochisia plant as certain conditions may affect its fertilization needs.
Manilkara Mochisia plant requires a well-draining and nutrient-rich soil. The soil pH level should be slightly acidic to neutral, with a range of 6.0 to 7.0. The soil should be able to retain moisture, but not become waterlogged, as this can lead to root rot. A mix of peat moss, compost, and sandy loam soil can be used to create a suitable soil mix for this plant. It is also recommended to add organic matter, such as aged manure or compost, to improve soil fertility and structure. Avoid using heavy clay soils or soils with high salt content, as these can be detrimental to the growth of the Manilkara Mochisia plant.
To propagate the Manilkara Mochisia plant, follow these steps:
- Begin by obtaining a healthy and mature Manilkara Mochisia plant. Look for a plant that is disease-free and has a strong root system.
- Prepare a propagation medium by mixing equal parts of peat moss, perlite, and sand. This mixture provides good drainage and aeration to encourage root growth.
- Take a stem cutting from the Manilkara Mochisia plant. Choose a stem that is about 4-6 inches long and has several leaves. Use a clean and sharp pair of pruning shears to remove the cutting. Make a clean cut just below a node, which is where the leaf attaches to the stem.
- Remove the lower leaves of the stem cutting, leaving only a few leaves at the top. This reduces moisture loss and allows the cutting to focus on root development.
- Optional: Dip the bottom end of the cutting in a rooting hormone powder. This can improve the chances of successful rooting, but it is not required.
- Make a small hole in the propagation medium using a pencil or your finger. Insert the bottom end of the stem cutting into the hole, making sure it is deep enough to provide stability. Gently press the medium around the cutting to secure it in place.
- Mist the cutting and medium with water to moisten it but avoid overwatering. Excessive moisture can lead to rot and hinder rooting. Maintain a consistently moist but not waterlogged environment.
- Place the cutting in a warm and bright area that receives indirect sunlight. Avoid exposing it to direct sunlight, as this may cause damage to the cutting. A temperature range of 70-85°F (21-29°C) is ideal for root development.
- Cover the cutting with a plastic bag or use a small propagator to create a humid environment. This helps to retain moisture around the cutting and promotes root growth. Just make sure to remove the cover periodically to allow for air circulation and prevent mold or fungal issues.
- Check the cutting regularly for signs of rooting, such as new leaf growth or resistance when you gently tug on it. This usually takes several weeks to a few months, depending on various factors such as temperature and the health of the cutting.
- Once the cutting has developed a healthy root system, it is ready for transplantation into a larger pot or the desired planting location. Handle the new plant gently to avoid damaging the roots.
By following these steps, you can successfully propagate the Manilkara Mochisia plant and enjoy the beauty of this species in your garden or indoor space.


