Plant Overview
The Common Medlar, or Mespilus germanica, is a piece of living history that once held a place of honor in medieval royal gardens. Mentioned by literary giants like Chaucer and Shakespeare, it is famously known by the cheeky nickname "Open-tail" due to the unique shape of its fruit. It is one of the few fruit trees that provides a harvest in the dead of winter, though it requires a bit of patience and a process called "bletting" to become sweet.
🔍 How to Identify
- 🍃 Elongated Foliage: The leaves are large, oval, and dark green with a slightly fuzzy underside, turning a magnificent russet-orange or gold in the autumn.
- 🌸 Solitary Blooms: In late spring, the tree produces beautiful, oversized white or pale-pink flowers that sit alone at the tips of branches, rather than in clusters.
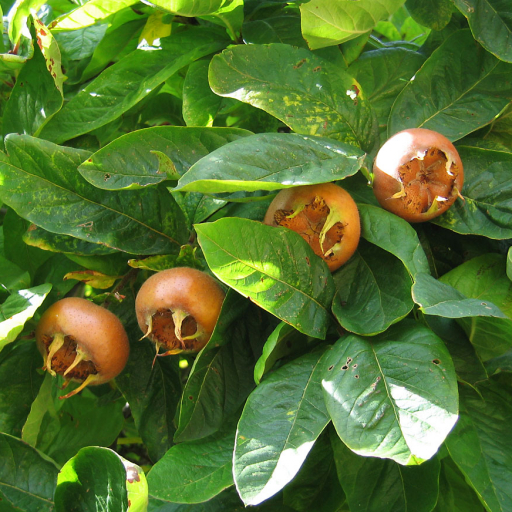
- 🍎 "Inside-Out" Fruit: The fruit is a small, brownish-green pomme characterized by a wide, flat top and five long, leafy "teeth" (sepals) that surround a hollow eye.
🏡 In Your Garden
- 🌳 Hardy and Resilient: The Medlar is an incredibly tough tree that thrives in temperate climates and is far more resistant to common fruit pests and diseases than apples or pears.
- 🍂 The Art of Bletting: To eat the fruit, you must wait until after the first frost, or store them in a cool place until they become soft, brown, and squishy. Only then does the flesh transform into a delicious, spiced apple-butter consistency.
⚠️ Safety & Toxicity
- ✅ Safe for All: The fruit of the Medlar is non-toxic and has been eaten for centuries; the leaves and wood are also safe for pets and children.
- 🦷 Seed Caution: Like many members of the Rose family, the large seeds contain small amounts of hydrogen cyanide. While swallowing a seed whole is harmless as it passes through, you should avoid crushing or chewing them.
✨ Fun Fact
In the Middle Ages, the Medlar was a popular symbol for "premature aging" because the fruit is only considered "ripe" when it appears to be rotten. It was often used in poetry to mock people who grew old before they grew wise!

Detailed Care Instructions
| Humidity | Normal |
| Lighting | Full Sun |
| Toxicity | Poisonous |
| Difficulty | Medium |
| Hibernation | Cold Period |
| Hardiness Zones | 5 - 8 |
To grow a Mespilus Germanica plant, also known as medlar, follow these steps:
- Choose a location: Medlar plants prefer a sunny spot with well-drained soil. Ensure the area receives at least 6-8 hours of sunlight each day.
- Soil preparation: Prepare the soil by loosening it with a garden fork or tiller. Add compost or organic matter to improve drainage and fertility.
- Planting: Dig a hole that is slightly larger than the container the medlar plant is in. Gently remove the plant from the container, taking care not to damage the roots. Place the plant in the hole, ensuring it sits at the same level as it did in the container. Fill the hole with soil, gently firming it around the plant.
- Watering: After planting, water the medlar plant thoroughly. Continue to water regularly, especially during dry periods, keeping the soil evenly moist but not waterlogged.
- Mulching: Apply a layer of organic mulch, such as wood chips or straw, around the base of the plant to help retain moisture, suppress weeds, and regulate soil temperature.
- Pruning: Prune your medlar plant during its dormant period in late winter or early spring. Remove dead, damaged, or crossing branches. This will encourage healthy growth and maintain an open shape.
- Fertilization: Apply a balanced fertilizer, such as a granular general-purpose fertilizer, in early spring and again in early summer. Follow the instructions on the fertilizer packaging for proper application rates.
- Pest and disease control: Monitor the plant for any signs of pests or diseases, such as aphids or fungal infections. Apply appropriate pest control measures or consult a local gardening expert if necessary.
- Harvesting: Medlar fruits are typically picked when fully ripe but still firm. For most varieties, this occurs in late autumn or early winter. The fruits need to "blet" or soften off the tree for a few weeks or months before they are ready to eat.
By following these steps and providing proper care, you can successfully grow a Mespilus Germanica plant in your garden.

Place in a window with dappled sun or a spot in the middle of a room. Or directly in a window facing west or east.

To water this particular plant, it is important to take into consideration its natural habitat and the amount of moisture it requires to thrive. This can be achieved by thoroughly watering the root zone of the plant once a week during the growing season and reducing watering during winter dormancy. It is important to avoid watering the foliage as this can increase susceptibility to disease and pests. Additionally, ensuring that the soil is well-draining and not waterlogged will help maintain a healthy root system. Finally, monitoring the plant for signs of stress, such as yellowing leaves or wilting, can indicate either over or under watering and should be adjusted accordingly.
To fertilize this plant, use a balanced, slow-release fertilizer in early spring before new growth appears. Apply the fertilizer at the base of the plant and water thoroughly. Repeat the application in late spring/early summer if desired. Avoid fertilizing after mid-summer to prevent new growth that may be damaged by winter cold.
Mespilus Germanica plant requires a well-draining soil with good fertility and a pH level between 6.0 to 7.0. The ideal soil type for this plant is loamy soil that contains a mixture of sand, silt, and clay in roughly equal proportions. The soil should have good organic matter content with proper aeration to improve soil structure and texture. Additionally, the soil should be moist but not waterlogged as this can cause root rot. The plant also prefers soils that are not too sandy or too heavy in clay. Adding compost or organic matter to the soil before planting can improve soil quality and nutrient availability.
To propagate this plant, you will need to collect semi-hardwood cuttings from the parent plant during the summer months. Select healthy shoots that are about 8-10cm long and free from disease or damage. Using a sharp, clean pair of secateurs, make a clean cut just below a leaf node and remove the lower leaves from the stem.
Dip the cut end of each cutting into rooting hormone powder and tap off any excess. Insert the cutting into a pot filled with well-draining soil and water thoroughly. Cover the pot with a clear plastic bag to create a miniature greenhouse and place it in a warm, bright spot out of direct sunlight.
Check the cuttings regularly and mist the inside of the plastic bag with water to keep the humidity high. After a few weeks, you should see signs of new growth and roots beginning to form. Once the cuttings have established, carefully transplant them into individual pots and continue to care for them as you would for a mature plant.
Common pests of the medlar include Spider mites, aphids, larvae. Make a habit of checking your medlar frequently for pests so that any infestations can be caught and managed early.


