Plant Overview
Often called the Yellow Monkeyflower, this cheerful South American native looks like it’s laughing right back at you. Its scientific name, Mimulus, is derived from the Latin word for "mime" or "actor," a nod to the flower's uncanny resemblance to a smiling face or a classic monkey's mask. While it originated in the Andes, it has danced its way across the globe, brightening up stream banks and damp garden corners with its sunny disposition.
🔍 How to Identify
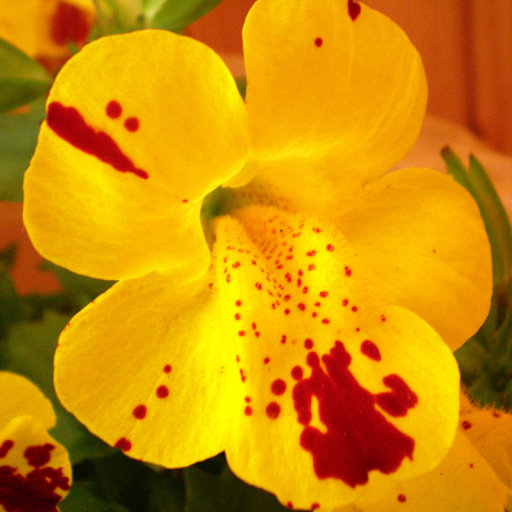
- 🌼 The "Monkey" Bloom: Bright, snapdragon-like yellow flowers featuring a "two-lipped" shape. The lower lip is usually decorated with a splash of mahogany or red dots that act as a landing strip for pollinators.
- 🍃 Toothed Foliage: The leaves are light green, oval-shaped, and have distinct serrated (toothed) edges. They grow in opposite pairs along succulent, slightly hairy stems.
- 🌱 Matting Habit: It typically grows in low, spreading clumps. If you see a carpet of gold near a water source, you’ve likely found a colony of Mimulus luteus.
🏡 In Your Garden
- 💧 Wet Feet Welcome: Unlike most garden plants that fear root rot, the Yellow Monkeyflower thrives in mud. It is a "riparian" specialist, meaning it is the perfect candidate for pond edges, bog gardens, or that one soggy spot in your yard where nothing else will grow.
- ⛅ Heat Sensitivity: This plant is a fan of the "cool and damp" lifestyle. While it loves bright light to produce those iconic blooms, it will wilt and go dormant if the summer heat becomes too intense without adequate shade and constant moisture.
⚠️ Safety & Toxicity
- 🐾 Pet Friendly: Good news for pet owners—Mimulus luteus is generally considered non-toxic to cats, dogs, and horses.
- 👶 Low Risk: It is safe for "sensory gardens" where children might be present. However, it isn't a food crop, so it’s best to keep the "monkey faces" for looking, not for snacking.
✨ Fun Fact
🎭 The Master of Disguise: The Yellow Monkeyflower is a favorite among scientists studying evolution. It can adapt its size and flowering time so rapidly to its environment that two plants of the same species can look like entirely different varieties just because one grew in a sunny meadow and the other in a shaded creek!

Detailed Care Instructions
To grow Mimulus luteus, also known as the monkey flower, you can follow these steps:
- Planting: Start by selecting a suitable location for planting. Mimulus luteus prefers partial shade to full sun, so choose a spot that receives at least 4-6 hours of sunlight each day. The soil should be well-draining and moist.
- Sowing Seeds: You can start growing Mimulus luteus from seeds. Sow the seeds indoors in late winter or early spring, about 8-10 weeks before the last frost date in your area. Fill seed trays or pots with seed starting mix and sprinkle the seeds on top, pressing them lightly into the soil. Keep the soil moist and maintain a temperature of around 60-70°F (15-21°C) for germination.
- Transplanting: Once the seedlings have grown and developed several sets of leaves, they can be transplanted outdoors after the last frost has passed. Choose a location with the appropriate light conditions as mentioned earlier. Dig a hole slightly larger than the root ball of the seedling, gently remove it from the container, and place it in the hole. Backfill with soil, firming it around the base of the plant.
- Watering: Monkey flowers prefer consistently moist soil. Water the plants regularly to keep the soil evenly moist. However, avoid overwatering, as it can lead to root rot. Aim to keep the soil damp but not waterlogged.
- Mulching: Applying mulch around the base of the plants can help retain moisture in the soil and prevent weed growth. Use organic mulch, such as wood chips or straw, and spread it evenly around the plants while keeping a small gap around the stem to prevent rotting.
- Fertilizing: Monkey flowers are not heavy feeders, but you can apply a balanced, slow-release fertilizer once or twice during the growing season. Follow the instructions on the fertilizer package for appropriate dosing.
- Pruning: Trim back any dead or damaged stems to maintain the plant's appearance and promote healthy growth. You can also pinch back the tips of the stems to encourage bushier growth and more flowers.
- Pest and Disease Control: Monkey flowers are generally resistant to pests and diseases. However, keep an eye out for common garden pests like aphids or slugs. If necessary, treat with appropriate organic pest control methods.
By following these steps, you should be able to successfully grow Mimulus luteus and enjoy their vibrant, trumpet-shaped flowers.

Place in a bright room that is sun drenched almost all day. Or directly in a south-facing window.

To water this particular plant, it is important to look at its specific needs based on its growth stage and the environment it is currently in. Mimulus Luteus plants typically prefer moist soil, which means that they most likely will require watering on a regular basis to ensure that the soil does not dry out completely.
When watering, it is important to not overwater the plant, as this can lead to root rot and other issues. Instead, it is recommended to water the plant deeply and thoroughly, allowing the water to reach the roots and penetrate the soil. It may be helpful to check the moisture level in the soil before watering again by sticking your finger into the soil; if it feels dry, it is time to water the plant.
It is also important to take note of the temperature and humidity levels in the plant's environment, as this can affect how often and how much water the plant requires. During warm and dry periods, the plant may require more frequent watering to maintain its moisture levels.
In addition to regular watering, it is recommended to fertilize the Mimulus Luteus plant every few weeks during the growing season to help promote healthy growth and flowers. As with all plants, it is important to monitor the plant's health and adjust watering and fertilization as needed to ensure that it is thriving.
To fertilize the Mimulus Luteus plant, you should use a balanced fertilizer with equal amounts of nitrogen, phosphorus, and potassium. Apply the fertilizer once per month during the growing season, which is typically from late spring through early fall. Dilute the fertilizer to half strength before applying it to the soil around the plant. Avoid getting the fertilizer on the leaves or flowers. Water the plant deeply after fertilizing.
The ideal soil for this plant should be well-draining and rich in organic matter. It should have a pH range of slightly acidic to neutral, between 6.0 and 7.0. The soil should also be moist but not waterlogged, as the plant prefers moderate moisture levels. Avoid using heavy clay soils or sandy soils with poor water retention. Adding compost or perlite to the soil can improve drainage and increase nutrient availability. It is also recommended to avoid using fertilizers high in nitrogen, as they can promote leafy growth at the expense of flowering.
To propagate this plant, start by taking stem cuttings from a healthy and established plant. Choose a stem that is strong and has at least two leaf nodes on it.
Next, prepare a container with well-draining soil mix and make a hole in the soil where you will insert the cutting.
Remove the lower leaves from the cutting, leaving only two or three leaves at the top. Dip the cut end of the stem in rooting hormone powder and insert it into the prepared hole.
Gently press the soil around the stem to secure it in place and ensure that the stem is in an upright position. Water the cutting thoroughly and cover it with a plastic bag or a propagation dome to create a humid environment.
Place the container in a warm and bright spot, but avoid direct sunlight. Keep the soil moist, but not soaked, and mist the leaves regularly to maintain humidity.
After a few weeks, you should start to see new growth emerging from the cutting. Once the plant has developed roots and established itself, you can remove the plastic cover and transplant it into a larger pot or into your garden.


