Plant Overview
Often called the Starch Grape Hyacinth, Muscari atlanticum is a charming herald of spring that blankets gardens in deep indigo. Its tiny, urn-shaped flowers are clustered so tightly they resemble a miniature bunch of grapes, earning it its most common nickname. While it originated in the Mediterranean and Western Asia, it has traveled the world, becoming a beloved staple for its reliability and "plant-it-and-forget-it" nature.
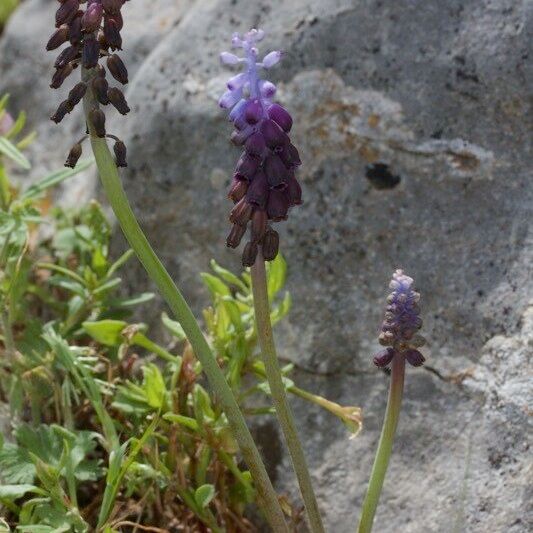
🔍 How to Identify
- 🍇 The "Grapes": Look for dense, spike-like clusters (racemes) of dark blue to near-black flowers. The very top flowers are often sterile and a lighter shade of blue.
- 🦷 White Rims: Each individual bell-shaped flower features a tiny, distinct white "fringe" or "teeth" at the opening, making the dark blue pop.
- 🍃 Grassy Foliage: The leaves are narrow, fleshy, and channeled (u-shaped in cross-section). They often emerge in the autumn and stay green through the winter before the flowers appear in spring.
🏡 In Your Garden
- 🌱 The Great Naturalizer: This plant is a "weaver." It spreads easily via tiny underground bulb offsets and seeds, making it perfect for creating a "blue carpet" effect under deciduous trees or in rock gardens.
- ☀️ Dormancy Manners: Unlike many perennials, Grape Hyacinths go dormant and disappear in the heat of summer. Don't panic when the leaves turn yellow and die back in July—they are simply saving energy for next spring.
- 🥣 Soil Preference: They are not picky but demand good drainage. They hate "wet feet" during their winter nap, which can cause the bulbs to rot.
⚠️ Safety & Toxicity
- 🐾 Mildly Toxic: While not usually fatal, all parts of the plant (especially the bulbs) contain saponins.
- 👶 Keep Away from Explorers: Ingestion can cause stomach upset, nausea, or vomiting in pets and small children. The sap may also cause mild skin irritation for those with sensitive skin.
✨ Fun Fact
The genus name Muscari comes from the Greek word moschos, meaning musk. If you lean in close on a sunny day, you’ll catch a faint, sweet scent that some describe as a mix between grape juice and light perfume!

Detailed Care Instructions
Growing Muscari atlanticum, commonly known as Moroccan grape hyacinth, can be a delightful addition to your garden with its beautiful blue, urn-shaped flowers. Native to North Africa, particularly Morocco, this bulbous perennial is relatively easy to grow and can add charm to your spring garden. Here are some guidelines on how to cultivate Muscari atlanticum:
1. Choosing a Plant Site
- Light Requirements: Muscari atlanticum thrives in full sun to partial shade. However, in regions with very hot summers, providing some afternoon shade can help protect the plants.
- Soil Requirements: These bulbs prefer well-drained soil with moderate fertility. They are tolerant of a variety of soil types but avoid waterlogged conditions.
2. Planting Bulbs
- When to Plant: The best time to plant Muscari bulbs is in the fall before the ground freezes. This allows them to establish roots and spring up as the weather warms.
- Planting Depth and Spacing: Plant the bulbs about 3-4 inches deep and space them about 3 inches apart. Planting them in groups or clusters can create a fuller, more striking display when they bloom.
3. Watering
- Initial Watering: Water your bulbs thoroughly after planting to settle the soil around them.
- Ongoing Watering: Muscari atlanticum requires moderate watering during the growing season, especially in dry periods. However, it's critical to ensure good drainage as the bulbs are prone to rot in soggy soil.
4. Fertilization
- Apply a balanced, slow-release fertilizer in early spring as the shoots appear. This will nourish the bulbs as they begin their active growth and flowering period.
5. Mulching
- Mulching around the plants can help retain moisture, suppress weeds, and keep the roots cool. An organic mulch, like bark or leaf mold, applied in the fall can also provide added winter protection.
6. Care During Dormancy
- After flowering, allow the leaves to die back naturally. The leaves will continue to photosynthesize and store energy in the bulb for the next blooming season.
- Reduce watering once the leaves yellow and fade, and let the soil dry out somewhat more in the dormant season.
7. Propagating
- Muscari atlanticum can be propagated by dividing congested clumps of bulbs in late summer, after the foliage has died back. Replant the divisions immediately.
8. Pest and Disease Management
- Muscari is generally robust and not greatly troubled by pests and diseases. However, watch for signs of slugs, snails, or bulb rot in very wet conditions.
By following these care tips, you should be well on your way to growing a lovely display of Muscari atlanticum. These charming little bulbs are also excellent for naturalizing in grassy areas or beneath deciduous trees and can be combined with other spring bulbs like tulips or daffodils for a more extended flowering period.

Place in a bright room that is sun drenched almost all day. Or directly in a south-facing window.

To properly water your Muscari atlanticum, appropriate moisture levels are crucial to support their growth and blooming cycle, particularly since they originate from environments that can have moist winters and dry summers. Here’s how to ensure optimum watering:
1. **Seasonal Watering Needs**:
- **During Growing Season (Fall to Spring)**: This is when your plant will need the most water. Start watering when you see the leaves begin to emerge in the fall and continue through the blooming period in the spring. The soil should be kept evenly moist, but not waterlogged.
- **Post-Bloom (Late Spring to Summer)**: After the flowers have blossomed and the leaves begin to yellow and die back, gradually reduce watering. The plant will enter a dormancy period where less water is required.
2. **Checking Soil Moisture**:
- Before watering, check the soil about an inch or two below the surface; if it feels dry, it’s time to water. If it still feels moist, wait a couple of days and check again.
3. **Method of Watering**:
- Use a watering can to gently water around the base of the plant, avoiding water on the foliage and flowers, which could promote fungal diseases. Water slowly, allowing the water to seep down to the roots rather than running off the surface.
- If grown in containers, ensure that these have adequate drainage holes. Water thoroughly until it starts to drain out of the bottom, but let the soil drain completely between watering sessions to prevent root rot.
4. **Amount of Water**:
- The amount of water needed will depend on the environment and weather conditions. Less water is needed in cloudy or cool weather and more in brighter, warmer conditions.
- For gardens, a general rule of thumb is about an inch of water per week, including rainfall.
5. **Additional Considerations**:
- In climates with wet winters and springs, be particularly cautious with watering, relying more on natural rainfall and reducing supplementary watering.
- Avoid overwatering as this can lead to bulb rot. Balanced moisture is key to healthy growth.
6. **Monitoring Plant Health**:
- Keep an eye for signs of both underwatering (such as wilting leaves) and overwatering (yellowing leaves, pest issues) and adjust your watering practices accordingly.
Following these guidelines will help maintain healthy Muscari atlanticum plants that can thrive and bloom beautifully during their season.
To ensure that your Muscari atlanticum plant thrives, it's important to provide the right fertilization regimen. This herbaceous plant performs best when given a balanced approach to nutrients, focusing on a schedule that supports its growth during blooming and vegetative stages.
- Fertilizer Type: Opt for a balanced, water-soluble fertilizer such as a 10-10-10 or 20-20-20 formulation, which provides equal parts of nitrogen, phosphorus, and potassium.
- Fertilizing Time: The ideal time to fertilize Muscari atlanticum is in early spring as they begin active growth. This timing helps the plant develop strong foliage and robust blooms during its flowering period. A second application might be beneficial right after the blooms have faded to support leaf growth and the replenishment of energy stores for the next season.
- Application Method: When applying fertilizer, mix it with water according to the product's instructions, and apply it to the soil around the plants. Avoid getting fertilizer on the leaves or flowers to prevent burning.
- Rate and Frequency: Apply the mixed fertilizer every 4-6 weeks through the growing season, stopping as the active growth winds down or by late summer to allow the plants to prepare naturally for dormancy.
- Additional Care: Besides regular fertilizing, ensure your plant's health by maintaining consistent moisture in the soil (but avoid waterlogging) and mulching around the base to conserve moisture and suppress weeds.
Following these fertilization instructions for your Muscari atlanticum will help promote healthy, vigorous growth and abundant flowering. Remember that well-timed and -dosed fertilization goes a long way in the overall health and blooming success of your plants.
Muscari atlanticum, a bulbous perennial plant, thrives best in well-draining soil that has a good mix of organic material. Here are specifics on the ideal soil composition and characteristics for cultivating this plant:
- Soil Type: Loamy soil is ideal because it effectively balances drainage with nutrient retention. Sandy loam is also suitable, especially if you are in a region with wetter climates, as it ensures even better drainage.
- Drainage: Excellent drainage is crucial for Muscari atlanticum to prevent bulb rot. You can improve soil drainage by incorporating materials such as perlite, coarse sand, or small gravel into the soil mix.
- pH Level: This plant prefers a slightly acidic to neutral pH, ranging from 6.0 to 7.0. You can test your soil's pH and amend it with sulfur or lime to adjust the acidity or alkalinity.
- Organic Matter: Adding compost or well-rotted manure will enrich the soil with essential nutrients and improve its texture and overall fertility. Organic matter also aids in moisture retention in the soil without causing waterlogging.
- Nutrients: A balanced slow-release bulb fertilizer can be beneficial at planting time and early spring. Choose a fertilizer that is high in potassium to support strong flowering but avoid excessive nitrogen, which can promote more leaf growth at the expense of flowers.
For planting Muscari atlanticum, whether in garden beds or containers, ensure that the soil is prepared well to meet these conditions. In containers, use a commercial potting mix designed for bulbs, or make your own mix using equal parts loam, peat, and sharp sand to ensure optimal growth.
To propagate Muscari atlanticum, a bulbous perennial hailing from the genus Muscari, you will primarily rely on two methods: division and seed propagation. Here’s a detailed guide on how to effectively propagate this plant:
By Division:
The most efficient way to propagate Muscari atlanticum is through bulb division. This method is best performed in late summer or early autumn, after the leaves have yellowed and died back, which signifies dormancy.
- Preparation:
- Choose a dry, cool day for digging up the bulbs.
- Prepare the new planting site or pots before you dig up the bulbs. Ensure the soil is well-draining and has been loosened.
- Choose a dry, cool day for digging up the bulbs.
- Digging Up Bulbs:
- Carefully dig around the cluster of bulbs with a spade or garden fork, starting several inches away from the base to avoid damaging the bulbs.
- Lift the clump of bulbs and gently shake off excess soil.
- Carefully dig around the cluster of bulbs with a spade or garden fork, starting several inches away from the base to avoid damaging the bulbs.
- Separating Bulbs:
- Separate the bulbs by gently pulling them apart. Each bulb should have some root material attached.
- Discard any bulbs that are soft, shriveled, or diseased.
- Separate the bulbs by gently pulling them apart. Each bulb should have some root material attached.
- Replanting:
- Plant the bulbs immediately at a new site. They should be planted at a depth three times the height of the bulb and spaced a few inches apart.
- Cover with soil and water lightly to settle the soil around the bulbs.
By Seed:
Propagating Muscari atlanticum from seeds is a slower process and might not produce flowers for several years.
- Plant the bulbs immediately at a new site. They should be planted at a depth three times the height of the bulb and spaced a few inches apart.
- Seed Collection:
- Allow the flowers to bloom and fade naturally on the plant.
- After blooming, seed pods will develop and ripen. Wait until the pods are dry and brown.
- Allow the flowers to bloom and fade naturally on the plant.
- Harvesting:
- Carefully harvest the pods and extract the seeds.
- Dry the seeds for a few days in a cool, dry place.
- Carefully harvest the pods and extract the seeds.
- Sowing:
- Sow seeds in autumn directly in a cold frame or in seed trays with well-draining seed starting mix.
- Cover seeds lightly with soil as they need some light to germinate.
- Sow seeds in autumn directly in a cold frame or in seed trays with well-draining seed starting mix.
- Germination:
- Keep the soil moist but not waterlogged.
- Germination might take several months, and the seedlings are typically slow growing.
- Keep the soil moist but not waterlogged.
- Care for Seedlings:
- Once seedlings appear and are large enough to handle, transplant them into individual pots.
- Allow them to grow in pots for at least one or two seasons until they are robust enough to be planted out.
Aftercare for Both Methods:
- Once seedlings appear and are large enough to handle, transplant them into individual pots.
- Watering: Young plants need regular watering but ensure the soil drains well to prevent rot.
- Feeding: Apply a balanced fertilizer during the growing season to support healthy growth.
- Mulching: Apply a light layer of organic mulch around the base of the plants to help maintain soil moisture and temperature.
Using these methods, Muscari atlanticum can be successfully propagated, providing a delightful display in subsequent years. Remember that patience is key, especially with seed propagation, as it can take a few years before you see blooms.


