Plant Overview
Known as the Creeping Boobialla, this Australian native is the ultimate "living carpet." It is a rugged, low-growing evergreen that transforms harsh, dry patches of earth into a lush, emerald rug dotted with tiny white stars. In its homeland, it is a champion of the coastline, often found clinging to sandy dunes and rocky cliffs.
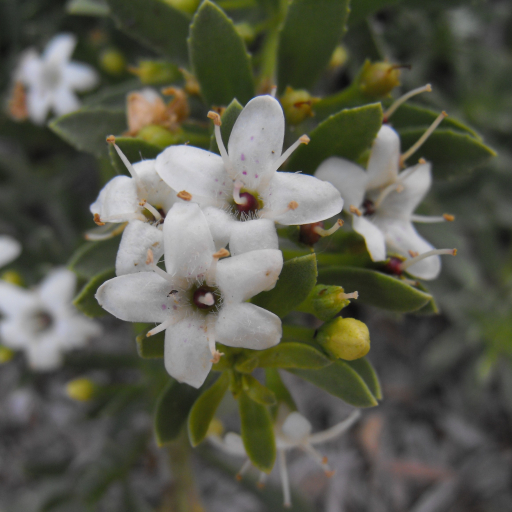
🔍 How to Identify
- 🍃 The Foliage: Features small, narrow, and slightly fleshy leaves that are a vibrant bright green. They grow densely along trailing, woody stems.
- 🌸 The Blooms: Produces a profusion of tiny, star-shaped white flowers (sometimes with faint purple spots) that emit a delicate, honey-like fragrance.
- 📏 The Habit: A true prostrate shrub, it stays very low to the ground (usually under 6 inches) but can spread horizontally up to 10 feet wide.
🏡 In Your Garden
- 🌱 The Weed Smotherer: Because it grows so densely, it acts as a natural mulch. Once established, it blocks sunlight from the soil surface, effectively preventing weed seeds from germinating.
- 🏜️ Tough Love: This plant thrives on neglect. It possesses a deep taproot that helps it survive extreme heat and drought, but this also means it hates being moved once planted.
- 💧 Drainage Nuance: The biggest enemy of the Creeping Boobialla is "wet feet." It requires porous, well-draining soil; if kept in heavy, waterlogged clay, the center of the plant may rot and die back.
⚠️ Safety & Toxicity
- ✅ General Status: Myoporum parvifolium is generally considered low-risk and non-toxic to humans and common household pets like dogs and cats.
- 🚜 Livestock Note: While safe for the backyard, some species in the Myoporum genus contain "ngaione," a toxin that can affect the liver in cattle and sheep if consumed in large quantities.
- 🧤 Skin Sensitivity: Some gardeners with sensitive skin may experience mild redness or itching when handling the sap during heavy pruning.
✨ Fun Fact
- 🔥 Nature’s Firewall: In wildfire-prone regions, this plant is often used in "defensible space" landscaping. Its succulent-like leaves hold a high moisture content, making it naturally more resistant to catching fire than dry grasses or woody mulch.

Detailed Care Instructions
To grow Myoporum Parvifolium plant, you can follow these steps:
- Choose a suitable location: Myoporum Parvifolium prefers full sun to partial shade. Select a spot with well-draining soil, as the plant does not tolerate waterlogged conditions.
- Prepare the soil: Before planting, loosen the soil and remove any weeds or rocks. If the soil is heavy or clay-like, amend it by adding organic matter such as compost or peat moss to improve drainage.
- Planting: Dig a hole slightly larger than the root ball of the plant. Place the plant in the hole, ensuring that the top of the root ball is level with or slightly above the soil surface. Backfill the hole with soil, gently firming it around the plant to eliminate air pockets. Water the plant thoroughly after planting.
- Watering: Initially, water the newly planted Myoporum Parvifolium regularly to help it establish a strong root system. Once established, the plant becomes more drought-tolerant and requires minimal watering, except during extended dry periods.
- Mulching: Apply a layer of organic mulch around the plant to help conserve moisture and suppress weed growth. Avoid piling the mulch against the stem to prevent rotting.
- Pruning: Myoporum Parvifolium can tolerate light pruning to maintain its shape and encourage denser growth. Trim the plant in early spring before new growth appears. Remove any dead, damaged, or overgrown branches.
- Fertilizing: Myoporum Parvifolium generally does not require frequent fertilizing. However, you can apply a slow-release fertilizer in spring to promote healthy growth. Follow the manufacturer's instructions for application rates.
- Propagation: Myoporum Parvifolium can be propagated from cuttings. Take softwood cuttings in spring or semi-hardwood cuttings in late summer. Dip the cut end in rooting hormone and plant it in well-draining potting mix. Keep the cuttings in a warm and humid environment until roots form.
- Pest and disease control: Myoporum Parvifolium is generally resistant to pests and diseases. However, keep an eye out for spider mites, which might infest the plant in hot, dry conditions. Infestations can be controlled by spraying the plant with a strong stream of water or using insecticidal soap if necessary.
By following these steps, you can successfully grow Myoporum Parvifolium and enjoy its attractive and low-maintenance qualities.

Place in a bright room that is sun drenched almost all day. Or directly in a south-facing window.

The best way to water this particular plant is to give it regular and consistent watering, without letting it become too soggy. You should aim to water it deeply, but not too frequently, as moist soil is key for its growth. When checking if it needs water, feel the top inch of the soil – if it’s starting to feel dry, then it’s time to water. Alternatively, give it a little tug – if it doesn’t come out of the soil easily, then it’s likely hydrated enough. It’s also important to avoid getting water on the leaves and instead water the soil directly to avoid any fungal issues. Finally, make sure the plant has good drainage so that excess water can flow out of the pot or soil quickly.
To effectively fertilize Myoporum Parvifolium, follow these instructions:
- Timing: Apply the fertilizer during the active growing season, which is usually spring and early summer. Avoid fertilizing during winter or when the plant is dormant.
- Choose the right fertilizer: Select a balanced, slow-release fertilizer specifically formulated for shrubs or groundcover plants. Look for a formulation with an NPK ratio (nitrogen, phosphorous, potassium) of around 10-10-10 or similar.
- Measure the fertilizer: Follow the manufacturer's instructions to determine the appropriate amount of fertilizer according to the size and age of your Myoporum Parvifolium plant.
- Prepare the soil: Before applying the fertilizer, ensure that the soil is moist but not saturated. If the soil is too dry, lightly water it a day before fertilizing.
- Application: Carefully spread the fertilizer around the base of the plant, ensuring an even distribution. Avoid getting the fertilizer directly on the leaves or stems to prevent potential burning.
- Incorporate the fertilizer: Gently rake or lightly scratch the soil surface to incorporate the fertilizer into the upper layer of the soil. This helps the plant's roots to access the nutrients effectively.
- Water thoroughly: After applying the fertilizer, water the plant deeply and evenly. This helps to activate the slow-release components and prevents the risk of burning. Ensure the water penetrates the soil and reaches the plant's root zone.
- Repeat applications: Depending on the specific fertilizer you use, repeat the fertilization process every 4-6 weeks during the active growing season. However, always refer to the fertilizer packaging for accurate instructions regarding frequency and amounts.
Remember, regular fertilization is generally beneficial for Myoporum Parvifolium, but it's important not to over-fertilize, as this can lead to excessive growth and potential harm to the plant. Adjust the fertilization schedule based on the specific needs and condition of your plant.
The ideal soil for this particular plant should be well-draining and fertile, with a pH level that ranges between 6.0 to 7.5. It should have good moisture retention capabilities without being too damp or waterlogged as it may lead to root rot. A loamy, sandy soil mix with organic matter and small pebbles is suggested to allow for proper aeration and drainage. Additionally, it is recommended to avoid using heavy clay soil as it can suffocate the roots of the plant.
To propagate Myoporum Parvifolium, you can follow these general steps:
- Choose a healthy parent plant: Select a mature and healthy Myoporum Parvifolium plant with no signs of disease or pest infestation. This will increase the chances of successful propagation.
- Identify suitable plant parts for propagation: Myoporum Parvifolium can be propagated using both stem cuttings and seeds. Decide which method you want to try based on your preferences and available resources.
- Propagating through stem cuttings:
a. Select and prepare the cutting: Choose a non-flowering stem from the parent plant. Cut a 2-3 inch (5-7.5 cm) long section of the stem with a sharp, sterile knife or pruning shears. Remove any leaves from the lower half of the cutting, leaving a few at the top.
b. Treat the cutting: Optionally, you can apply a rooting hormone to the end of the cutting to stimulate root growth.
c. Plant the cutting: Fill a small pot or tray with a well-draining potting mix. Make a hole in the soil using a pencil or your finger and gently insert the bottom half of the cutting into the hole. Firmly press the soil around the cutting to ensure good contact.
d. Provide proper care: Place the potted cutting in a warm and bright location, but avoid direct sunlight. Keep the soil evenly moist but not waterlogged. Mist the cutting regularly to increase humidity and prevent dehydration.
e. Root development: In a few weeks to a couple of months, the cutting should develop roots. You can gently tug on the cutting to test if it's rooted. Once rooted, you can transplant the new plant into a larger pot or transplant it into your desired garden location.
- Propagating through seeds:
a. Collect ripe seeds: Wait for the plant to produce seeds, which are small and usually housed within a fruit-like covering. Collect the ripe seeds by either hand-picking them from the plant or harvesting fallen fruits from the ground.
b. Clean and dry the seeds: Separate the seeds from the fruit covering if necessary. Rinse the seeds in water to remove any remaining fruit residue, then spread them out on a paper towel or tray to dry for a few days. Make sure the seeds are fully dry before proceeding.
c. Sow the seeds: Fill a seed tray or small pots with a well-draining seed-starting mix. Plant the seeds about 1/4 inch (0.6 cm) deep in the soil, spacing them evenly. Cover the seeds lightly with soil and water gently.
d. Provide proper care: Place the tray or pots in a warm location with filtered sunlight. Ensure the soil remains consistently moist but not waterlogged. Germination may take several weeks or longer. Once the seedlings have grown to a suitable size, they can be transplanted into larger pots or directly into the garden.
Remember, propagation success may vary depending on several factors, including environmental conditions and the specific plants used. It's always good to research and understand the propagation requirements of the particular plant you are working with.


