Plant Overview
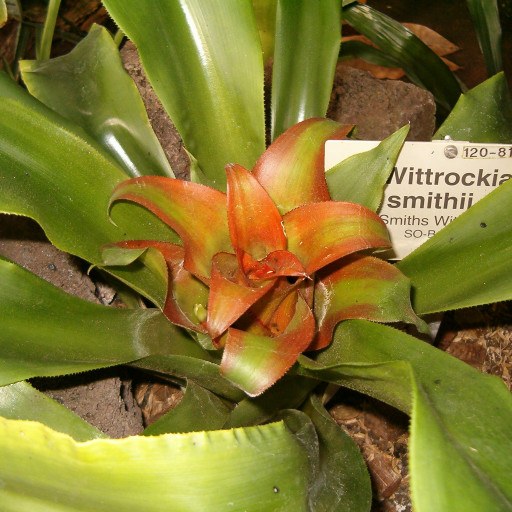
Commonly known as the Amazonian Bird’s Nest Bromeliad, Nidularium amazonicum is a dramatic tropical beauty hailing from the shaded floors of the Brazilian rainforests. It earned its genus name from the Latin word nidus (nest), referring to the way its vibrant flowers huddle deep within a "nest" of central leaves. Unlike many other bromeliads that shoot up tall flower spikes, this species keeps its treasures tucked low, creating a stunning, smoldering color transition from dark chocolate-green to fiery brick-red.
🔍 How to Identify
- 🍃 The Rosette: Grows in a classic fountain-like shape with broad, strap-shaped leaves that arch outward, reaching about 12-18 inches in length.
- 🎨 The "Nest" Bracts: As the plant prepares to bloom, the short inner leaves (bracts) transform from deep green to a striking metallic burgundy or rusty red, signaling the arrival of flowers.
- 📐 Serrated Edges: The leaf margins are lined with fine, tiny "teeth" or spines that give the foliage a slightly serrated texture.
- 🌸 Hidden Blooms: Small, white or pale flowers appear deep inside the central water tank, barely peeking over the edge of the bracts.
🏡 In Your Garden
- 💧 The Central Tank: Because this plant is an epiphyte, it drinks primarily through its center. You should keep the central "cup" filled with fresh rainwater or distilled water, but be sure to flush it out occasionally to prevent stagnant bacteria growth.
- ☁️ Humidity over Soil: It thrives in high humidity and dappled light. It hates direct afternoon sun, which will scorch its dark leaves. Think of it as an understory plant—it prefers the soft, filtered light found beneath a forest canopy.
- 🪴 Airy Roots: Avoid heavy, dense potting soil. It prefers a chunky mix of orchid bark, peat, and perlite to ensure the roots can breathe and don't rot from over-saturation.
⚠️ Safety & Toxicity
- 🐾 Status: Generally considered non-toxic to cats, dogs, and humans.
- 🌵 Mechanical Damage: While not poisonous, the serrated edges of the leaves can be quite sharp. It’s best to keep it on a shelf or stand where children or curious pets won’t accidentally brush against the "teeth" and get a skin scratch.
✨ Fun Fact
In their native Brazilian habitat, the "nests" of Nidularium plants act as miniature islands of biodiversity. They collect so much rainwater and debris that tiny tree frogs and insects use them as private nurseries to lay their eggs and raise their young!

Detailed Care Instructions
To grow a Nidularium Amazonicum plant, you can follow these steps:
- Start with a healthy Nidularium Amazonicum pup or offshoot. Look for a pup that has a good root system.
- Choose a well-draining pot or container with drainage holes. A small pot is suitable, as the plant does not require much space.
- Fill the pot with a well-draining potting mix, such as a mix of peat moss, perlite, and orchid bark. This will provide good aeration and drainage for the roots.
- Place the Nidularium Amazonicum pup in the pot and cover its roots with the potting mix. Gently pack the soil around the base of the plant, ensuring it is stable.
- Position the plant in a location with bright, indirect light. It can tolerate a few hours of direct sunlight, but too much can scorch the leaves.
- Maintain a temperature between 60-85°F (15-29°C). Avoid exposing the plant to temperatures below 50°F (10°C), as it prefers warmer conditions.
- Water the plant regularly, keeping the soil consistently moist but not waterlogged. Allow the top inch of soil to dry out before watering again. Use either filtered water or let tap water sit for 24 hours to allow chlorine to dissipate.
- Maintain a higher humidity level around the plant by misting its leaves regularly or placing a humidity tray filled with water nearby. This helps replicate the plant's natural tropical habitat.
- Fertilize the Nidularium Amazonicum plant every one to two months during the growing season with a balanced, water-soluble houseplant fertilizer. Follow the package instructions for proper dilution and application.
- Remove any dead or yellowed leaves to promote plant health and aesthetics.
- Propagate the plant by dividing the clumps of pups that form around the base of the main plant. Wait until the pups have grown to a reasonable size before separating them from the parent plant. Carefully cut or twist the pup away from the mother plant and plant it in a separate pot using the same planting methods described above.
By following these steps, you can successfully grow a Nidularium Amazonicum plant. Remember to provide it with proper care, regular maintenance, and attention to its specific needs to ensure its healthy growth.

Place in a window with dappled sun or a spot in the middle of a room. Or directly in a window facing west or east.

Nidularium Amazonicum is a tropical plant that requires a consistent watering schedule to thrive. When watering, it is important to avoid getting the leaves and flowers wet, as this can cause damage or disease. To water this plant, start by filling a watering can or similar container with room temperature or tepid water. Slowly pour the water into the soil at the base of the plant, taking care to evenly distribute the water around the roots. Allow the soil to absorb as much water as it can, and then empty any excess water from the drainage tray or saucer to prevent the roots from becoming waterlogged. The frequency of watering will depend on the climate, humidity levels, and time of year, but as a general rule, it is best to keep the soil evenly moist without allowing it to become soaking wet.
To fertilize Nidularium Amazonicum, use a balanced liquid fertilizer with equal amounts of nitrogen, phosphorus, and potassium. Dilute the fertilizer to half strength and apply it once a month during the growing season, which typically lasts from spring to early fall. Avoid fertilizing during the winter months as the plant is usually dormant at this time. Make sure to water the plant thoroughly before and after applying the fertilizer to prevent root burn.
The soil most suitable for a certain species of tropical epiphytic plant in the family Bromeliaceae, which is native to the Amazon rainforest, should be well-draining, slightly acidic, and composed of a mix of organic and inorganic materials. It is recommended to use a mixture of peat moss, bark, perlite, and coarse sand to ensure adequate drainage and aeration while retaining moisture. The plant prefers a soil pH of 4.5-5.5 and should be planted in a container with good drainage holes. Additionally, the plant should be fertilized with a balanced, water-soluble fertilizer every few months during the growing season.
To propagate this specific plant, you will need to obtain offsets or pups that grow from the base of the mature plant. These offset sections can be gently removed from the parent plant with a sharp, clean blade, taking care not to damage the roots or parent plant. Once removed, allow the offsets to dry and callous over for about a day before planting them in a well-draining potting mix. Keep the soil consistently moist but not overly wet, and place the new plant in a warm, bright spot but out of direct sunlight until it establishes itself.
Common pests of the nidularium amazonicum include Scale insect, mealybugs, spider mites. Make a habit of checking your nidularium amazonicum frequently for pests so that any infestations can be caught and managed early.


