Plant Overview
Often called the "Sun Star" or "Orange Star," this South African native is like a burst of captured sunlight for your windowsill. While many of its cousins in the Ornithogalum family are known for snowy white petals, the Dubium species stands out with its electric hues. It is a favorite for floral arrangements because its blooms are incredibly long-lasting, often staying vibrant for over a month.
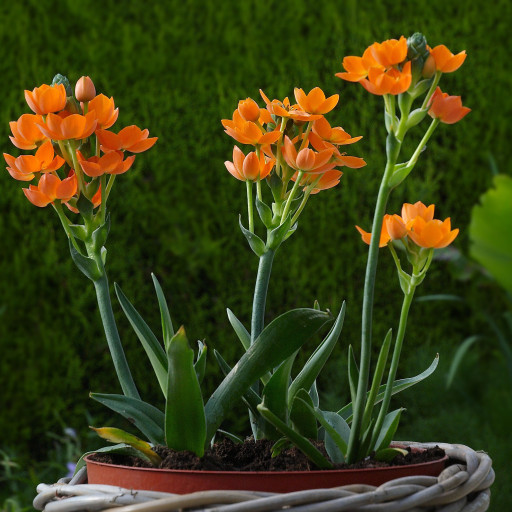
🔍 How to Identify
- 🌼 Floral Clusters: It produces dense, pyramidal clusters of 5 to 25 star-shaped flowers that open progressively from the base of the stalk upward.
- 🎨 Vivid Palette: Most famous for its brilliant "safety cone" orange, though buttery yellow and cream varieties also exist, often featuring a distinct dark green or brownish center.
- 🍃 Foliage: Features a neat rosette of 3 to 8 strap-shaped, dark green leaves that are slightly fleshy and clasp the base of the flowering stem.
🏡 In Your Garden
- ☀️ The Light Craving: True to its name, the Sun Star requires high light levels. If kept indoors, a south-facing window is ideal; without enough light, the stems will stretch and eventually collapse under the weight of the flowers.
- 💤 The Dormancy Secret: Many people toss this plant after the flowers fade, thinking it has died. In reality, it is a bulb that requires a dry "nap." Once the leaves turn yellow, stop watering entirely and let the bulb rest in a cool, dry place until the next growing season.
- 🪴 Drainage Priority: Because it grows from a bulb, it is highly susceptible to "wet feet." It prefers a gritty, fast-draining potting mix. It is much better to underwater this plant than to overwater it.
⚠️ Safety & Toxicity
- 🚫 Toxic Status: All parts of the plant are considered toxic if ingested.
- 🐾 Pets & Children: It contains cardiac glycosides which can cause drooling, vomiting, and heart rate irregularities in cats, dogs, and humans. Always keep this "star" on a high shelf away from curious nibblers.
✨ Fun Fact
The genus name Ornithogalum literally translates from Greek as "bird’s milk." In ancient times, this phrase was used to describe something rare, wonderful, or "nearly too good to be true"—a fitting tribute to the plant's stunning, saturated color!

Detailed Care Instructions
| Color | Orange |
| Soil Ph | Slightly Acidic To Neutral To Slightly Alkaline |
| Humidity | Normal |
| Lighting | Part Sun |
| Toxicity | Poisonous |
| Soil Type | Moist, Rich, And Well-Drained |
| Bloom Time | May Or June |
| Difficulty | Medium |
| Plant Type | Spring-Flowering Bulb |
| Mature Size | Growing To 10 In. Tall |
| Native Area | Europe, North Africa, And The Middle East (Mediterranean) |
| Temperature | 18°C - 25°C |
| Sun Exposure | Full Sun To Partial Shade |
| Hardiness Zones | 7-10 |
To grow Ornithogalum Dubium plants, also known as sun star or star of Bethlehem, follow these steps:
- Choose the right location: Ornithogalum Dubium plants thrive in full sunlight, so find a location that receives at least six hours of direct sunlight each day. They can also tolerate partial shade, but they may not flower as profusely.
- Prepare the soil: Ornithogalum Dubium plants prefer well-draining soil. If your soil is heavy or clay-like, improve it by adding organic matter like compost or well-rotted manure. This will help improve drainage and fertility.
- Plant the bulbs: Plant the bulbs in the fall or early winter, about 3-4 inches deep and 4-6 inches apart. Make sure to position them with the pointed end facing upward. If you're planting in a pot, use a well-draining potting mix.
- Watering: Water your Ornithogalum Dubium plants regularly, keeping the soil slightly moist but not waterlogged. During active growth, water whenever the top inch of soil feels dry. However, reduce watering during their dormant period in late spring and summer.
- Fertilizing: Feed your plants with a balanced, all-purpose fertilizer in early spring and again in mid-summer. Follow the manufacturer's instructions for recommended dosage.
- Mulching: Apply a layer of mulch around the plants to help retain moisture and suppress weed growth. Be careful not to cover the bulbs, as they need access to sunlight.
- Protect from extreme cold: Ornithogalum Dubium plants are cold-hardy, but if you live in an area with severe winters, it's a good idea to cover the plants with a layer of straw or mulch to protect them from freezing temperatures.
- Propagation: You can propagate Ornithogalum Dubium plants by dividing the bulbs in early fall, after the foliage has died back. Dig up the bulbs and separate the offsets, replanting them at the same depth as the parent bulb.
Remember to be patient, as it may take a couple of years for the bulbs to mature and produce flowers. With proper care and conditions, you should be able to enjoy beautiful blooms from your Ornithogalum Dubium plants.

Place in a window with dappled sun or a spot in the middle of a room. Or directly in a window facing west or east.

1. Identify the plant's watering needs: Ornithogalum Dubium requires regular watering, but not excessively. The soil should be allowed to dry out partially between watering sessions.
2. Water the plant with care: Water the plant gently, being careful not to disturb the soil or damage the delicate roots. Avoid getting water on the leaves and flowers of the plant, as this can cause damage or disease.
3. Use the right tools: A watering can with a fine spout or a spray bottle can be used to water the plant without causing damage.
4. Choose the right time: Water the plant during the early morning or late afternoon, when temperatures are cooler and the plant is not under direct sunlight. This will prevent water from evaporating quickly and allow the plant to absorb water more effectively.
5. Monitor soil moisture: Check the soil moisture regularly to ensure that the plant is neither over- nor under-watered. To do so, stick your finger into the soil up to the first knuckle. If it feels dry, water the plant. If it feels wet or moist, wait a few more days before watering again.
6. Adjust watering frequency based on the environment: During hot and dry weather, you may need to water the plant more often. In cooler weather, watering only once a week may be sufficient. Be sure to adjust the frequency of watering based on the needs of the plant and the environment.
To fertilize the plant, use a balanced fertilizer with a N-P-K ratio of 10-10-10 or 20-20-20. Apply the fertilizer to the soil around the base of the plant, following the manufacturer's instructions for the correct dosage and frequency of application. Avoid fertilizing the plant during the winter months when it is dormant.
The ideal soil to use with this plant is a well-draining soil that is also rich in nutrients. It should be a mix of organic matter, such as compost or peat moss, and sand or perlite to ensure that water can easily drain through the soil. The pH level of the soil should be slightly acidic to neutral, around 6.0 to 7.0, and it should be kept consistently moist but not overly waterlogged. Avoid using soils that are heavy or compacted, as these can prevent roots from growing and can lead to root rot. It's also important to note that this plant prefers full sun to partial shade, and should be watered regularly during the growing season to ensure healthy growth and flowering.
To propagate this plant, you can start by collecting mature bulbs from the mother plant. Make sure that the bulbs are healthy and free from any damage or disease. You can then separate the bulbs into smaller sections, each with their own roots.
Prepare a well-draining soil mixture by combining sand, perlite, and peat moss in equal parts. Plant the bulb sections about 1 inch deep in the soil, with the root end down and the pointed end facing upward. Water the plant lightly and place it in a warm, bright location.
As the bulb sections establish roots and begin to grow, make sure to water them regularly and fertilize them every few weeks with a balanced fertilizer. Once they have grown into mature plants, they can be transplanted into larger pots or directly into the garden.
Common pests of the sun star include Thrips. Make a habit of checking your sun star frequently for pests so that any infestations can be caught and managed early.


