Plant Overview
Often called the Few-leaved Star of Bethlehem, this delicate bulbous perennial emerges like a scattered constellation across rocky slopes and mountain meadows. It is one of the more modest and "shy" members of its family, preferring the crisp air of the Balkans and Turkey over the lush, manicured gardens of its showier cousins. Its understated elegance makes it a favorite for rock gardeners looking for a touch of early-spring magic.
🔍 How to Identify
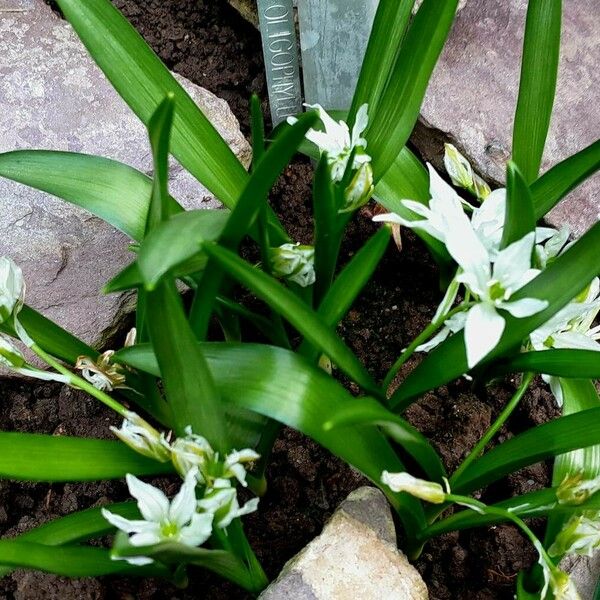
- ⭐ The Bloom: Small, star-shaped flowers that appear pure white from above, but feature a distinctive, broad green stripe running down the back of each petal.
- 🍃 The Foliage: True to its name (oligophyllum means "few leaves"), it typically produces only two or three narrow, grayish-green leaves that often curve or lie flat against the soil.
- 📏 Growth Habit: A true miniature, this plant rarely grows taller than 4 to 6 inches, making it easily overlooked until its brilliant white stars pop against the spring mud.
🏡 In Your Garden
- ⛰️ Drainage is Key: Because this species originates in mountainous regions, it demands "sharp drainage." It prefers gritty, sandy soil and will quickly rot if left in heavy, waterlogged clay during its winter dormancy.
- ⏳ The Vanishing Act: This plant is a spring ephemeral. After flowering in early spring, the leaves will yellow and disappear entirely by mid-summer. Don't be tempted to "clean up" the spot by digging—the bulb is simply sleeping underground, waiting for next year.
⚠️ Safety & Toxicity
- 🚫 Status: Toxic to humans and pets.
- 🐾 Details: Like most members of the Ornithogalum genus, it contains cardiac glycosides. If ingested, it can cause nausea, drooling, and heart rhythm issues in cats, dogs, and horses. Always wear gloves when handling the bulbs if you have sensitive skin, as the sap can cause mild irritation.
✨ Fun Fact
The genus name Ornithogalum literally translates from Greek as "bird's milk." In the ancient world, this phrase was a common idiom used to describe something wonderful, rare, or almost miraculous—a fitting tribute to the plant's pristine, milky-white blossoms.

Detailed Care Instructions
Ornithogalum oligophyllum, commonly known as the "star-of-Bethlehem," is a bulbous perennial plant that can be a delightful addition to your garden. Here are some tips on how to grow and care for it:
Planting
- Location:
- Choose a spot with well-draining soil. The plant thrives in sunny areas but can tolerate partial shade.
- Choose a spot with well-draining soil. The plant thrives in sunny areas but can tolerate partial shade.
- Soil Preparation:
- Ensure the soil is light and well-draining. Sandy or loamy soil is ideal. If your soil is heavy, consider adding organic matter or sand to improve drainage.
- Ensure the soil is light and well-draining. Sandy or loamy soil is ideal. If your soil is heavy, consider adding organic matter or sand to improve drainage.
- Planting Time:
- Plant the bulbs in the fall (around September to November) or early spring, depending on your climate.
- Plant the bulbs in the fall (around September to November) or early spring, depending on your climate.
- Depth and Spacing:
- Plant the bulbs about 3-5 inches deep and 4-6 inches apart.
Watering
- Plant the bulbs about 3-5 inches deep and 4-6 inches apart.
- Water the bulbs thoroughly after planting, ensuring that the soil is moist but not soggy.
- Once established, Ornithogalum oligophyllum is relatively drought-tolerant, but regular watering during dry spells will help improve growth.
Care
- Fertilization:
- Apply a balanced, slow-release fertilizer in spring as new growth emerges. This will support healthy growth and flowering.
- Apply a balanced, slow-release fertilizer in spring as new growth emerges. This will support healthy growth and flowering.
- Mulching:
- Apply a layer of mulch to help retain moisture and suppress weeds. Organic mulch can also improve soil quality as it breaks down.
- Apply a layer of mulch to help retain moisture and suppress weeds. Organic mulch can also improve soil quality as it breaks down.
- Maintenance:
- Deadhead spent flowers to promote further blooming and prevent unwanted self-seeding.
Pests and Diseases
- Deadhead spent flowers to promote further blooming and prevent unwanted self-seeding.
- Ornithogalum oligophyllum is generally resilient but can be susceptible to pests like aphids and diseases such as bulb rot if overwatered. Ensure proper drainage to avoid these issues.
Overwintering
- In regions with harsh winters, mulch can help protect the bulbs. If you're in a warmer climate, the plant is typically hardy and doesn't require special winter care.
Propagation
- This plant can be propagated by offsets (bulb divisions) after a few years of growth. Dig up the bulbs after the foliage dies back and separate the offsets for replanting.
By following these care instructions, you should be able to successfully grow and enjoy Ornithogalum oligophyllum in your garden!
Watering Ornithogalum oligophyllum effectively involves a few key practices to ensure the plant remains healthy and thrives. This perennial is adapted to specific moisture conditions, so it’s important to match your watering practices to its needs.
- Soil Check: Before watering, check the soil moisture. Use your finger or a moisture meter to assess how dry the top inch or two of soil is. The plant prefers well-draining soil that can dry out slightly between waterings.
- Watering Technique: When you decide to water, do so thoroughly. Pour water directly onto the soil, ensuring that it seeps down deep to reach the root zone. Avoid watering the foliage to reduce the risk of fungal diseases.
- Watering Frequency: During the growing season (typically spring to early summer), water regularly, approximately once a week or when the soil feels dry. In dormancy (late summer to early winter), reduce watering significantly as the plant requires less moisture during this time.
- Water Quality: Use room temperature water if possible. If your tap water is high in salts or chlorine, consider using filtered or rainwater to avoid any potential harm to the plant.
- Environmental Factors: Be mindful of environmental conditions that may affect watering needs, such as temperature, humidity, and light levels. Higher temperatures and direct sunlight can increase evaporation and may require more frequent watering, while cooler or shadier spots may need less.
- Pot Drainage: Ensure that the pot or container has adequate drainage holes. This allows excess water to escape and helps prevent root rot, which can occur if the roots sit in waterlogged soil.
By following these guidelines, you can maintain the appropriate moisture levels for Ornithogalum oligophyllum, promoting its growth and health throughout the seasons.
To properly fertilize Ornithogalum oligophyllum, follow these instructions:
- Timing: Fertilize during the growing season, typically in spring and early summer, when the plant is actively growing.
- Type of Fertilizer: Use a balanced, water-soluble fertilizer with an N-P-K ratio suitable for flowering plants, such as 10-10-10 or a similar formulation. Alternatively, a slow-release fertilizer with a similar N-P-K ratio can be used at the beginning of the growing season.
- Dilution: If using a liquid fertilizer, dilute it to half the recommended strength to avoid over-fertilization, which can harm the plant.
- Application: Apply the fertilizer evenly around the base of the plant, avoiding direct contact with the leaves or bulbs. If using granules, gently work them into the top layer of soil.
- Watering: After application, water the plant thoroughly to help dissolve the fertilizer and promote absorption.
- Frequency: Fertilize every 4-6 weeks during the growing season. Reduce or cease fertilization in the fall when the plant enters dormancy.
- Observation: Monitor the plant's growth and health. If you notice leaf burn or stunted growth, reconsider your fertilization schedule or concentration.
By following these guidelines, you will help ensure healthy growth and flowering of your Ornithogalum oligophyllum.
Ornithogalum oligophyllum thrives in well-draining soil that mimics its native growing conditions. A suitable soil mix would typically consist of the following components:
- Texture: A loamy or sandy texture is preferable, as this allows for adequate drainage while still retaining some moisture.
- Drainage: Ensure the soil has excellent drainage capabilities. To achieve this, you can incorporate materials such as perlite, coarse sand, or gravel. This helps to prevent waterlogging, which can be detrimental to the plant.
- pH Level: A slightly acidic to neutral pH level, ideally between 6.0 and 7.0, is recommended. Testing the soil pH can help you adjust it if necessary, using amendments such as lime to raise pH or sulfur to lower it.
- Organic Matter: Incorporating organic matter such as well-rotted compost or leaf mold can enhance the soil structure and provide some nutrients while maintaining moisture without causing excessive retention.
- Fertility: While these plants do not require overly rich soil, a balanced, slow-release fertilizer or a low-nitrogen fertilizer can be applied occasionally during the growing season to support their growth.
When potting, ensure that the container has drainage holes to prevent water from accumulating at the bottom. Overall, the aim is to create a growing medium that is well-draining yet retains some moisture to support healthy root development.
Ornithogalum oligophyllum can be propagated through several methods, primarily by seed or division of bulbs. Here’s a detailed guide on both methods:
Propagation by Seed
- Seed Collection:
- After flowering, allow the seed pods to mature fully on the plant. This typically occurs after the flowers have dried and the pods have turned brown.
- Once mature, collect the seeds carefully to avoid damaging them.
- After flowering, allow the seed pods to mature fully on the plant. This typically occurs after the flowers have dried and the pods have turned brown.
- Preparing the Seeds:
- Clean the seeds of any debris or plant material and allow them to dry for a short period to prevent mold.
- Clean the seeds of any debris or plant material and allow them to dry for a short period to prevent mold.
- Sowing:
- Use a well-draining potting mix. A combination of potting soil, sand, and perlite works well.
- Sow the seeds on the surface of the soil, as they require light for germination. Lightly press them into the soil but do not bury them deeply.
- Water the soil gently to moisten it without displacing the seeds.
- Use a well-draining potting mix. A combination of potting soil, sand, and perlite works well.
- Conditions for Germination:
- Place the container in a warm location with indirect sunlight. Ideal temperatures for germination are between 20-25°C (68-77°F).
- Keep the soil consistently moist, but not soggy.
- Place the container in a warm location with indirect sunlight. Ideal temperatures for germination are between 20-25°C (68-77°F).
- Transplanting Seedlings:
- Once seedlings have developed several true leaves and are strong enough to handle, they can be transplanted into separate pots or into the garden.
Propagation by Bulb Division
- Once seedlings have developed several true leaves and are strong enough to handle, they can be transplanted into separate pots or into the garden.
- Timing:
- The best time to divide bulbs is during their dormancy, typically in late summer to early fall after the foliage has died back.
- The best time to divide bulbs is during their dormancy, typically in late summer to early fall after the foliage has died back.
- Preparing for Division:
- Carefully dig up the clumps of bulbs, taking care not to damage them. Use a spade or garden fork, and lift the soil gently.
- Carefully dig up the clumps of bulbs, taking care not to damage them. Use a spade or garden fork, and lift the soil gently.
- Dividing the Bulbs:
- Separate the bulbs from one another. Each bulb should have some roots and a healthy shoot. Discard any damaged or diseased bulbs.
- Separate the bulbs from one another. Each bulb should have some roots and a healthy shoot. Discard any damaged or diseased bulbs.
- Planting Divided Bulbs:
- Replant the divided bulbs immediately. Choose a site with well-drained soil and sunlight.
- Plant bulbs at a depth of about 2-3 times their height and space them adequately to allow for growth.
- Replant the divided bulbs immediately. Choose a site with well-drained soil and sunlight.
- Aftercare:
- Water the newly planted bulbs thoroughly to help them settle, and keep the soil moist but not waterlogged.
- Fertilizing with a balanced, slow-release fertilizer can promote healthy growth.
Additional Tips
- Water the newly planted bulbs thoroughly to help them settle, and keep the soil moist but not waterlogged.
- Pest and Disease Management: Keep an eye out for pests and signs of disease. Good airflow and healthy soil can minimize these issues.
- Environmental Conditions: This species prefers well-drained soils and thrives in full sun to partial shade.
- Patience: Whether propagating by seed or bulb division, it may take time for new plants to establish and bloom.
By following these methods, you can successfully propagate this plant and enjoy its unique beauty in your garden or home.


