Plant Overview
Often mistaken for its prickly cousin, the English Holly, the Osmanthus heterophyllus is a true master of botanical mimicry. Known commonly as "False Holly" or "Holly Tea Olive," this Japanese native offers a delightful sensory surprise: the architectural, protective foliage of a holly combined with a heavenly, apricot-like fragrance. It is a favorite for gardeners who want a "living wall" that provides security during the day and a sweet, perfumed breeze at night.
🔍 How to Identify
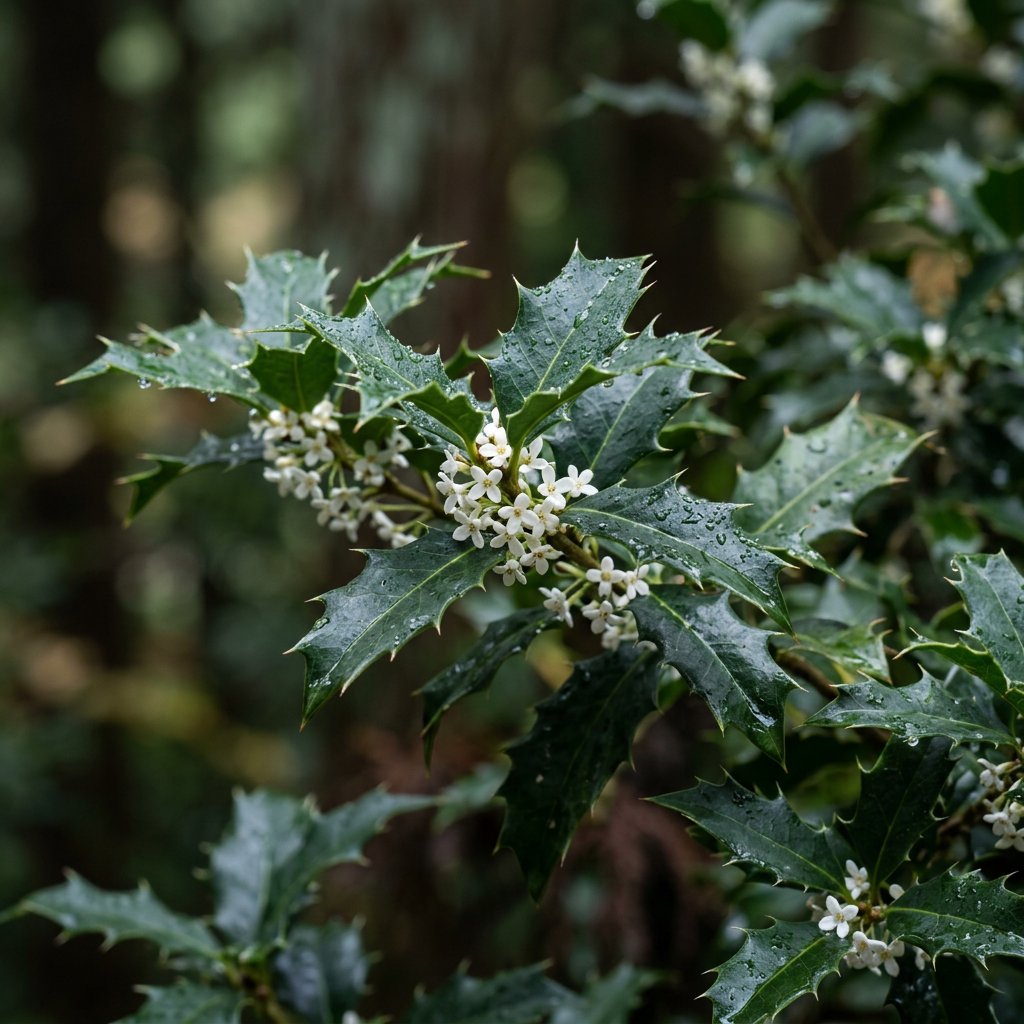
- 🍃 Chameleon Foliage: The most striking feature is "heterophylly"—having different leaves. Lower, younger leaves are armed with sharp, holly-like spines to deter animals, while older leaves higher up are often smooth and oval.
- 🌸 Secretive Blooms: In late autumn, tiny, four-lobed white flowers hide tucked away in the leaf axils. While they are visually modest, their scent is powerful and distinct.
- 🌑 Dark Stems: The plant features smooth, grey-brown bark that becomes slightly fissured as it ages, providing a dark backdrop that makes the glossy green leaves pop.
🏡 In Your Garden
- 🛡️ Natural Security: Because of its dense growth habit and prickly lower leaves, it serves as an excellent "impenetrable" hedge. It is far more shade-tolerant than many other screening plants, making it perfect for those tricky corners of the yard.
- 🌬️ Seasonal Timing: While most of the garden goes to sleep in October and November, the False Holly wakes up. Planting it near a window or a patio allows you to enjoy its intense, peach-like fragrance during the cooler months.
- ✂️ Pruning Patience: It is a slow-grower, which means it keeps its shape for a long time without constant maintenance. However, because it blooms on old wood, heavy pruning should be done right after the autumn flowering to avoid cutting off next year's buds.
⚠️ Safety & Toxicity
- ✅ Safe for Pets: Osmanthus heterophyllus is generally considered non-toxic to dogs, cats, and horses.
- 🌵 Physical Caution: While not chemically toxic, the "teeth" on the leaves are very sharp. Wear thick gloves when pruning, and avoid planting it directly next to narrow paths where the spines might snag clothing or skin.
✨ Fun Fact
- 📚 The species name heterophyllus literally translates from Greek as "different leaves." This is an evolutionary defense mechanism; the plant only spends energy growing expensive, sharp spines on the parts of the shrub that are within reach of grazing animals!

Detailed Care Instructions
| Humidity | Normal |
| Lighting | Full Sun |
| Difficulty | Medium |
| Hibernation | Cold Period |
| Hardiness Zones | 6 - 9 |
To grow an Osmanthus heterophyllus plant, follow these steps:
- Choose a suitable location: Osmanthus plants thrive in partial shade to full sun, so select a spot in your garden that receives a few hours of direct sunlight each day. Ensure that the soil is well-drained.
- Prepare the soil: Osmanthus plants prefer slightly acidic soil with a pH level between 5.5 and 7.0. Amend the soil by adding organic matter like compost or well-rotted manure to improve its fertility and drainage.
- Select the plant: Purchase a healthy Osmanthus heterophyllus plant from a nursery or garden center. Look for a well-branched plant with vibrant foliage.
- Dig a hole: Dig a hole that is slightly larger than the root ball of the plant. The depth should be such that the plant can be planted at the same level as it was in the pot.
- Plant the Osmanthus: Place the plant in the hole, making sure that it is centered. Backfill the hole with the amended soil, ensuring that there are no air pockets around the roots. Gently firm the soil around the plant.
- Water the plant: Give the newly planted Osmanthus a thorough watering to settle the soil and hydrate the roots. Water regularly, especially during dry spells, to keep the soil consistently moist but not waterlogged.
- Mulch: Apply a layer of organic mulch around the base of the plant, such as wood chips or bark. Mulching helps retain moisture, suppress weeds, and regulate soil temperature.
- Pruning: Prune the Osmanthus plant immediately after flowering to maintain its desired shape and remove any dead, damaged, or crossing branches. Make clean cuts using sharp pruning shears.
- Fertilizing: Feed the Osmanthus with a slow-release, balanced fertilizer in early spring. Follow the manufacturer's instructions for application rates.
- Regular care: Continue to monitor the plant for pests, such as scale insects or aphids, and address any issues promptly. Water the plant regularly during dry periods and provide additional water during hot weather.
With proper care, your Osmanthus heterophyllus plant should grow well and reward you with its fragrant blooms and attractive foliage.

Place in a bright room that is sun drenched almost all day. Or directly in a south-facing window.

1. Determine the water requirements of the plant: Before watering the plant, it's important to know how much water it needs. Osmanthus Heterophyllus plant prefers well-draining soil that is kept consistently moist but not waterlogged.
2. Check the soil moisture: Before watering the plant, check the soil moisture level by sticking your finger about an inch into the soil. If it feels dry, it's time to water. If it's still moist, wait for a few more days before watering.
3. Water the plant thoroughly: When watering the plant, give it enough water to soak the soil completely. Water until you see the water coming out of the drainage holes.
4. Don't let the plant sit in standing water: After watering the plant, make sure to empty the saucer or drainage tray underneath it to prevent the plant from sitting in standing water. This can cause root rot which can be fatal for the plant.
5. Water the plant according to the season: During the growing season, water the plant more frequently, about once a week. During the dormant season, reduce the watering frequency to once every two weeks or so.
6. Use the right watering method: Depending on the size of the plant and the container it's in, you can water it using a watering can, a hose with a gentle stream, or a drip irrigation system. Avoid using a spray bottle as it won't provide enough water to soak the soil thoroughly.
7. Monitor the plant for signs of overwatering or underwatering: Overwatering or underwatering can cause the leaves of the plant to turn yellow and eventually fall off. Monitor the plant regularly to ensure it's getting the right amount of water.
To fertilize this plant, you will need to use a balanced fertilizer that contains equal amounts of nitrogen, phosphorus, and potassium. Ideally, the fertilizer should have a slow-release formula to ensure that the plant is fed over a longer period of time.
Apply the fertilizer during the plant's growing season, which is usually in the spring and summer. Be sure to follow the manufacturer's instructions on how much to use and how often to apply it.
Spread the fertilizer evenly around the base of the plant and water it thoroughly afterward. Avoid getting the fertilizer on the leaves or stems as this could burn them.
Finally, keep an eye on the plant for any signs of over-fertilization, such as yellowing or browning leaves. If you notice these symptoms, reduce the amount of fertilizer you are using.
When planting Osmanthus Heterophyllus, it is important to choose the right soil type to ensure healthy growth. It prefers well-draining, slightly acidic soil that is rich in organic matter. The ideal pH range for this plant is between 5.5 and 6.5. You may need to amend your soil with organic matter, such as compost or peat moss, to achieve the right pH and nutrients. It is also important to ensure that the soil doesn't become too compacted or saturated, as this can lead to root rot and other issues. Adding sand or perlite to the soil can help improve drainage.
To propagate this plant, start by selecting an established healthy plant. Then, choose a stem from the plant that is new growth and has at least two nodes. Cut the stem below the node using a sharp, sterilized knife or a pair of scissors. Make sure to remove any leaves from the stem that will be below the soil when planted.
Next, prepare a pot or container by filling it with well-draining soil. Moisten the soil until it is damp but not soaked. Then, create a hole in the soil with your finger or a pencil and insert the stem cutting, making sure the bottom node is covered with soil.
After planting the cutting, place it in a location with bright, indirect light and at a temperature of approximately 70°F (21°C). Keep the soil consistently moist, but not waterlogged, by watering the plant when the top inch of soil feels dry.
After a few weeks, roots should start to grow from the bottom node of the stem cutting. Once the roots have developed and are visible through the drainage holes in the bottom of the pot, the new plant can be transplanted to a larger pot or directly into the ground.
Common pests of the chinese-holly include Scale insect, spider mites. Make a habit of checking your chinese-holly frequently for pests so that any infestations can be caught and managed early.


