Plant Overview
Known as "Oca" or the "New Zealand Yam," this vibrant Andean treasure was once a staple crop of the Inca Empire. It produces edible tubers that look like colorful gems buried in the soil, ranging from sunset orange to deep violet. It is a hardy, low-maintenance alternative to the potato, offering a refreshing, lemony crunch that adds a gourmet touch to any home garden.
🔍 How to Identify
- 🍀 The Foliage: Features distinctive trifoliate (three-lobed) leaves that look remarkably like large wood sorrel or common clover, often with a succulent, fleshy texture.
- 🌞 The Flowers: Produces small, cheerful yellow trumpet-shaped flowers that bloom on thin, upright stalks during the mid-summer months.
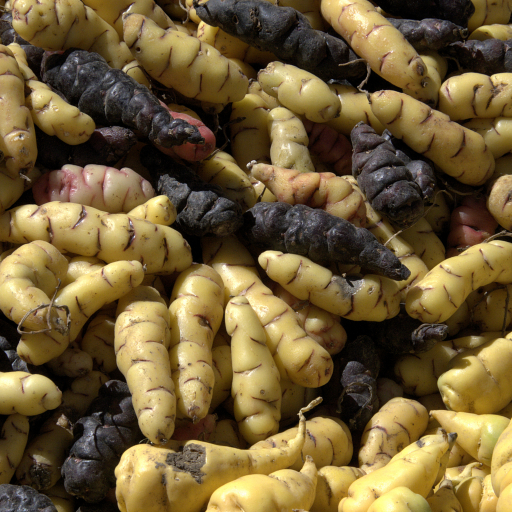
- 🌈 The Tubers: The most striking feature is found underground—knobby, waxy-skinned tubers with deep "eyes" that come in brilliant shades of pink, gold, red, or white.
🏡 In Your Garden
- 🍂 The Autumn Wait: Oca is a "short-day" plant, meaning it only begins to swell its tubers when the daylight hours decrease in late autumn. It is crucial to keep the plant in the ground until the first frost blackens the leaves to ensure a good harvest.
- ⛰️ Soil & Hilling: It thrives in loose, well-drained soil rich in organic matter. Much like potatoes, "hilling"—or drawing soil up around the base of the succulent stems as they grow—provides more space for tubers to develop and increases your yield significantly.
⚠️ Safety & Toxicity
- 🍋 The Sour Factor: Oca contains oxalic acid (the same compound found in spinach and rhubarb), which gives the raw tubers a tangy, lemon-like zing.
- 🦴 Health Note: While safe and nutritious for most people, those with a history of kidney stones or gout should consume Oca in moderation due to the oxalate content.
- 🐾 Pet Safety: While not strictly "poisonous," the high oxalic acid can cause stomach upset or drooling in curious cats and dogs if they munch on the foliage or tubers excessively.
✨ Fun Fact
In the high Andes, traditional farmers "sun" their Oca after harvest. By leaving the tubers in the direct sunlight for several days, the organic acids break down and convert into sugars, transforming the flavor from tart and lemony to remarkably sweet!

Detailed Care Instructions
To grow Oxalis Tuberosa (also known as oca), follow these steps:
- Choose a planting site: Oca prefers a sunny spot with well-draining soil. If your soil is heavy or clay-like, amend it with organic matter like compost or well-rotted manure to improve drainage.
- Prepare the soil: Remove any weeds or rocks from the planting area. Loosen the soil using a garden fork or tiller, ensuring it is a loose and slightly crumbly texture.
- Sow the tubers: Oca is typically propagated from tubers. Plant them about 1-2 inches (2.5-5 cm) deep and around 4-6 inches (10-15 cm) apart. Space rows about 18-24 inches (45-60 cm) apart.
- Watering: Oca needs regular watering, especially during dry periods. Keep the soil consistently moist, but not waterlogged. A layer of mulch can help retain moisture.
- Fertilizer: Oca generally does not require heavy fertilization. However, you can incorporate a balanced slow-release fertilizer into the soil during planting or apply a liquid fertilizer once the plants are established.
- Weed control: Mulching around the plants can help suppress weeds. Regularly check for any competing weeds and remove them by hand to avoid competition for nutrients and space.
- Pest and disease management: Oca is relatively resistant to pests and diseases. Monitor for any signs of infestation, such as aphids or slugs, and take appropriate action if necessary.
- Harvesting: Oca tubers are usually ready to harvest about 120-150 days after planting, once the foliage starts to yellow and die back. Carefully dig up the tubers using a garden fork or trowel to avoid damaging them. Cure them in a cool, dark, and well-ventilated area for about 1-2 weeks before consuming or storing.
Remember that Oca is generally grown as a perennial in subtropical or mild climates, but it can also be grown as an annual in colder regions.

Place in a bright room that is sun drenched almost all day. Or directly in a south-facing window.

To water this plant, it is important to ensure that the soil is moist but not waterlogged. Ensure that the soil has good drainage and that excess water can drain easily. Water the plant when the top 1-2 inches of soil feels dry to the touch. When watering, apply water at the base of the plant, taking care not to wet the leaves or stem. Avoid getting water on any bulbs or tubers that may be resting on top of the soil. Allow excess water to drain away and do not allow the plant to sit in standing water. During winter months, reduce watering frequency as the plant goes into dormancy.
To fertilize the Oxalis Tuberosa plant, follow these instructions:
- Choose a balanced, water-soluble fertilizer with equal amounts of nitrogen (N), phosphorus (P), and potassium (K). The N-P-K ratio will be written on the packaging.
- Dilute the fertilizer according to the package instructions. Typically, you will dissolve 1 tablespoon of fertilizer in 1 gallon of water.
- Water the plant thoroughly before applying fertilizer to ensure the soil is moist.
- Pour the diluted fertilizer solution around the base of the plant, avoiding direct contact with the leaves.
- Avoid over-fertilizing, as it can harm the plant. Generally, fertilize Oxalis Tuberosa about once every 2-4 weeks during active growth periods, such as spring and summer.
- Monitor the plant's response to the fertilizer. If you notice signs of fertilizer burn, like leaf discoloration or wilting, reduce the frequency or concentration of fertilizer applied.
- Regularly water the plant after fertilization to help distribute the nutrients evenly in the soil.
- Consider using organic fertilizers or slow-release granular fertilizers for a more natural and long-lasting nutrient supply.
- Keep track of the fertilization schedule and adjust it based on the plant's growth and health.
For optimal growth and health of this particular plant, it is recommended to use well-draining soil containing a mix of organic matter and sand. The pH level of the soil should be slightly acidic, around 6.0 to 6.5. It is also important to avoid compacted or heavy soils, as these can inhibit root development and lead to poor growth. Additionally, providing proper drainage is crucial to prevent waterlogging and potential rotting of the plant's tubers.
The process of propagating Oxalis Tuberosa involves the following steps:
- Plant Selection: Choose a healthy and mature plant with well-developed tubers. Ensure that it is disease-free and free from any visible damage.
- Harvesting the Tubers: Carefully dig up the tubers from the soil using a small garden fork or hand trowel. Gently remove the soil around the tubers and separate them from the plant.
- Tubers Division: Separate the tubers into smaller sections, ensuring that each division has at least one shoot bud or an "eye." Snip off any damaged or unhealthy parts using clean shears or a sharp knife.
- Drying: Lay the tubers in a shaded, dry location for a few days to allow them to dry out and form a callus on the cut surfaces. This reduces the risk of rot when planted.
- Soil Preparation: Prepare a well-draining potting mix by combining equal parts of peat moss, perlite, and compost. Fill small pots or seedling trays with this mixture.
- Planting: Place the tuber divisions on the surface of the potting mix, ensuring that the cut sides are facing upward. Gently press them into the soil, leaving the tops of the tubers exposed.
- Watering: Moisten the potting mix thoroughly with a watering can or spray bottle. Avoid over-watering as excess moisture can cause rotting.
- Location and Temperature: Place the pots or seedling trays in a warm location with indirect sunlight. Oxalis Tuberosa prefers temperatures between 60-70 degrees Fahrenheit (15-21 degrees Celsius).
- Care: Keep the soil consistently moist but not waterlogged. Mist the plants occasionally to maintain humidity levels. In about 2-4 weeks, you should start to see new shoots emerging from the tubers.
- Transplanting: Once the new shoots are around 4-6 inches (10-15 cm) tall, you can transplant the Oxalis Tuberosa into larger pots or directly into your garden. Ensure they are planted in well-draining soil and spaced adequately apart.
- Maintenance: Provide regular watering, preferably in the morning, and ensure the plants receive partial sunlight. Fertilize them every month during the growing season with a balanced, water-soluble fertilizer.
By following these steps, you can successfully propagate Oxalis Tuberosa and cultivate new plants from its tubers.
Common pests of the new zealand-yam include Aphids, thrips, whiteflies, larvae, snails. Make a habit of checking your new zealand-yam frequently for pests so that any infestations can be caught and managed early.


