Plant Overview
Often called the "Cheese Vine" or "Stinkvine," Paederia lanuginosa is a striking climber famous for its dual-colored leaves and "stinky" reputation. While it is a prized culinary herb in Vietnamese cuisine, many hobbyists grow it purely for its velvety, deep purple-and-green foliage that adds a moody, tropical vibe to any trellis or indoor space.
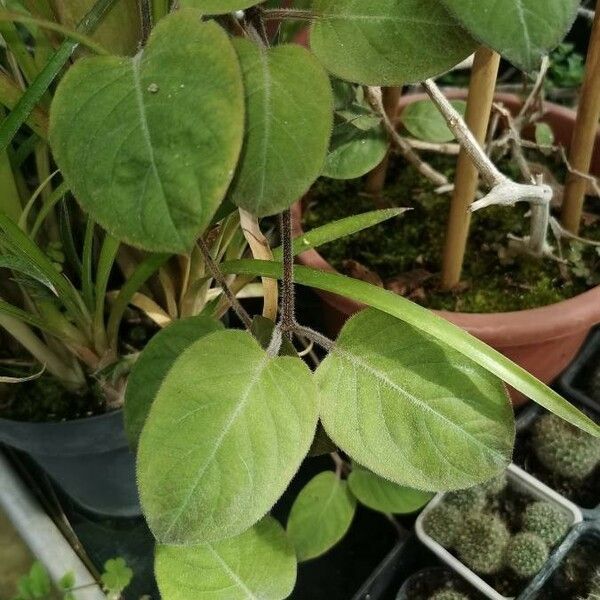
🔍 How to Identify
- 🍃 Two-Tone Leaves: The most striking feature is the color contrast; the top of the leaf is a rich, velvety green, while the underside is a dramatic, deep burgundy or royal purple.
- ☁️ Fuzzy Texture: True to its name (lanuginosa means "woolly"), the stems and leaves are covered in fine, soft hairs that feel like suede to the touch.
- 🌀 Twining Habit: This is a vigorous climber that doesn't use tendrils; instead, the entire stem wraps tightly around stakes, strings, or neighboring plants to pull itself upward.
🏡 In Your Garden
- 🧗 Give it a Lift: Because it is a fast-moving vine, it needs a dedicated support system. In a pot, a small bamboo hoop or trellis is essential to prevent it from tangling with other houseplants.
- ☀️ Light for Color: To maintain the vibrant purple undersides, provide bright, indirect light. If the plant is kept in a spot that is too dark, the purple will fade to a dull, muddy green, and the stems will become "leggy."
⚠️ Safety & Toxicity
- ✅ Status: Generally Non-Toxic and Edible.
- 🍽️ Culinary Use: This plant is actually a staple in Southeast Asian cooking (known as Lá Mơ Lông), often paired with protein-heavy dishes to aid digestion.
- 🐾 Pets: It is considered safe for cats and dogs. In fact, the sulfurous smell of the leaves usually acts as a natural deterrent, keeping curious pets from chewing on it.
✨ Fun Fact
🧀 The "Stink" Secret: When the leaves are crushed or bruised, they release a strong aroma of sulfur or ripened cheese. This is caused by dimethyl disulfide, the same compound found in some cheeses and "stinkvines," but don't worry—the plant only releases the scent if the leaves are damaged!

Detailed Care Instructions
To grow Paederia lanuginosa plant, you can follow these steps:
- Obtain seeds or cuttings: You can either purchase seeds or obtain cuttings from an existing plant. Cuttings should ideally be taken in spring or early summer when the plant is actively growing.
- Choose a suitable location: Paederia lanuginosa prefers partial shade or filtered sunlight. It can tolerate a range of soil types, but well-draining soil is important. Choose a location that meets these requirements.
- Prepare the soil: If the soil is compacted or poor in quality, it's a good idea to amend it with organic matter like compost or well-rotted manure to improve drainage and fertility.
- Sow seeds or plant cuttings: If you have seeds, sow them directly into the soil at a depth of around 1/4 inch (0.6 cm). If using cuttings, plant them at a similar depth.
- Watering: Keep the soil consistently moist but not waterlogged, especially during the establishment phase. Once the plant is established, it will be more tolerant of dry conditions, especially if you mulch around it to retain moisture.
- Fertilization: Paederia lanuginosa doesn't have specific fertilizer requirements. However, you can apply a balanced, slow-release fertilizer in spring to promote healthy growth.
- Pruning: As the plant grows, you may want to shape it or control its size. Prune back any dead or damaged branches as needed. Pruning can also encourage bushier growth.
- Pests and diseases: Monitor the plant for any signs of pests like aphids or diseases like powdery mildew. If detected, take appropriate measures to control them. Regularly inspecting the plant will help identify and address any issues promptly.
- Propagation: Once your Paederia lanuginosa is established, you can propagate additional plants by taking stem cuttings in spring or early summer. Follow the same steps as mentioned in point 2 for rooting the cuttings.
Remember that different environmental conditions may influence the success of growing Paederia lanuginosa, so it may require some experimentation and adjustments to optimize growth.

Place in a bright room that is sun drenched almost all day. Or directly in a south-facing window.

To water this plant, you should first check the moisture level of the soil by sticking your finger an inch deep into the soil. If it feels dry, it is time to water the plant. Use a watering can or a hose with a gentle spray nozzle to water the base of the plant until the soil is evenly moist. Be careful not to overwater the plant, as this can lead to root rot. It is best to allow the soil to partially dry out before watering again. Watering frequency will depend on factors such as the size of the pot, the temperature and humidity of the environment, and the amount of light the plant receives. It is recommended to water less frequently in winter when the plant experiences a dormant period.
Fertilizing instructions for Paederia Lanuginosa plant:
- Choose a balanced, water-soluble fertilizer suitable for indoor plants.
- Dilute the fertilizer according to the instructions on the packaging.
- Apply the diluted fertilizer to the soil around the base of the plant, avoiding direct contact with the leaves.
- Water the plant immediately after fertilizing to ensure proper absorption of nutrients.
- Repeat the fertilization process every four to six weeks during the growing season (spring and summer).
- During the dormant period (fall and winter), reduce the frequency of fertilizing to once every two to three months.
- Monitor the plant's response to fertilization, watching for signs of overfertilization, such as yellowing or wilting leaves. Adjust the fertilizer application accordingly.
- Regularly flush the soil with plain water to remove any excess minerals and prevent salt buildup.
Note: These instructions are generalized and may vary based on the specific needs of your Paederia Lanuginosa plant. It is always best to refer to the label instructions provided with your chosen fertilizer and take into account the plant's individual requirements for optimal care.
Paederia Lanuginosa plants require well-draining, nutrient-rich soil that is slightly acidic. A mixture of peat moss, perlite, and sand is recommended to create a well-draining soil that will not become waterlogged. Because this plant prefers a slightly acidic soil, it may be necessary to adjust the pH level of the soil to promote optimal plant growth. Fertilizing the soil with a balanced fertilizer that contains equal amounts of nitrogen, phosphorus, and potassium will help to provide the plant with the necessary nutrients for healthy growth. The soil should be kept moist, but not too wet, as excess water can lead to root rot and other plant health issues.
Without mentioning the common names of the plant, here's a detailed guide on propagating Paederia Lanuginosa:
- Select a Healthy Parent Plant: Choose a mature and healthy parent plant to obtain cuttings from. Look for plants that have vibrant leaves and show no signs of disease or pests.
- Gather Propagation Tools: Get the necessary tools for propagating, including a clean and sharp pair of pruning shears or scissors, a clean container with drainage holes, well-draining potting soil, and a clear plastic bag or a propagator.
- Prepare the Parent Plant: Before taking cuttings, water the parent plant thoroughly a day or two in advance. This will ensure it is well-hydrated and promotes successful rooting.
- Take Cuttings: Locate a non-flowering stem on the parent plant and select a healthy section to cut. Using the pruning shears or scissors, make a diagonal cut right above a leaf node, ensuring the cutting is at least 4-6 inches long. Remove any lower leaves, leaving only a few leaves at the top.
- Treat the Cuttings: Dip the cut end of the cutting into rooting hormone powder or gel to enhance root development. Be sure to follow the instructions on the rooting hormone packaging.
- Plant the Cuttings: Prepare a container with well-draining potting soil. Make a small hole in the soil using a pencil or your finger, then gently insert the treated end of the cutting into the hole. Firmly press the soil around the cutting to secure it.
- Provide Ideal Growing Conditions: Place the container in a warm and bright location, away from direct sunlight. Ensure the temperature remains consistently between 68-77°F (20-25°C). Keep the soil consistently moist but not overly saturated.
- Create a Humid Environment: Cover the container with a clear plastic bag or use a propagator to create a mini greenhouse effect. This will help retain moisture and create a humid environment conducive to rooting.
- Monitor and Care for Cuttings: Regularly check the soil moisture level and mist the cuttings with water if it appears dry. Avoid overwatering, as it can lead to rot. Keep the plastic covering on for a few weeks, removing it occasionally to prevent the growth of mold or fungus.
- Root Development: After a few weeks, gently tug on the cuttings to check for resistance, indicating root development. If there is resistance, it means the cuttings have begun to root.
- Transplanting: Once the cuttings have developed a strong root system, and after several weeks, they can be transplanted into individual pots. Use a well-draining potting mix and ensure the pot has drainage holes.
- Acclimatize and Care for New Plants: Gradually expose the new plants to more sunlight over a period of a week or two, allowing them to adapt to the increased light intensity. Water the plants regularly, allowing the soil to dry out slightly between each watering.
By following these steps, you can propagate Paederia Lanuginosa and grow new plants from cuttings without needing to refer to its common names.
Common pests of the paederia lanuginosa include Spider mites, aphids. Make a habit of checking your paederia lanuginosa frequently for pests so that any infestations can be caught and managed early.


