Plant Overview
Known widely as the Zonal Geranium, this vibrant favorite is the undisputed king of the window box and the summer porch. While they are colloquially called "Geraniums," they are actually hybrids of the Pelargonium genus, brought to Europe from South Africa in the 1700s. They are beloved for their near-constant blooming and their ability to thrive in the heat where other flowers might wilt.
🔍 How to Identify
- 🍃 Leaf Pattern: The "Zonal" name comes from the distinct, dark horseshoe-shaped band of pigment that circles the center of each velvety, scalloped leaf.
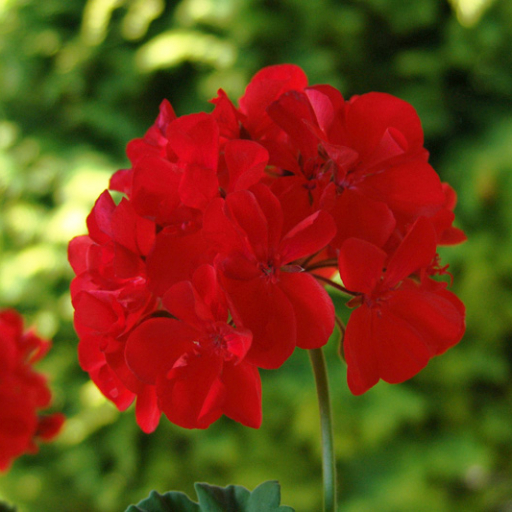
- 🌸 Flower Clusters: They produce large, spherical flower heads (umbels) perched on long, sturdy stalks, featuring a spectrum of colors from brilliant scarlet and salmon to pure white.
- 🪴 Stems and Texture: The stems are thick, semi-succulent, and covered in fine hairs, giving the entire plant a slightly fuzzy texture and a characteristic spicy, earthy scent when touched.
🏡 In Your Garden
- ☀️ Solar Powered: These plants are sun-worshippers. If your Geranium is growing "leggy" with few flowers, it is likely protesting a lack of light; they need at least six hours of direct sun to maintain their bushy shape.
- 💧 Drought Tolerance: Because of their thick stems, they store water remarkably well. They prefer to dry out almost completely between waterings, making them the perfect choice for forgetful gardeners or hot, breezy balconies.
- ✂️ Deadheading Nuance: To keep the plant's energy focused on new blooms, you should "deadhead" faded flowers. Don't just pull the petals—snap the entire flower stalk off at the base where it meets the main stem.
⚠️ Safety & Toxicity
- 🐾 Mildly Toxic: Pelargonium species contain the essential oils geraniol and linalool, which are toxic to dogs, cats, and horses.
- 🤢 Symptoms: If ingested by pets, it can cause vomiting, lethargy, or skin irritation. While humans are generally safe, the oils can cause a mild rash (dermatitis) in people with sensitive skin during heavy pruning.
✨ Fun Fact
Thomas Jefferson was one of the first American fans of this plant! He fell in love with them while serving as a diplomat in France and famously grew them in the White House during his presidency, helping to cement their status as a classic American garden staple.

Detailed Care Instructions
| Humidity | High |
| Lighting | Part Sun |
| Difficulty | Medium |
| Temperature | 18°C - 28°C |
| Hardiness Zones | 10 - 12 |
To grow Pelargonium x hortorum, also known as geraniums, you can follow these steps:
- Choose a suitable location: Find a spot that receives at least 6 hours of direct sunlight per day. Geraniums thrive in full sun but can tolerate some partial shade.
- Prepare the soil: Ensure the soil is well-draining by amending it with organic matter such as compost or aged manure. This will help improve the soil's fertility and drainage.
- Plant the geraniums: Dig a hole slightly larger than the root ball of your geranium plant. Place the plant in the hole and backfill with soil, gently firming it around the roots. Space the plants about 12-18 inches apart, as geraniums tend to spread vigorously.
- Watering: Geraniums prefer moderate watering. Water the plants thoroughly, allowing the soil to dry slightly between waterings. Avoid overwatering, as it can lead to root rot.
- Fertilizing: Use a balanced, slow-release fertilizer or a liquid fertilizer specifically formulated for flowering plants. Follow the manufacturer's instructions for dosage and application. Apply fertilizers every four to six weeks during the growing season.
- Pruning: Regularly remove spent flowers and yellowing leaves to encourage continuous blooming and maintain an attractive appearance. You can also lightly prune the plant to shape it if desired.
- Protect from frost: Geraniums are sensitive to frost, so ensure you protect them during colder months. Move container-grown geraniums indoors, or cover outdoor plants with a frost cloth or bring them indoors during freezing temperatures.
- Pests and diseases: Geraniums can be susceptible to pests such as aphids, caterpillars, and spider mites. Monitor your plants regularly and treat any infestations promptly with appropriate organic or chemical controls. Additionally, ensure good air circulation around the plants to minimize the risk of fungal diseases such as powdery mildew.
By following these steps and providing proper care, your Pelargonium x hortorum plants should grow and thrive, producing beautiful blooms throughout the growing season.

Place in a window with dappled sun or a spot in the middle of a room. Or directly in a window facing west or east.

Pelargonium X hortorum is a plant that requires regular watering to maintain its health and growth. The most important thing to remember when watering this plant is that you should not overwater it. Overwatering can lead to the development of root rot, which can be fatal. Therefore, it is important to ensure that the soil dries out before the next watering.
The best way to water Pelargonium X hortorum is to use a watering can or hose with a gentle stream. It is important to water the soil directly, avoiding the leaves and flowers. This will help prevent the development of fungal diseases and keep the foliage dry.
You should water the plant about once a week, or more frequently if the soil appears dry. It is important to ensure that the soil is evenly moist and that water is not pooling on the soil surface. If the soil is poorly drained, you may need to water the plant less frequently or improve soil drainage.
Another important consideration when watering Pelargonium X hortorum is to use tepid water. Cold water can shock the roots, causing stress to the plant. It is also important to use water that is free of salts and other minerals, which can build up in the soil and cause problems over time.
In summary, to water Pelargonium X hortorum, you should:
- Water the soil directly, avoiding the leaves and flowers
- Water once a week or more frequently if the soil appears dry
- Ensure that the soil is evenly moist and that water is not pooling on the soil surface
- Use tepid water that is free of salts and other minerals
To fertilize the Pelargonium X Hortorum plant, follow these instructions:
- Use a balanced fertilizer: Look for a fertilizer that contains equal amounts of nitrogen (N), phosphorus (P), and potassium (K). This balanced formula will promote overall plant health and balanced growth.
- Dilute the fertilizer: Mix the fertilizer with water according to the instructions on the product packaging. It is crucial to follow the recommended dilution ratio to prevent overfeeding or damaging the plant.
- Apply the fertilizer: Pour the diluted fertilizer mixture onto the soil around the base of the plant, ensuring that it reaches the root zone. Avoid pouring the fertilizer directly on the leaves or flowers, as this can cause burns or discoloration.
- Timing: Fertilize the Pelargonium X Hortorum plant during its growing season for best results. Spring and summer are typically the active growth periods, so apply the fertilizer every two to four weeks during this time.
- Water after fertilizing: After applying the fertilizer, water the plant thoroughly to help distribute the nutrients and prevent any potential root burn. Ensure that excess water drains properly to avoid waterlogging the plant.
- Monitor the plant's response: Keep an eye on the plant's growth and appearance. If you notice any signs of overfertilization, such as burned or yellowing leaves, reduce the frequency or concentration of the fertilizer.
Remember, it's important to read the specific instructions provided on the fertilizer packaging as different brands or products might have slight variations in application methods or dosages.
The best soil to use with the plant in question is a well-draining, slightly acidic soil mix that contains organic matter such as peat moss, perlite, or vermiculite. The soil should have a pH range of 5.5-6.5, as the plant prefers slightly acidic conditions. Avoid using heavy, clay soils, as they tend to retain water and can lead to root rot. A soil mix with good aeration and drainage is important to prevent waterlogged conditions, which can also lead to root rot. The plant prefers to be in a soil that is consistently moist but not waterlogged. Adding some slow-release fertilizers or a balanced liquid fertilizer can also help provide nutrients to the plant to aid in its growth and flowering.
To propagate this plant, you will need to take stem cuttings. First, choose a healthy parent plant and select a stem that is approximately 4 inches long. Make a clean cut at a 45-degree angle just below a node using a sharp, sterile knife or scissors. Remove the leaves from the bottom half of the stem, leaving a few at the top.
Next, dip the cut end of the stem into rooting hormone powder, then gently shake off any excess. Plant the stem in a well-draining potting mix, burying the bottom half of the stem. Water the soil thoroughly and cover the cutting with a clear plastic bag, creating a mini greenhouse.
Place the pot in a warm and bright location, but out of direct sunlight. Check the soil moisture frequently, and mist the cutting occasionally to prevent it from drying out. After a few weeks, root development should begin to appear. Once roots have formed and the cutting has started to grow new leaves, it can be transplanted into a separate pot with regular potting soil. Continue caring for the new plant as you would for a mature plant, and it should thrive!
Common pests of the zonal geranium include Spider mites, fungus gnats, aphids, whiteflies. Make a habit of checking your zonal geranium frequently for pests so that any infestations can be caught and managed early.


