Plant Overview
Often called the Hoary Mock Orange, this elegant Chinese native is a late-bloomer that fills the early summer air with a sweet, citrus-like perfume. While other spring shrubs are already fading, this "gray-haired" beauty steps into the spotlight with its snow-white blossoms. It earned its common name because its scent is so reminiscent of orange blossoms that travelers in the past often mistook the two from a distance.
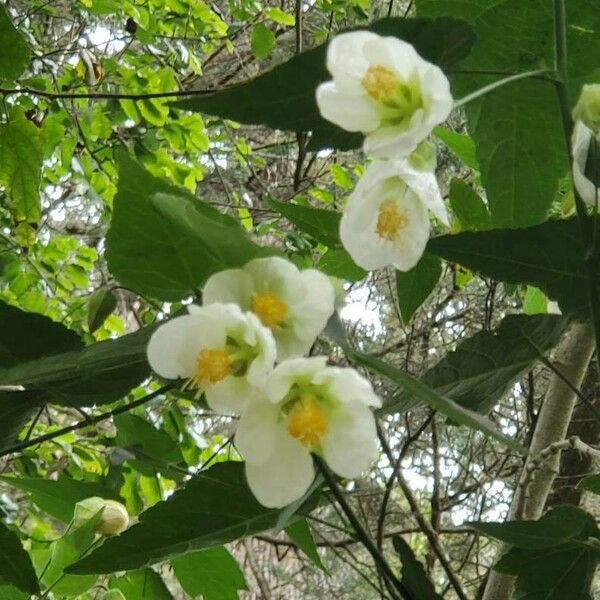
🔍 How to Identify
- 🌸 The Blooms: Large, cup-shaped flowers with four creamy-white petals and a dense cluster of golden-yellow stamens in the center. They typically appear in clusters of 5 to 11.
- 🍃 The Foliage: Pointed, oval leaves that are noticeably fuzzy or "hoary" on the underside. This fine, gray down gives the plant a soft, silvery-green appearance compared to its cousins.
- 🪵 The Bark: As the plant matures, the bark on the older, woody stems begins to peel or "exfoliate" in thin, papery flakes, providing visual interest even in the winter.
🏡 In Your Garden
- ✂️ Pruning Strategy: This shrub is a "bloomer on old wood," meaning it prepares its flower buds a year in advance. To avoid accidentally cutting off next year’s display, only prune or shape the plant immediately after the blossoms fade in mid-summer.
- ☀️ Sun & Air: While it is tough enough to survive in partial shade, it needs a sunny spot to produce a heavy blanket of flowers. It prefers well-drained soil and is remarkably resistant to most common garden pests.
⚠️ Safety & Toxicity
- ✅ Non-Toxic: Philadelphus incanus is generally considered non-toxic to humans, dogs, and cats. It is a very safe choice for family gardens and high-traffic areas.
- 🧤 Skin Sensitivity: Though not poisonous, the fine hairs on the underside of the leaves can occasionally cause mild skin irritation for people with very sensitive skin during heavy pruning.
✨ Fun Fact
The genus name Philadelphus translates to "brotherly love" in Greek. It was named in honor of Pharaoh Ptolemy II Philadelphus, an ancient ruler of Egypt who was a legendary patron of the arts and sciences!

Detailed Care Instructions
Growing Philadelphus incanus, also known as a species within the mock-orange family, can be a rewarding addition to your garden due to its fragrant and attractive blooms. Here's a general guide to help you get started:
Site Selection
- Light Requirements: Philadelphus incanus prefers full sun to partial shade. For optimal blooming, plant it in a location that receives at least six hours of direct sunlight daily.
- Soil Type: This plant thrives in well-drained, fertile soil. While it can tolerate a range of soil types, adding organic matter like compost can enhance soil fertility and drainage.
Planting
- Timing: The best time to plant Philadelphus incanus is in the early spring or fall. This allows the shrub to establish roots before extreme weather conditions hit.
- Spacing: Plan for the mature size of the plant. These shrubs can grow several feet tall and wide, so space them about 3 to 5 feet apart to ensure good air circulation and growth room.
- Digging the Hole: Dig a hole twice the width of the root ball and the same depth as the root ball. This gives the roots plenty of room to spread out.
- Planting: Place the plant in the hole and backfill with soil, ensuring that the top of the root ball is level with or slightly above the surrounding soil. Water thoroughly after planting.
Watering
- Initial Watering: Newly planted shrubs need consistent moisture. Water deeply once or twice a week, depending on weather conditions.
- Established Plants: Once established, Philadelphus incanus is relatively drought-tolerant but will perform best with regular watering. Aim to keep the soil moist but not waterlogged.
Mulching
- Mulch Layer: Apply a 2-3 inch layer of organic mulch (e.g., wood chips, bark) around the base of the plant. This helps retain soil moisture, regulate temperature, and suppress weeds.
- Avoid Trunk Coverage: Keep the mulch a few inches away from the trunk to prevent rot.
Pruning
- Timing: Prune after flowering, typically in late spring or early summer. This avoids cutting off next year’s flower buds.
- Method: Remove dead or diseased wood, and thin out crowded branches to improve air circulation. Reduce the length of the previous season’s growth to encourage new, vigorous shoots.
Fertilization
- When to Fertilize: Apply a balanced, slow-release fertilizer in early spring and possibly again in mid-summer if growth seems sluggish.
- How to Apply: Follow the manufacturer's instructions for dosage and distribution. Over-fertilizing can lead to excessive growth with fewer flowers.
Pest and Disease Management
- Common Issues: Philadelphus incanus is generally resistant to many pests and diseases but can occasionally be affected by aphids, scale insects, or powdery mildew.
- Control Methods: For pest control, use insecticidal soap or neem oil. Ensure good air circulation and avoid overhead watering to minimize disease risks.
Propagation
- Cuttings: Take semi-hardwood cuttings in late summer. Dip the cut end in rooting hormone and plant it in a well-draining soil mix. Keep the soil moist until roots develop.
- Layering: Another method is to bend a low branch to the ground, cover it with soil, and encourage it to root while still attached to the parent plant. Once roots form, you can cut the new plant away and transplant it.
Winter Care
- Mulch: Apply a thicker layer of mulch around the base of the plant in colder climates to protect the roots from freezing temperatures.
- Protection: In severe climates, consider wrapping plants with burlap or using other frost protection methods.
By following these guidelines, you can successfully grow and maintain a healthy Philadelphus incanus plant, enjoying its beautiful and fragrant flowers season after season.

Place in a bright room that is sun drenched almost all day. Or directly in a south-facing window.

To water this plant, you should ensure that the soil around the plant is moist, but not waterlogged. It is best to water the plant deeply and thoroughly, allowing the water to soak in and reach the roots. Make sure to check the soil regularly to ensure that it does not become too dry. When watering, try not to splash the leaves or flowers as this can cause damage or encourage fungal growth. It is important to note that this plant prefers well-draining soil and does not like to be in standing water. It is recommended to water this plant consistently but not excessively, allowing the top layer of soil to dry out slightly between watering sessions.
Here are the fertilizing instructions for Philadelphus Incanus:
- Soil Preparation: Prior to planting, enrich the soil with well-rotted compost or organic matter to improve drainage and nutrient content.
- Initial Feeding: When planting Philadelphus Incanus, mix a balanced, slow-release fertilizer into the soil at the bottom of the planting hole. Use a 10-10-10 (N-P-K) balanced fertilizer.
- First Year Care: In the first year after planting, give it a light feeding with a balanced, water-soluble fertilizer in early spring. Follow the dosage instructions on the fertilizer package.
- Annual Feeding:
- Early Spring: Apply a balanced, slow-release granular fertilizer around the base of the plant according to the package directions. A 10-10-10 fertilizer works well.
- Mid-Summer: If the plant shows signs of nutrient deficiency (such as yellowing leaves or stunted growth), you may give an additional feeding with a water-soluble balanced fertilizer.
- Early Spring: Apply a balanced, slow-release granular fertilizer around the base of the plant according to the package directions. A 10-10-10 fertilizer works well.
- Application Method:
- Scatter the granular fertilizer evenly around the base of the plant, avoiding direct contact with the stems.
- Lightly work the fertilizer into the top inch of soil.
- Water the area thoroughly after applying fertilizer to help it penetrate the soil and reach the roots.
- Scatter the granular fertilizer evenly around the base of the plant, avoiding direct contact with the stems.
- Organic Alternatives: You can also use organic fertilizers such as compost tea, fish emulsion, or well-rotted manure if you prefer organic gardening methods.
- Monitoring: Regularly monitor the health of your Philadelphus Incanus. Adjust fertilization based on its growth and any signs of nutrient deficiencies.
Note that over-fertilizing can harm the plant, so it's essential to follow recommended dosages and not exceed them. Happy gardening!
When planting Philadelphus Incanus, it is recommended to use a well-draining soil that is slightly acidic to neutral with a pH range of 5.5 to 7.5. The soil should be rich in organic matter, such as compost or leaf mold, to provide nutrients for the plant. It is also important to ensure that the soil is not too compacted, as the plant's roots need room to spread and grow. Adding perlite or coarse sand to the soil can help improve drainage and prevent waterlogging. Additionally, it is recommended to amend the soil with slow-release fertilizer before planting to encourage strong growth.
Propagating Philadelphus incanus involves several steps to ensure successful growth. Here’s a detailed guide on how to propagate this plant:
Materials Needed:
- Sharp pruning shears
- Rooting hormone (optional but recommended)
- Well-draining potting mix
- Pots or containers
- Plastic bags or a humidity dome
- Water
- A clean, well-lit, but indirect sunlight location
Propagation Methods:
Philadelphus incanus can be propagated through either softwood cuttings or hardwood cuttings.
Softwood Cuttings (Best done in late spring to early summer):
- Selection of Cuttings:
- Choose young, healthy softwood stems that are still green but mature enough to snap when bent. These are usually found in the late spring to early summer.
- Choose young, healthy softwood stems that are still green but mature enough to snap when bent. These are usually found in the late spring to early summer.
- Cutting Preparation:
- Cut segments about 4-6 inches long.
- Remove the lower leaves from the cutting, leaving only the top 2-3 leaves in place.
- If desired, dip the cut end into rooting hormone to increase the chance of successful rooting.
- Cut segments about 4-6 inches long.
- Planting:
- Insert the cuttings into a pot or container filled with a well-draining potting mix.
- Water the potting mix lightly to settle the cuttings in place.
- Insert the cuttings into a pot or container filled with a well-draining potting mix.
- Humidity and Light:
- Cover the pot with a plastic bag or a humidity dome to maintain high humidity around the cutting.
- Place the container in a warm area with indirect sunlight.
- Cover the pot with a plastic bag or a humidity dome to maintain high humidity around the cutting.
- Aftercare:
- Check the moisture level regularly, ensuring the potting mix stays damp but not soaking wet.
- Ventilate periodically by opening the plastic bag to prevent mold growth.
- Check the moisture level regularly, ensuring the potting mix stays damp but not soaking wet.
- Root Development:
- After about 4-6 weeks, check if roots have developed by gently tugging on the cuttings.
- Once rooted, gradually acclimate the young plants to less humid conditions before transplanting them to larger pots or directly into the garden.
Hardwood Cuttings (Best done in late autumn to early winter):
- After about 4-6 weeks, check if roots have developed by gently tugging on the cuttings.
- Selection of Cuttings:
- Choose mature, woody stems from healthy parts of the plant. These should be about pencil-thick in diameter.
- Choose mature, woody stems from healthy parts of the plant. These should be about pencil-thick in diameter.
- Cutting Preparation:
- Take 6-12 inch long cuttings from the selected stems.
- Remove all the leaves from the cutting and dip the base in rooting hormone if desired.
- Take 6-12 inch long cuttings from the selected stems.
- Planting:
- Prepare a pot with a well-draining potting mix, or a protected garden bed.
- Insert the cuttings into the soil so that about half to two-thirds of the cutting is buried.
- Prepare a pot with a well-draining potting mix, or a protected garden bed.
- Aftercare:
- Water the soil lightly to keep it moist.
- Place the pot or garden bed in a cool, sheltered location, preferably with some shade.
- Mulch around the cuttings if they are planted in the garden, to help retain moisture and protect them from extreme cold.
- Water the soil lightly to keep it moist.
- Root Development:
- Monitor the cuttings periodically over the winter months.
- By early spring, they should start to root and show signs of new growth.
- Once new growth is evident, the cuttings can be transplanted to their permanent locations.
Tips for Success:
- Monitor the cuttings periodically over the winter months.
- Timing: Ensure you take cuttings during the ideal times specified (softwood in spring/summer, hardwood in autumn/winter).
- Sanitation: Always use clean tools to prevent the spread of disease.
- Patience: Rooting can take time. Maintain proper conditions and be patient for optimal results.
By following these detailed steps, you can successfully propagate Philadelphus incanus and enjoy its delightful growth in your garden or landscape.


