Plant Overview
Known as the Lewis’s Mock Orange, this hardy deciduous shrub is famous for its intoxicating fragrance that mimics the sweet scent of orange blossoms. Named after Meriwether Lewis, who first documented it during his 1806 expedition, it serves as the proud state flower of Idaho. In late spring, it transforms into a snowy cascade of white, making it a favorite for those who want a "perfume garden" effect.
🔍 How to Identify
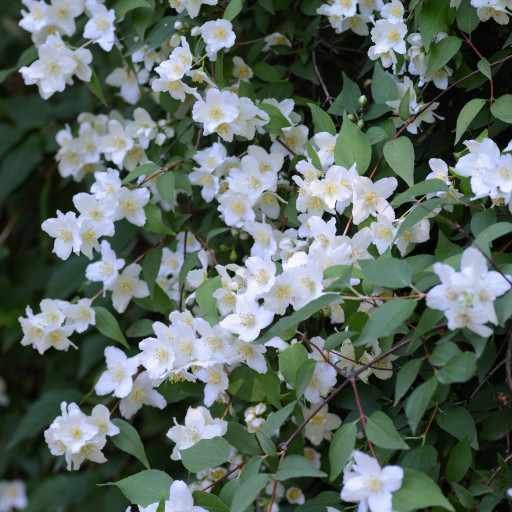
- 🌸 The Blooms: Features clusters of 1-inch, pure white flowers, each with four distinct petals and a dense "firework" of yellow stamens in the center.
- 🍃 The Foliage: Opposite, oval-shaped leaves with a matte green finish and subtle veins. They often have tiny, serrated teeth along the edges.
- 🪵 The Bark: Older stems develop a beautiful, shreddy, or peeling texture with a reddish-brown color, adding visual interest even in the winter.
🏡 In Your Garden
- ☀️ Sun Seekers: While it can tolerate partial shade, it needs at least 6 hours of full sun to produce its maximum floral display and the strongest scent.
- ✂️ Timing the Trim: This plant blooms on "old wood" (last year's growth). To avoid cutting off next year’s flowers, always prune it immediately after the blooms fade in summer.
- 💧 Established Resilience: Once its root system is deep, it is remarkably drought-tolerant, though it prefers well-drained soil and occasional deep watering during extreme heat.
⚠️ Safety & Toxicity
- 🐾 Pet-Friendly: Good news for pet owners—this species is generally considered non-toxic to dogs, cats, and horses.
- 👶 Child Safe: It is not known to be poisonous to humans, though the leaves and flowers are not edible and may cause mild stomach upset if ingested by curious toddlers.
✨ Fun Fact
🏹 Nature’s Toolbox: Beyond its beauty, Native American tribes, including the Nez Perce, traditionally used the straight, hard wood of the Mock Orange to craft arrows, pipe stems, and digging sticks.

Detailed Care Instructions
To grow Philadelphus Lewisii, also known as Lewis' mock orange, follow these steps:
- Choose a suitable location: Philadelphus Lewisii thrives in full sun to light shade. Select a spot in your garden that receives at least 6 hours of direct sunlight per day.
- Soil preparation: The plant is adaptive to many soil types, but it prefers well-draining soil. Work on improving the soil by adding organic matter, such as compost or well-rotted manure, to enhance drainage and provide nutrients.
- Planting: Dig a hole in the prepared soil that is slightly larger than the root ball of the Philadelphus Lewisii plant. Place the plant in the hole, ensuring that the soil level matches that of the surrounding ground. Backfill the hole and gently tamp down the soil to remove any air pockets.
- Watering: Water the newly planted Philadelphus Lewisii thoroughly and regularly to establish a strong root system. Keep the soil consistently moist but not waterlogged. After the plant is established, reduce the frequency of watering and only provide water during dry periods.
- Mulching: Apply a layer of mulch around the base of the plant, but ensure it doesn't touch the stem. Mulching helps retain soil moisture and suppresses weed growth.
- Pruning: Philadelphus Lewisii benefits from regular pruning to maintain its shape and promote healthy growth. Prune the plant after it has finished flowering, removing any dead or damaged branches and shaping it as desired. Avoid heavy pruning, as it may negatively impact the plant's flowering the following year.
- Fertilizing: Feed Philadelphus Lewisii with a balanced fertilizer in spring before new growth begins. Follow the package instructions for the specific fertilizer you choose.
- Pests and diseases: This plant is generally resistant to pests and diseases. However, keep an eye out for aphids, which may occasionally infest the plant. Treat aphids with insecticidal soap or by spraying them away with a strong stream of water.
By following these steps, you should be able to successfully grow Philadelphus Lewisii in your garden.

Place in a window with dappled sun or a spot in the middle of a room. Or directly in a window facing west or east.

To properly water this plant, you should ensure that the soil is evenly moist but not waterlogged. Allow the top inch of soil to dry out slightly before watering again, as this will prevent over-saturation. Water the plant deeply at the base, rather than from above, to avoid wetting the leaves and causing disease. During periods of hot, dry weather, you may need to water more frequently to prevent the soil from drying out completely.
To fertilize this plant, you should apply a slow-release granular fertilizer in early spring or after the first flush of blooms. Use a balanced fertilizer with equal amounts of nitrogen, phosphorus, and potassium. Apply the fertilizer around the base of the plant, taking care not to get it on the leaves or flowers. Water the soil thoroughly after fertilizing. Avoid fertilizing during the fall or winter months.
The ideal soil for this plant should be a well-draining soil with a neutral pH. It should have a good balance of organic matter and perlite to improve drainage and aeration. A sandy loam soil rich in organic matter is highly recommended as it provides the necessary nutrients for proper growth and development. A mix of peat moss, compost, and sand can also be used as a soil blend for planting this plant. Make sure to avoid heavy clay soils as they retain too much water and can cause root rot.
To propagate this plant, start by collecting seeds in the fall. Place the seeds in a plastic bag with a moist paper towel and store in a cool, dry place for the winter. In the spring, fill a seed starting tray with a mixture of equal parts peat moss and perlite. Sow the seeds on the surface of the soil and lightly cover with more soil. Water the tray and cover it with plastic wrap or a lid to create a greenhouse effect. Keep the tray in a warm, bright location, and water it regularly to keep the soil moist.
In the summer, the seedlings should be large enough to transplant into individual pots. Fill each pot with a mixture of potting soil and sand, and make a hole in the center. Carefully remove each seedling from the tray and place it in the hole. Gently press the soil around the seedling to secure it. Water the pots thoroughly and keep them in a sunny location.
Throughout the growing season, keep the pots moist and fertilize every two weeks with a balanced fertilizer. In the fall, before the first frost, transplant the seedlings to their permanent location in the garden. Choose a spot that receives full sun to partial shade, and make sure the soil is well drained. Dig a hole for each seedling that is twice as wide and deep as the pot it is in. Carefully remove the plant from the pot and place it in the hole, making sure that the top of the root ball is level with the soil surface. Fill the hole with soil and press it down firmly around the plant. Water the plants thoroughly and keep the soil moist until they are established.
Common pests of the lewis's mock orange include Aphids, larvae. Make a habit of checking your lewis's mock orange frequently for pests so that any infestations can be caught and managed early.


