Plant Overview
Named after the legendary Brazilian landscape architect Roberto Burle Marx, this philodendron is a staple of tropical-inspired design. Often called the "Burle Marx Philodendron," it is celebrated for its dense, glossy foliage and rugged, "unkillable" reputation. It brings a lush, architectural feel to any room, mirroring the vibrant energy of the South American rainforests from which it hails.
🔍 How to Identify
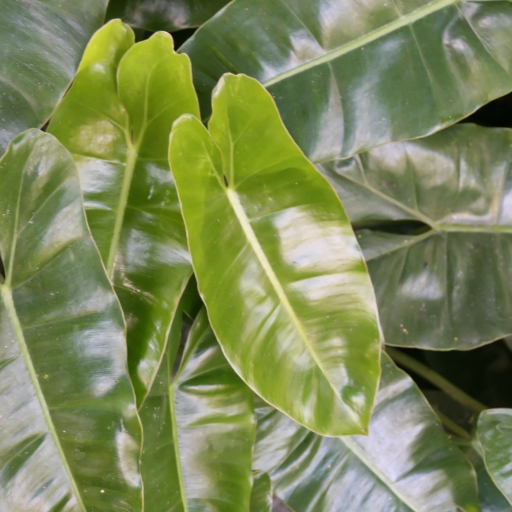
- 🍃 Leaf Shape: Features distinct, elongated heart-shaped leaves with a deep "V" at the top, resembling a glossy green shield or paddle.
- 🌿 Texture & Color: The foliage has a high-shine, waxy finish and remains a deep, rich emerald green year-round.
- 🌱 Growth Habit: It is a versatile "clumping climber." While it can trail or sprawl across the soil, it prefers to use its aerial roots to latch onto surfaces and grow upwards.
🏡 In Your Garden
- 🧗 Support Systems: To see this plant reach its full potential, provide a moss pole or wooden stake. When it senses a vertical surface, the leaves tend to grow larger and the nodes become more compact.
- 💧 Resilient Roots: This species is more forgiving of "under-watering" than many other tropicals. Its thick stems store moisture, but it is highly sensitive to "wet feet." Using a chunky, well-draining aroid mix (bark, perlite, and soil) is the secret to a happy plant.
- ☀️ Light Adaptation: It thrives in bright, indirect light but is famously tolerant of lower-light corners where other plants might struggle, though its growth will slow down significantly.
⚠️ Safety & Toxicity
- 🐾 Toxic to Pets: Like all members of the Araceae family, this plant contains insoluble calcium oxalate crystals.
- 👄 Irritation: If chewed or swallowed by cats, dogs, or children, it will cause immediate oral pain, swelling of the throat, and digestive distress. Keep it on a high shelf or hanging planter if you have curious housemates.
✨ Fun Fact
- 🎨 Living Art: Roberto Burle Marx, the plant's namesake, was a pioneer who treated gardens like "abstract paintings." This specific philodendron was one of his favorite textures to use in his massive, world-famous landscape installations in Brazil!

Detailed Care Instructions
To grow a Philodendron Burle-marxii plant, follow these steps:
- Choose the right location: Philodendron Burle-marxii prefers bright, indirect light. Place it near a north-facing window or with filtered sunlight. Direct sunlight can burn the leaves.
- Provide the right temperature and humidity: Philodendron Burle-marxii thrives in average to warm temperatures between 65-85°F (18-29°C). Maintain a humidity level around 50-60% to mimic its natural tropical environment.
- Select a suitable pot and soil: Choose a well-draining pot with drainage holes to avoid waterlogging. Philodendron Burle-marxii grows well in a mixture of regular potting soil, peat moss, and perlite. Aim for a slightly acidic soil pH around 6.0-6.5.
- Watering: Keep the soil consistently moist but not soggy. Allow the top inch of the soil to dry out before watering again. Overwatering can lead to root rot, so ensure proper drainage.
- Fertilizing: During the growing season (spring and summer), feed the plant with a balanced liquid fertilizer diluted to half strength every 2-4 weeks. Reduce or stop fertilizing during winter.
- Pruning: Trim any dead or yellowing leaves regularly. Pinch back leggy growth to encourage bushier growth. You can also propagate from the cuttings you prune.
- Propagation: Philodendron Burle-marxii can be propagated through stem cuttings. Take a 4-6 inch (10-15 cm) cutting from a healthy stem just below a node. Remove lower leaves and place the cutting in water or moist soil until roots develop. Then, transfer it to a pot.
- Re-potting: As the plant grows, you may need to re-pot it every 1-2 years. Choose a slightly larger pot and refresh the soil mixture.
- Keep pests away: Philodendron Burle-marxii can be susceptible to mealybugs and spider mites. Monitor the plant regularly and treat with appropriate insecticides or insecticidal soap if needed.
- Enjoy your plant: With proper care, your Philodendron Burle-marxii should grow lush and healthy, adding beauty to your indoor space.

Place in a window with dappled sun or a spot in the middle of a room. Or directly in a window facing west or east.

To water this plant, you should first check the soil moisture level by inserting your finger about an inch into the soil. If the soil is dry, it's time to water. Slowly pour lukewarm water onto the soil until it begins to flow out the drainage holes in the pot. Allow the excess water to drain away completely before putting the plant back in its desired location. Be careful not to overwater the plant, as this can lead to root rot. It's also important to avoid getting water on the leaves, as this can cause damage or disease.
To fertilize this plant, use a balanced liquid fertilizer with equal levels of nitrogen, phosphorus, and potassium. Dilute the fertilizer to half strength and apply it to the soil during the growing season, which is usually from spring to early fall. Make sure not to over-fertilize, as this can lead to fertilizer burn and damage the plant.
The ideal soil for Philodendron Burle-marxii plant should be well-draining and rich in nutrients. A mixture of peat moss, perlite, and coarse sand in equal proportions is recommended for creating the appropriate soil mix. The pH level of the soil should be between 5.5-7.5, slightly acidic to neutral. It's crucial to avoid overwatering and ensure that the soil is moist, but not waterlogged, to prevent root rot. Additionally, it's advisable to add organic matter such as compost or aged manure to the soil every few months to provide a steady supply of nutrients.
To propagate this plant, you will need to take a stem cutting from a mature and healthy plant. Choose a stem that is 6-8 inches long and has at least 2-3 leaves. Using a sterile knife or scissors, make a clean cut just below a node (where a leaf meets the stem).
Remove the leaves from the bottom 1-2 inches of the stem and dip the cut end into rooting hormone powder. This will help the cutting develop roots more quickly.
Prepare a pot with well-draining soil and make a hole in the center for the cutting. Insert the stem into the soil and gently press the soil around the stem to secure it in place.
Water the cutting thoroughly and cover it with a plastic bag or dome to create a mini greenhouse environment. This will help retain moisture and increase humidity around the cutting.
Place the pot in a bright, indirect light location and keep the soil moist but not waterlogged. After a few weeks, you should see new growth emerging from the top of the cutting, which indicates that roots have formed.
After another few weeks, when the roots have grown sufficiently, you can remove the plastic cover and allow the plant to acclimate to its new environment. You can then transplant it into a larger pot or into the ground, depending on your preference.
Common pests of the philodendron burle-marx include Mealybugs, spider mites, thrips. Make a habit of checking your philodendron burle-marx frequently for pests so that any infestations can be caught and managed early.


