Plant Overview
True to its name, this titan of the jungle is a living green sculpture that demands attention. Often called the "Giant Philodendron," it originates from the lush, humid forests of the Caribbean and South America, where it spends its life scaling massive trees to reach for the canopy light. While it looks like a prehistoric relic, it is surprisingly adaptable to indoor living—provided you have the floor space to accommodate its massive footprint!
🔍 How to Identify
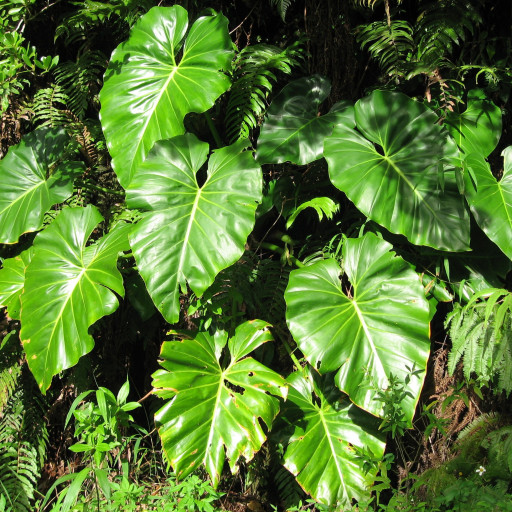
- 🍃 Massive Foliage: The most striking feature is the sheer size of the leaves, which are deeply heart-shaped (cordate) and can grow over three feet long in ideal conditions.
- ✨ Glossy Texture: The leaf surface is exceptionally smooth and shiny, acting like a natural mirror for soft, filtered light.
- 📏 Sturdy Petioles: The leaf stems (petioles) are thick, succulent, and slightly pale, engineered to support the heavy weight of the massive green blades.
🏡 In Your Garden
- 🧗 A Natural Climber: While it can grow as a terrestrial plant, this species is a "hemiepiphyte," meaning it loves to scale vertical surfaces. Providing a sturdy moss pole or a wooden plank will mimic its natural habitat and encourage the plant to produce its largest possible leaves.
- ☁️ Humidity over Wetness: Coming from tropical islands, it craves moisture in the air more than in the soil. If the indoor air is too dry, the edges of those giant leaves may turn crisp and brown, losing their emerald luster.
⚠️ Safety & Toxicity
- 🚫 Toxic for Ingestion: Like most members of the Araceae family, the entire plant contains insoluble calcium oxalate crystals.
- 🐾 Pets & Kids: If any part of the plant is chewed or swallowed, it can cause immediate burning of the mouth, swelling of the throat, and digestive upset in cats, dogs, and humans. It is best placed in a corner where curious nibblers cannot reach it.
✨ Fun Fact
In its native habitat, Philodendron giganteum acts as a "mini-ecosystem." Its massive, funnel-like leaves are so effective at catching rainwater that they often provide a drinking station and a humid shelter for small tropical tree frogs and insects during the heat of the day!

Detailed Care Instructions
To grow a Philodendron Giganteum plant, you can follow these steps:
- Choose the right location: Philodendron Giganteum thrives in bright, indirect light, so find a spot in your home where it can receive enough sunlight without direct exposure. Avoid placing it in low-light areas or too close to windows with direct sunlight.
- Select a suitable pot: Use a well-draining pot with drainage holes. Philodendron Giganteum prefers a slightly acidic soil mix that is rich in organic matter.
- Prepare the soil: Fill the pot with a mixture of potting soil, perlite, and a small amount of peat moss or coconut coir. This will provide the plant with good drainage and moisture retention.
- Plant the Philodendron Giganteum: Gently remove the plant from its nursery pot, being careful not to damage the roots. Place it in the prepared pot, ensuring that the root ball is at the same level as the soil surface. Fill the remaining space around the roots with potting mix and gently pat it down.
- Water and humidity: Water the plant thoroughly until water drains out of the bottom of the pot. Philodendron Giganteum likes moderately moist soil but does not tolerate waterlogging. Allow the top inch of soil to dry out between watering. Maintaining humidity levels of around 50% or higher through misting or using a humidity tray can benefit the plant.
- Provide adequate temperature: Philodendron Giganteum prefers temperatures between 65-85°F (18-29°C). Avoid exposing it to cold drafts or sudden temperature fluctuations.
- Fertilize regularly: During the growing season (spring and summer), use a balanced liquid fertilizer diluted to half strength every 2-4 weeks. Reduce or stop fertilization during the dormant winter period.
- Pruning: Prune any yellow or dead leaves to keep the plant tidy and promote new growth. You can also trim leggy stems to encourage bushier growth.
- Offer support: As the Philodendron Giganteum grows, it may need support to keep its leaves upright. Use stakes, moss poles, or trellises to support the stems as needed.
- Repotting: Repot the plant every 1-2 years when it becomes root-bound. Choose a pot that is one size bigger, gently remove the plant from its current pot, and replant it using fresh potting mix.
Remember to observe your Philodendron Giganteum plant regularly, checking for any signs of pests or diseases. With proper care, your plant will grow and thrive, adding beauty to your indoor space.

Place in a window with dappled sun or a spot in the middle of a room. Or directly in a window facing west or east.

To water this plant properly, you should first assess the moisture levels in the soil. Stick your finger about 1-2 inches into the soil, and if it feels dry, it's time to water. When watering, pour water slowly and evenly around the base of the plant until water starts to seep out of the drainage holes. Avoid getting water on the leaves since this can lead to fungal diseases. During the growing season, water the plant once a week or when the top inch of the soil dries out. In the dormant season, water sparingly and allow the soil to dry out between waterings. Additionally, make sure the plant is in a well-draining pot and that excess water is able to drain out properly to prevent root rot.
To fertilize this plant, use a balanced liquid fertilizer during the growing season, which is spring and summer. Dilute the fertilizer to half strength and apply it once a month. In the winter, reduce fertilizer applications to once every other month. Always water the plant thoroughly before and after fertilizing. Avoid fertilizing a dry plant, as it can cause root burn or stress.
The ideal soil for Philodendron Giganteum should be a well-draining soil with good aeration and moisture retention capacity. It should be rich in nutrients and organic matter to support the plant's growth and development. The soil pH range should be slightly acidic to neutral, and the texture should be loamy or sandy. It is important to avoid heavy clay soils or soils that are too compacted as they can cause poor drainage and root rot. A mixture of peat moss, perlite, and coconut fiber or vermiculite can be a good option for potting. Also, adding some slow-release fertilizer or compost to the soil can provide essential nutrients for the plant.
To propagate this plant, you will need a sharp, sterile pruning tool and a pot filled with a well-draining potting mix.
Begin by selecting a healthy stem with multiple leaves and a node (where the leaf meets the stem). Make a clean cut just below the node using your pruning tool. If desired, you can dip the cut end in rooting hormone to encourage development of roots.
Place the cutting in the potting mix, ensuring that the node is buried in the soil and the leaves are above the soil line. Water the soil thoroughly and cover the pot with a clear plastic bag to create a humid environment.
Place the pot in bright, indirect light and keep it consistently moist (but not waterlogged). After a few weeks, the cutting should begin to develop roots. Once the plant has established roots and new growth, you can transplant it into a larger pot or into your desired location in the garden.
Common pests of the giant philodendron include Mealybugs, spider mites, thrips. Make a habit of checking your giant philodendron frequently for pests so that any infestations can be caught and managed early.


