Plant Overview
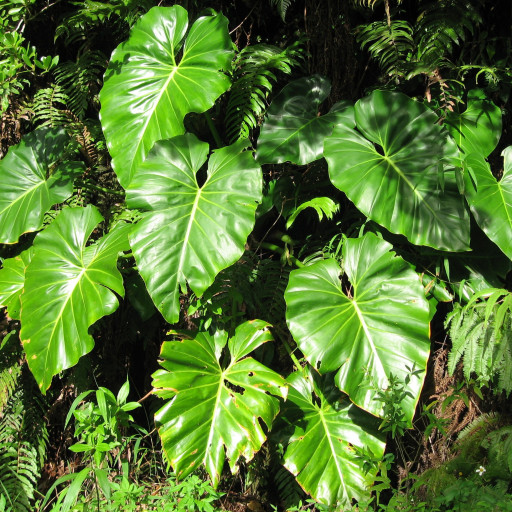
Known as the "Giant Velvet Philodendron," the Philodendron gigas is a true titan of the tropical world. Originating from the humid rainforests of Panama, this plant is a master of transformation, starting as a modest climber and evolving into a massive, shimmering spectacle. For many houseplant collectors, it is considered a "holy grail" species because of its incredibly soft texture and dramatic, shield-like foliage.
🔍 How to Identify
- 🌿 Velvet Texture: The leaves have a luxurious, matte, velutinous surface that feels like soft suede and captures light with an iridescent sheen.
- 🍃 Leaf Color: Deep, forest-green foliage with pale, prominent midribs. New leaves often emerge in a stunning copper or bronze hue before maturing.
- 📐 Size & Shape: In its juvenile stage, leaves are small and heart-shaped, but as it climbs, they elongate into massive, drooping ovals that can reach several feet in length.
🏡 In Your Garden
- 🧗 The Need to Climb: True to its name, this "giant" requires a sturdy moss pole or cedar plank to reach its full potential. Without a vertical surface to latch onto with its aerial roots, the leaves will remain small and fail to develop their iconic size.
- ☁️ Humidity is Vital: Unlike hardier Philodendrons, the gigas is a child of the rainforest. It thrives in high humidity (60% or higher). If the air is too dry, new leaves may struggle to emerge from their protective sheaths, a phenomenon often called "getting stuck."
⚠️ Safety & Toxicity
- 🚫 Toxic Status: Like most members of the Araceae family, this plant is toxic to humans and pets.
- 👄 The Irritant: It contains insoluble calcium oxalate crystals. If chewed or ingested, it causes immediate oral pain, swelling of the tongue and throat, and digestive distress. Always wear gloves when pruning if you have sensitive skin.
✨ Fun Fact
The name "Gigas" is derived from the Greek word for "giant," which is no exaggeration—in its natural Panamanian habitat, a single leaf can grow to be over 4 feet long, draped elegantly against the trunks of massive rainforest trees!

Detailed Care Instructions
Here are some steps to help you grow a Philodendron Gigas plant:
- Choose a suitable location: Philodendron Gigas plants prefer bright, indirect light. Find a spot in your home that receives ample bright, filtered light throughout the day. Avoid direct sunlight, as it can scorch the leaves.
- Provide the right temperature and humidity: Philodendron Gigas plants thrive in average room temperatures ranging between 65-85°F (18-29°C). They also require high humidity levels, so misting the leaves or placing a humidifier nearby can help create the ideal environment.
- Select the right type of soil: Use a well-draining potting mix that retains some moisture without becoming waterlogged. A mix containing equal parts peat moss, perlite, and a small amount of orchid bark or charcoal is a good choice.
- Water appropriately: Water your Philodendron Gigas when the top inch of soil feels dry. Ensure that excess water drains out of the pot to prevent root rot. Avoid letting the plant sit in standing water.
- Fertilize regularly: Feed your Philodendron Gigas with a balanced, water-soluble fertilizer during the growing season (spring and summer). Follow the instructions on the packaging for the appropriate dosage and frequency.
- Provide support: Philodendron Gigas plants are climbers, so providing a trellis or moss pole for support will allow them to grow upright and develop their characteristic aerial roots.
- Prune as needed: Remove any yellow or dead leaves regularly to keep the plant healthy and aesthetically pleasing. You can also trim back any excessively long or leggy stems to encourage bushier growth.
- Propagation: Philodendron Gigas plants can be propagated through stem cuttings. Take a cutting with a few leaves and a node, and place it in a jar of water or directly into moist potting soil. Keep the soil consistently moist until roots develop.
Remember to research and understand your plant's specific needs to provide optimal care.

Place in a window with dappled sun or a spot in the middle of a room. Or directly in a window facing west or east.

Philodendron Gigas plants require regular watering to keep its soil moist, but not waterlogged. One way to tell if the plant needs watering is by checking the top two inches of soil. If it feels dry, then it is likely time to water. When watering, make sure to water the soil and avoid getting water on the leaves or stems, as this can cause damage or rot. It is best to use room temperature water and avoid using soft or distilled water. Watering should be reduced during the winter months when the plant's growth slows down.
- First, obtain a balanced fertilizer with an NPK ratio of around 10-10-10 or similar. This will ensure that the plant receives equal amounts of nitrogen (N), phosphorus (P), and potassium (K), providing essential nutrients for healthy growth.
- Dilute the fertilizer as instructed on the packaging. It is generally recommended to use half the recommended dosage to avoid overfertilization, which can harm the plant.
- Water the Philodendron Gigas plant thoroughly before applying the fertilizer. This will help prevent any potential root burn caused by applying fertilizer to dry soil.
- Pour the diluted fertilizer directly onto the soil around the base of the plant. Avoid getting the fertilizer on the foliage as it may cause leaf burn.
- After applying the fertilizer, water the plant again to ensure the nutrients penetrate the soil and reach the roots.
- Monitor the plant closely for any signs of overfertilization or nutrient deficiencies. Overfertilization can cause leaf discoloration, wilting, or even plant death, while nutrient deficiencies may result in stunted growth or yellowing leaves.
- Repeat the fertilization process every month during the growing season, generally from spring through summer. As the Philodendron Gigas plant enters its dormant period in fall and winter, reduce or suspend fertilization.
Remember to always follow the specific instructions provided by the fertilizer manufacturer, as different products may vary. Regular fertilization, combined with appropriate lighting and watering, should help promote the health and growth of your Philodendron Gigas plant.
Philodendron Gigas plant requires a special type of soil that consists of a mixture of different organic materials such as coconut coir, peat moss, and perlite. This soil mixture should allow for proper drainage and aeration while retaining enough moisture for the plant's growth. The pH level of the soil should be slightly acidic, ranging from 5.5 to 6.5. This type of soil will provide the necessary nutrients and elements for the Philodendron Gigas to thrive and enhance its overall health. It is important to avoid using heavy, clay soils or soils that are too dense, as they can lead to root rot and stunted growth.
Philodendron Gigas is a stunning plant with unique foliage that many plant lovers desire to propagate. Here's a step-by-step guide on how to propagate it:
- Select a healthy mature plant: Choose a Philodendron Gigas plant that is well-established, has several healthy leaves, and is free from any diseases or pests.
- Gather the necessary tools: Get a clean sharp knife or shears, a clean container, well-draining potting mix, water, and rooting hormone (optional).
- Prepare the potting mix: Fill the container with a well-draining potting mix. A common mix consists of equal parts of potting soil, perlite, and peat moss or coco coir to ensure proper drainage.
- Prepare the cutting: Identify a healthy stem that has at least two or three nodes (small bumps on the stem where leaves emerge). Nodes are important as they contain dormant buds that will eventually grow into new roots.
- Take the cutting: Using the sharp knife or shears, make a clean cut just below a node on the chosen stem. The cutting should be around 4-6 inches long, with at least one or two leaves attached.
- Remove lower leaves: Carefully remove the lower leaves, leaving only the uppermost one or two intact. This helps the cutting to focus its energy on root development rather than sustaining the leaves.
- Optional: Apply rooting hormone: If desired, dip the base of the cutting in the rooting hormone powder/gel. This can promote quicker root development, but it is not essential for successful propagation.
- Plant the cutting: Make a small hole in the potting mix with your finger or a pencil and gently insert the cutting, ensuring that at least one node is buried in the soil. Press the soil around the cutting to hold it in place.
- Provide the right conditions: Place the container in a location with bright indirect light. Avoid exposing the cutting to direct sunlight, as it may scorch the leaves or inhibit root growth. Maintain a warm temperature range between 70-80°F (21-27°C) and ensure moderate humidity.
- Water and maintain moisture: Water the cutting thoroughly after planting, ensuring that the soil is evenly moist but not waterlogged. Monitor the soil moisture levels and water as necessary, ensuring it doesn't dry out completely.
- Offer suitable humidity: Maintain a higher humidity level by misting the cutting regularly or placing a plastic bag or a ventilated dome over the container to create a mini greenhouse effect. This helps prevent excessive moisture loss and aids in root development.
- Monitor progress: Over the course of several weeks, keep an eye on the cutting for signs of new growth or root development. Be patient, as it may take time for root growth to occur.
- Transplanting: Once the cutting has developed a healthy root system, usually after a couple of months, you can transplant it into a slightly larger pot filled with regular potting soil. Provide the plant with the appropriate care and watch it thrive.
Remember, propagation success can vary, and it's important to adjust the method based on your specific environment. Good luck with propagating your Philodendron Gigas plant!
Common pests of the philodendron gigas include Mealybugs, spider mites, thrips. Make a habit of checking your philodendron gigas frequently for pests so that any infestations can be caught and managed early.


