Plant Overview
Often referred to as the Matte-Leaved Philodendron, Philodendron opacum is a sophisticated tropical climber that trades the typical waxy shine of its relatives for a deep, velvety finish. Hailing from the humid rainforests of Central and South America—specifically Panama and Colombia—this plant is a favorite among "aroid" collectors who appreciate subtle textures. It is a hemiepiphyte, meaning it begins its life on the forest floor before using its aerial roots to scale giant trees in search of the canopy's glow.
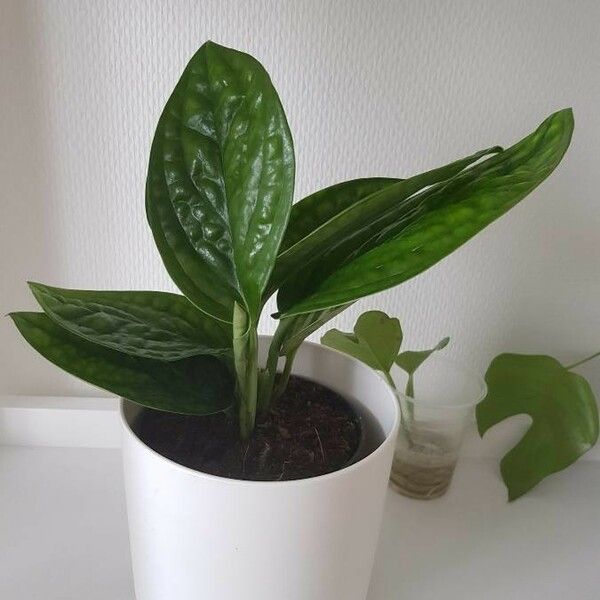
🔍 How to Identify
- 🍃 Velvety Texture: The name opacum refers to the "opaque" or matte surface of the foliage. Unlike the glossy Philodendron erubescens, these leaves do not reflect much light.
- 📏 Leaf Shape: The leaves are elongated and lance-shaped (lanceolate), featuring a prominent central midrib and a graceful, downward-pointing tip.
- 🎋 Climbing Stems: Look for thick, green stems that produce "air roots" at every node. These roots are designed to grip onto bark or mossy surfaces.
🏡 In Your Garden
- 🪵 The Support System: Because this plant is a natural climber, it thrives best when given a moss pole or a cedar plank. Without a vertical surface to grip, the leaves will remain small and the plant may become leggy as it "hunts" for a tree to climb.
- ☁️ Humidity Over Water: While it enjoys moist soil, it is the humidity in the air that truly makes it sing. Low humidity often leads to "stuck" leaves—where the new foliage struggles to emerge from the sheath and becomes deformed.
⚠️ Safety & Toxicity
- 🐾 Toxic to Pets: This plant is considered toxic to cats and dogs. It contains insoluble calcium oxalate crystals, which act like tiny needles if the plant is chewed.
- 👅 Human Irritant: If ingested, it causes immediate oral pain, swelling of the mouth or throat, and digestive distress. Keep it on a high shelf away from curious toddlers.
✨ Fun Fact
The matte surface of the Philodendron opacum isn't just for looks; it is a clever evolutionary adaptation. In the deep, dark understory of the rainforest, the non-reflective surface helps the plant absorb every possible bit of light for photosynthesis rather than bouncing it away!

Detailed Care Instructions
To grow a Philodendron Opacum plant, you should follow these steps:
- Select a suitable location: Philodendrons thrive in bright, indirect light. Choose a spot in your home or office that receives filtered sunlight, away from direct sunlight or shady areas.
- Optimal temperature and humidity: Philodendrons prefer a temperature range of 65-80°F (18-27°C). Maintain a humidity level of around 40-50% for best growth. You can increase humidity by using a humidifier or placing a tray of water near the plant.
- Choose the right soil: Philodendrons prefer a well-draining, peat-based potting soil. A mix of peat moss, perlite, and compost or coconut coir works best. Avoid using heavy clay or dense soil, as it can hinder root growth.
- Potting: Select a pot with drainage holes to prevent water from stagnating. Repot the Philodendron Opacum every 2-3 years, or when the roots start to outgrow the pot. Increase the pot size gradually to avoid overwhelming the plant.
- Watering: Water the plant thoroughly but allow the top inch of soil to dry out between waterings. Overwatering can lead to root rot, so check the moisture level before watering. The frequency may vary depending on the humidity and temperature in your environment.
- Fertilization: Feed your Philodendron Opacum with a balanced, water-soluble fertilizer during the growing season (spring and summer). Follow the instructions on the fertilizer package for the correct dosage and frequency.
- Pruning: Regularly trim any yellow or brown leaves to maintain the plant's health and appearance. You can also trim leggy stems to promote bushier growth.
- Support: As your Philodendron Opacum grows, it may need support to prevent trailing or leaning. Use stakes, trellises, or a moss pole to provide support as the plant climbs.
- Propagation: You can propagate Philodendron Opacum through stem cuttings. Take a cutting with 2-3 leaves and place it in water or a well-draining potting mix until roots develop. Then, transplant it into a pot with soil.
- Monitor for pests and diseases: Keep an eye out for pests like aphids, spider mites, or mealybugs. These can be treated with insecticidal soap or neem oil. Additionally, watch for signs of root rot or fungal diseases, and adjust watering if necessary.
By following these guidelines, you can successfully grow a healthy and lush Philodendron Opacum plant.

Place in a dark room with little light, like a dark bedroom or a spot far away from a window or directly in a north-facing window.

To properly water this plant, it is important to first check the soil moisture level. Stick a finger or a moisture meter into the soil and make sure the top inch is dry before watering. When ready to water, use room temperature water and pour slowly, allowing the soil to fully absorb the water without becoming waterlogged. Do not allow the plant to sit in standing water. Watering frequency will depend on several factors such as temperature, humidity, and lighting conditions. It is important to avoid overwatering as this can lead to root rot.
To fertilize your Philodendron Opacum plant, follow these instructions:
- Choose a balanced liquid fertilizer specifically formulated for houseplants, preferably with a 10-10-10 or 20-20-20 NPK (nitrogen-phosphorus-potassium) ratio.
- Dilute the fertilizer according to the package instructions. Use a clean container and mix the fertilizer with water to achieve the recommended strength.
- Ensure that the soil is slightly damp before applying fertilizer. If it is dry, water the plant a day or two before fertilizing.
- Slowly pour the diluted fertilizer around the base of the plant, taking care not to splash it on the leaves. Start with a small amount, observing the plant's response, and increase gradually over time if needed.
- Avoid over-fertilizing, as it can lead to salt buildup in the soil, which may damage the roots. It is generally better to slightly under-fertilize than to overdo it.
- Fertilize your Philodendron Opacum plant once a month during the growing season, which is usually spring through summer. Reduce or stop fertilization during the fall and winter when the plant's growth slows down.
- Regularly monitor the plant's health and adjust the fertilization frequency or strength accordingly. Signs of over-fertilization include burnt leaf tips, stunted growth, or discoloration.
- Always follow the specific instructions provided with your chosen fertilizer, as different products may have slightly different guidelines.
The ideal soil for PhilodendronOpacum is well-draining and rich in organic matter. It should be relatively loose and allow for good water penetration. Additionally, the soil should be slightly acidic with a pH of around 6.0 to 7.0. A mix of perlite, peat moss, and vermiculite works well for this plant. It is also important to use a pot with drainage holes to prevent waterlogging the soil. Overall, the soil should provide adequate drainage, nutrition, and aeration to support healthy root growth and plant development.
- Start by selecting a healthy mature Philodendron Opacum plant for propagation. Check for signs of disease or insect infestation and choose a plant that has vibrant foliage and strong stems.
- Prepare a clean working surface and gather the necessary tools and materials, including clean pruning shears, a sharp knife or razor blade, a sterile container for rooting, and a well-draining propagation medium such as perlite or a mixture of peat moss and sand.
- Before beginning the propagation process, it is recommended to water the plant a day or two in advance to ensure it is well-hydrated and in optimal condition for rooting.
- Carefully identify a healthy stem with several nodes or aerial roots. Nodes are slightly swollen areas on the stem where leaves or aerial roots emerge. These nodes are crucial for root development.
- Use sterilized pruning shears or a sharp knife to make a clean cut directly below a node. Ensure the cutting is at least 4-6 inches long for better chances of successful rooting.
- Remove any excess leaves or aerial roots from the lower half of the cutting, leaving only 2-3 leaves on the upper end. This helps reduce moisture loss and directs the plant's energy towards root development.
- If using a rooting hormone, dip the cut end of the stem into the rooting hormone powder or liquid, following the product instructions. This aids in promoting root formation.
- Fill the sterile container with the well-draining propagation medium. Make a small hole in the medium using a pencil or your finger.
- Insert the cutting into the prepared hole, ensuring that at least two nodes or aerial roots are buried beneath the medium. Gently press the medium around the cutting to secure it in place.
- Mist the cutting and the surrounding medium with water to increase humidity. Alternatively, cover the container with a clear plastic bag to create a mini-greenhouse effect that maintains high humidity levels.
- Place the container in a warm and bright location, avoiding direct sunlight that could scorch the cutting. Ensure the temperature is consistently between 70-80°F (21-27°C) to facilitate root development.
- Monitor the cutting regularly for the next few weeks, ensuring that the propagation medium remains moist but not waterlogged. If the medium dries out, mist it with water or lightly water from the base.
- After about 6-8 weeks, gently tug on the stem to check for resistance, indicating root development. If resistance is felt, it means the cutting has successfully rooted.
- Once the cutting has developed a healthy root system, carefully transplant it into a well-draining potting mix, slightly larger than its root ball.
- Provide the newly potted plant with optimal growing conditions, including bright, indirect light, and regular watering. Gradually acclimate it to its new environment by gradually exposing it to longer periods of direct light.
By following these steps, you can propagate and grow a new Philodendron Opacum plant from a mature parent plant, providing you with a beautiful addition to your indoor or outdoor green space.


