Plant Overview
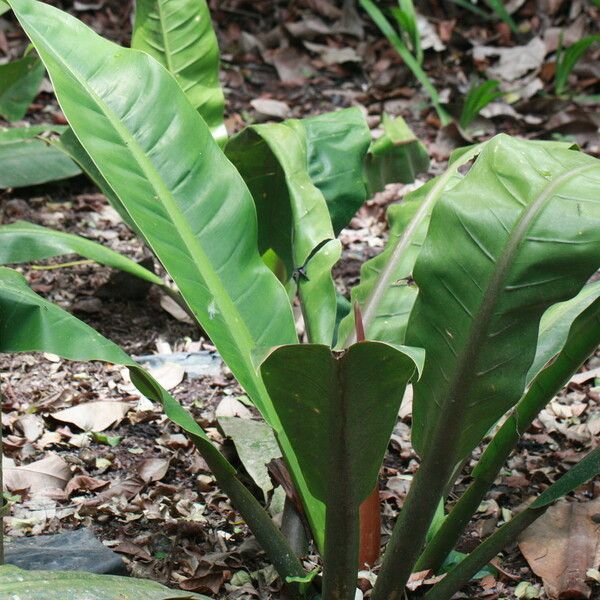
Meet the architectural marvel of the jungle floor, often called the "Bird’s Nest Philodendron." Unlike its climbing cousins that trail down shelves or scale walls, this Costa Rican native grows in a dramatic, self-heading rosette. It is a favorite for collectors who want a prehistoric, lush look without the need for moss poles or messy trellises.
🔍 How to Identify
- 🍃 Leaf Shape: Long, lance-shaped (strap-like) leaves that are remarkably glossy and can reach up to two feet in length as the plant matures.
- 🌿 Growth Habit: It forms a dense, circular "nest" where all leaves emerge from a single central crown, rather than growing along a running vine.
- 🧪 The Petioles: Look closely at the leaf stalks; they are short, thick, and have a distinct spongy texture with a flattened or slightly channeled top surface.
🏡 In Your Garden
- 💧 Hydration Nuance: Because those thick petioles (leaf stalks) store a bit of water, this Philodendron is more forgiving of a missed watering than thinner-leaved varieties. It prefers its soil to dry out halfway down the pot before getting another drink.
- 🪴 The Epiphytic Edge: In the wild, it often grows on tree branches rather than in the dirt. At home, it hates "wet feet," so use a chunky potting mix with plenty of orchid bark and perlite to keep the roots breathing.
- ☀️ Light Logic: While it can tolerate lower light, its "nest" shape will become loose and leggy if it's too dark. Medium, filtered light keeps the rosette tight and the leaves deep green.
⚠️ Safety & Toxicity
- 🚫 Status: Toxic to humans, cats, and dogs.
- 🐾 Details: This plant contains calcium oxalate crystals. If a leaf is chewed, these microscopic "needles" cause immediate mouth pain, drooling, and swelling. It is best kept on a high stand or shelf out of reach of curious pets and toddlers.
✨ Fun Fact
In the rainforests of Central America, Philodendron wendlandii acts as a literal "trash can" for the trees above; its nest-like shape is designed to catch falling leaf litter, which then decomposes to provide the plant with nutrients!

Detailed Care Instructions
To grow Philodendron Wendlandii plant, follow these steps:
- Choose a suitable location: Philodendron Wendlandii prefers bright, indirect light, so place it near a window with filtered sunlight or in a spot with bright but indirect light.
- Pick the right soil: Use well-draining soil that retains some moisture but is not waterlogged. A mixture of peat moss, perlite, and orchid bark works well for the Philodendron Wendlandii.
- Watering: Water the plant regularly, ensuring that the top inch of soil remains slightly moist. Avoid overwatering or letting the plant sit in standing water, as it can lead to root rot.
- Humidity: Philodendron Wendlandii thrives in high humidity. You can increase humidity by placing the pot on a tray filled with water and pebbles or using a humidifier. Misting the leaves can also help.
- Temperature: The plant prefers temperatures between 65-75°F (18-24°C). Avoid exposing it to cold drafts or extreme temperature fluctuations.
- Fertilizing: Use a balanced, water-soluble fertilizer once a month during the growing season (spring and summer). Follow the package instructions for the appropriate dosage.
- Pruning: Trim any leggy or yellowing leaves to maintain a neat appearance and encourage new growth. You can also trim stems to control the plant's size and shape.
- Propagation: Propagate Philodendron Wendlandii through stem cuttings. Cut a healthy stem just below a node and place it in water or directly into moist soil. Keep the cutting warm and provide it with indirect light until it develops roots.
- Repotting: If the plant outgrows its current container, repot it into a slightly larger pot, using fresh soil. Repotting is usually necessary every 1-2 years.
By providing the right conditions, regular care, and attention, you can successfully grow a Philodendron Wendlandii plant.

Place in a window with dappled sun or a spot in the middle of a room. Or directly in a window facing west or east.

To water this plant, it is important to make sure the soil is thoroughly moistened. Before watering, check the top inch of soil to make sure it has dried out slightly. When watering, use room temperature water and pour slowly, making sure the water penetrates the soil deeply. Be sure to allow excess water to drain from the bottom of the pot. Avoid allowing the soil to become waterlogged, as this can lead to root rot. It is also important to avoid watering directly onto the leaves, as this can encourage fungal growth. Instead, water at the base of the plant. Finally, it is important to avoid letting the soil completely dry out between waterings and to keep the plant in a humid environment.
To fertilize this plant, use a balanced liquid fertilizer with equal parts of nitrogen, phosphorus and potassium. Mix the fertilizer with water at half strength and apply once a month during the growing season (spring and summer). Avoid over-fertilization as it can damage the roots. During the dormant season (fall and winter), reduce the frequency of fertilization to once every two to three months. Always water the plant thoroughly before and after fertilizing to prevent burning the roots.
Philodendron Wendlandii plant thrives in soil that is rich in nutrients and well-draining. A mixture of peat moss, perlite, and vermiculite is an ideal soil mixture for this plant as it retains moisture while also allowing excess water to drain away. Alternatively, a mixture of high-quality potting soil, coarse sand, and pine bark can also be used as it provides adequate drainage and aeration for the plant's roots. It is important to avoid using heavy soils that do not drain well, as this can lead to waterlogging and root rot. Additionally, adding organic matter to the soil, such as compost or aged manure, can provide additional nutrients to the plant.
Philodendron Wendlandii plant propagation can be done through stem cuttings. Select a healthy stem that has at least two nodes and cut it about 4-6 inches long using a sterilized sharp pruning shear. Remove the lower leaves leaving only the top one or two sets of leaves attached to the stem cutting.
Place the stem cutting in a jar of water with the node submerged and keep in a bright, but indirect light. Change the water every other day to prevent bacterial growth. Within a few weeks, roots will start forming from the node. Once the roots are about an inch long, transfer the cutting to a well-draining potting mix and keep it in a warm and humid environment.
Water the cutting regularly but do not overwater. Allow the soil to dry out slightly before watering again. After a few weeks, the plant will start to produce new leaves, signaling that it has established itself in its new home.
Common pests of the philodendron wendlandii include Mealybugs, spider mites, fungus gnats, thrips. Make a habit of checking your philodendron wendlandii frequently for pests so that any infestations can be caught and managed early.


