Plant Overview
Often called the "Pointed Phlox" or "Star Phlox," this Texas native is a spring showstopper that blankets prairies in shades of rosy pink and lavender. It is a hardy survivor that thrives where other delicate flowers might wither, often popping up in dry, sandy roadside patches where it paints the landscape with color. In the language of flowers, Phlox symbolizes "sweet dreams" and "soul compatibility," making it a poetic addition to any wild meadow garden.
🔍 How to Identify
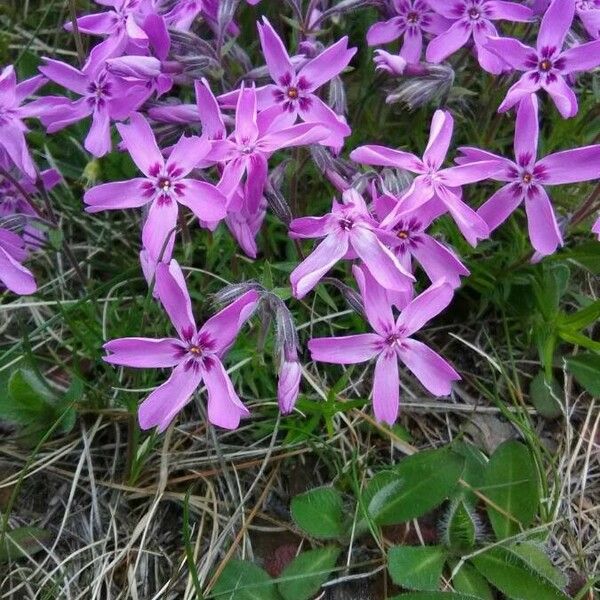
- 🌸 Star-Shaped Blooms: Unlike the rounded petals of common Garden Phlox, these flowers have distinctively pointed, almost needle-like tips on their five petals, giving them a jagged, star-like appearance.
- 🌿 Hairy Foliage: The stems and lance-shaped leaves are covered in fine, stiff hairs (pubescent), which act as a defense mechanism against water loss and hungry crawling insects.
- 📏 Low Growth Habit: This is a compact annual, typically reaching only 6 to 15 inches in height, often growing in dense, colorful clumps rather than tall stalks.
🏡 In Your Garden
- ☀️ Sun-Seeking Pioneer: This plant is a specialist for sandy, well-draining soils. It prefers "lean" environments over rich, soggy compost; if your garden soil is heavy clay, ensure you amend it with sand or grit to prevent root rot.
- 🦋 The Butterfly Buffet: Because of its tubular flower shape, it is a favorite landing pad for butterflies and long-tongued bees. It provides a vital nectar source during the peak of the spring pollinator season.
⚠️ Safety & Toxicity
- 🟢 Safe Status: Phlox cuspidata is generally considered non-toxic to humans, dogs, and cats. It is a worry-free choice for gardens shared by curious pets and children.
- 🧤 Mild Irritant: While not poisonous, the "hairy" texture of the stems can occasionally cause very mild mechanical skin irritation for individuals with high sensitivity. Wearing gloves during pruning is a simple precaution.
✨ Fun Fact
The species name cuspidata comes from the Latin word cuspis, meaning "point" or "spear." This perfectly describes the sharp, triangular tips of the petals that distinguish it from its many Phlox cousins.

Detailed Care Instructions
To grow Phlox Cuspidata, also known as alpine phlox or spearleaf phlox, you can follow these steps:
- Select a suitable location: Phlox Cuspidata prefers full sun to partial shade. Choose a spot in your garden that receives at least 6 hours of direct sunlight per day. Ensure the soil is well-draining and has a slightly acidic to neutral pH level.
- Prepare the soil: Before planting, loosen the soil and remove any weeds or debris. Incorporate organic matter into the soil to improve its fertility, moisture retention, and drainage.
- Plant the seeds: Phlox Cuspidata is usually propagated from seeds. Sow the seeds directly into the soil during early spring or fall. Lightly cover the seeds with a thin layer of soil, as they require light to germinate.
- Watering: Keep the soil consistently moist, but not waterlogged, during the germination period. Once the plants are established, reduce the frequency of watering. Water deeply and infrequently to encourage deep root growth.
- Mulching: Apply a layer of organic mulch around the plants to help retain moisture, suppress weed growth, and regulate soil temperature.
- Fertilization: Phlox Cuspidata generally doesn't require excessive fertilization. However, you can apply a balanced slow-release fertilizer in early spring or use compost as a natural fertilizer.
- Pruning: Trim off spent flowers to promote continuous blooming and to prevent self-seeding. In late autumn or early spring, cut back the plants to encourage fresh growth.
- Pests and diseases: Phlox Cuspidata is relatively resistant to most pests and diseases. However, keep an eye out for common issues like powdery mildew or aphids. Treat them promptly if detected.
- Winter care: Phlox Cuspidata is a hardy plant that can tolerate cold temperatures. However, to protect the roots during severe winters, you can apply a layer of mulch around the base of the plants.
It's worth noting that Phlox Cuspidata is a native alpine plant found in mountainous regions. Therefore, it may require specific environmental conditions to thrive in your area. Make sure to research your local climate and growing conditions to ensure optimal success.

Place in a bright room that is sun drenched almost all day. Or directly in a south-facing window.

Phlox Cuspidata plant prefers to receive frequent but light waterings, ensuring that the soil remains consistently moist but not waterlogged. Watering should be carried out in the early morning or late evening, avoiding the heat of the day. It is best to water at the base of the plant rather than pouring water on the foliage to avoid the risk of disease. The frequency and amount of water required will depend on the temperature, humidity, and soil conditions. Monitor the soil moisture regularly and adjust the watering accordingly. It is important not to let the soil completely dry out between watering sessions.
To fertilize this plant, apply a balanced, slow-release fertilizer in the spring when new growth begins. Alternatively, you can use an organic fertilizer such as compost or well-rotted manure. Apply the fertilizer at a rate of 1/2 to 1 pound per 100 square feet of planting area. Water the plant thoroughly after fertilizing to help the nutrients reach the roots. Repeat the fertilization process in mid-summer if necessary to maintain healthy growth and blooms.
Phlox Cuspidata prefers a well-draining soil that is rich in organic matter. The soil should be slightly acidic, with a pH between 5.5 and 6.5. It is important to avoid heavy clay soils that hold too much moisture, as this can lead to root rot. A sandy loam soil is ideal for this plant as it allows for proper drainage while retaining enough moisture for growth. Adding compost or organic matter to the soil can also improve its quality and provide necessary nutrients for the plant. It is best to plant Phlox Cuspidata in a location that receives full to partial sun exposure, and to avoid overcrowding as it needs space to spread its roots.
Phlox Cuspidata is a perennial flowering plant that can be propagated through stem cuttings. The first step is to select a healthy stem from an established plant. This stem should be approximately 4-6 inches long and have several sets of leaves.
Using a sharp knife or sterilized scissors, take a cutting from the stem just below a node, which is where the leaves are attached. Remove any lower leaves or buds from the stem, leaving only a few leaves near the top.
Dip the cut end in rooting hormone and then plant the cutting in a pot filled with a well-draining potting mix. Firmly press the soil around the cutting to ensure it is secure.
Water the cutting thoroughly and cover the pot with a plastic bag or clear plastic wrap to create a mini greenhouse. This will help keep the cutting moist and increase the chances of successful rooting.
Place the pot in a warm, bright location but out of direct sunlight. Keep the soil moist but not waterlogged.
After a few weeks, check the cutting by gently tugging on it. If there is resistance, it has rooted. Once rooted, remove the plastic cover and gradually acclimate the plant to normal indoor or outdoor conditions.


