Plant Overview
Commonly known as "Downy Phlox" or "Prairie Phlox," this North American native is the soft-spoken star of the wildflower world. It earned its nickname from the fine, velvety hairs that coat its stems and leaves, giving it a silver-green shimmer in the morning light. Historically, indigenous tribes used it as a seasonal marker, as its fragrant lavender blooms signal the height of spring and the arrival of the year’s first butterflies.
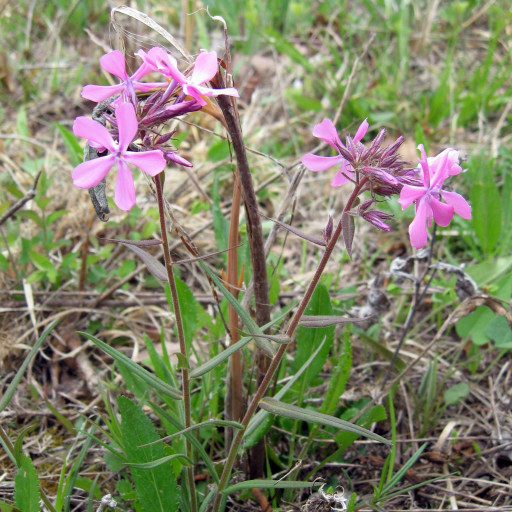
🔍 How to Identify
- 🍃 The Foliage: Long, narrow, lance-shaped leaves that grow in opposite pairs along the stem. They are notably "pilose" (covered in soft, fuzzy hairs).
- 🌸 The Bloom: Star-shaped flowers with five rounded petals. They typically appear in clusters of pink, violet, or occasionally white, often featuring a darker "eye" at the center.
- 📏 The Stature: A relatively compact perennial, it usually grows between 12 to 24 inches tall, creating a low-growing, airy cloud of color rather than a dense shrub.
🏡 In Your Garden
- 🦋 Pollinator Banquet: This plant is a critical food source for long-tongued insects. Because the nectar is hidden deep in a floral tube, it is a favorite of the clearwing hummingbird moth and various swallowtail butterflies.
- 🌬️ Air Circulation is Key: Unlike some hybrid garden phlox, this wild species is fairly hardy, but it demands good airflow. Planting it too closely to other heavy foliage can lead to powdery mildew, which thrives in stagnant, humid air.
- 🏜️ Drought Tolerance: Once its root system is established, it is surprisingly resilient. It handles dry spells better than its tall garden cousins, making it a perfect candidate for rock gardens or prairie-style landscapes.
⚠️ Safety & Toxicity
- ✅ Safe Status: Phlox pilosa is widely considered non-toxic to humans and common household pets.
- 🐾 Pet Friendly: It is generally safe for cats, dogs, and horses. While it isn't "tasty" to most animals, a curious nibble from a pet is unlikely to cause anything more than a minor stomach upset from the fiber.
✨ Fun Fact
The name "Phlox" comes from the Greek word for "flame." While Phlox pilosa is usually a soft pastel, the name was originally given to the genus because of the intense, fiery red and hot pink colors seen in wild colonies that look like flickering torches across a meadow.

Detailed Care Instructions
To grow Phlox pilosa, also known as prairie phlox or downy phlox, here are some steps you can follow:
- Choose a suitable location: Phlox pilosa prefers full sun to partial shade, so select a spot in your garden that receives at least 6-8 hours of direct sunlight per day.
- Prepare the soil: The plant thrives best in well-draining soil with a pH level of 5.8 to 7.5. Add organic matter like compost or aged manure to improve the soil's texture and fertility.
- Sow seeds or plant seedlings: You can either start Phlox pilosa from seeds or purchase young plants from a nursery. If starting from seeds, sow them directly in the garden in late spring or early summer, after the danger of frost has passed. If using seedlings, transplant them into the garden after hardening them off.
- Water regularly: Keep the soil consistently moist but not waterlogged. Water the plant deeply at the base, avoiding overhead watering, as it can promote disease.
- Mulch the soil: Apply a layer of organic mulch around the base of the plant to help retain moisture, suppress weeds, and provide some insulation to the roots.
- Support the plants: Some types of Phlox pilosa may benefit from staking or support if they have weak stems. This can prevent them from flopping over and provide additional structural support.
- Prune as needed: Phlox pilosa can benefit from periodic pruning. After the plant has finished blooming, remove any dead or diseased stems and trim back the foliage to maintain a more compact shape.
- Fertilize sparingly: Phlox pilosa is not a heavy feeder, so avoid excessive fertilization. Use a slow-release, balanced fertilizer once in early spring, following the package instructions.
- Control pests and diseases: Keep an eye out for common garden pests like aphids, spider mites, and slugs. Use organic pest control methods when necessary. Ensure good air circulation to prevent fungal diseases like powdery mildew by providing adequate spacing between plants.
- Enjoy the blooming: With proper care, your Phlox pilosa should start blooming in late spring or early summer, producing small, fragrant flowers in colors ranging from pink to lavender or blue. Enjoy the beautiful display and consider cutting some flowers for indoor arrangements.
Remember to check for specific care instructions for your specific variety of Phlox pilosa, as they may have slightly different requirements.

Place in a bright room that is sun drenched almost all day. Or directly in a south-facing window.

Watering this plant requires regular attention and care. It is important to provide adequate moisture to the soil without over-saturating it. The best way to water this plant is to check the soil moisture levels frequently by inserting your finger into the soil several inches deep. If the soil feels dry to the touch, it is time to water. When watering, ensure that the water is directly applied to the soil surrounding the plant's base. Avoid spraying water on the plant's foliage as this can cause water droplets to form on the leaves, which can lead to fungal growth. During hot, dry periods, it may be necessary to water this plant more frequently to prevent the soil from drying out completely. However, be careful not to over-water, as this can lead to root rot and other issues.
To fertilize the Phlox Pilosa plant, it is recommended to apply a balanced fertilizer in the early spring before new growth appears. Use a slow-release fertilizer according to package instructions and apply it evenly across the soil surface around the base of the plant. Water deeply after fertilizing to encourage nutrient uptake. Repeat the application of fertilizer every 4-6 weeks throughout the growing season, taking care not to over-fertilize as this can lead to excessive growth and reduced flowering.
Phlox Pilosa plant prefers well-drained soil with a slightly acidic to neutral pH level. The ideal soil for this plant is a loamy soil with excellent drainage capabilities. The soil should be rich in organic matter and nutrients to promote healthy growth. Avoid using heavy, clay soils as they retain too much moisture, which can lead to root rot. Furthermore, ensure the soil is not too alkaline, as the plant may struggle to take up nutrients. To improve the soil quality, mix in compost and peat moss before planting.
To propagate this species of plant, take stem cuttings from a mature plant during the spring or summer months. Cut a 4-5 inch section of stem from the tip or middle of the plant, making sure to remove any flowers or buds. Remove the leaves from the lower half of the stem, leaving only a few at the top. Dip the cut end of the stem in rooting hormone and plant it in a soilless growing medium, such as perlite or vermiculite. Water the cutting well and enclose it with a clear plastic bag to create a miniature greenhouse. Place the cutting in a bright, warm location that receives indirect sunlight, taking care to keep the soil moist but not waterlogged. Check the cutting regularly for signs of new growth or roots forming. Once new growth is visible or roots have formed, the cutting can be transplanted into a pot or directly into the garden.
Common pests of the prairie phlox include Spider mites, aphids, larvae. Make a habit of checking your prairie phlox frequently for pests so that any infestations can be caught and managed early.


