Plant Overview
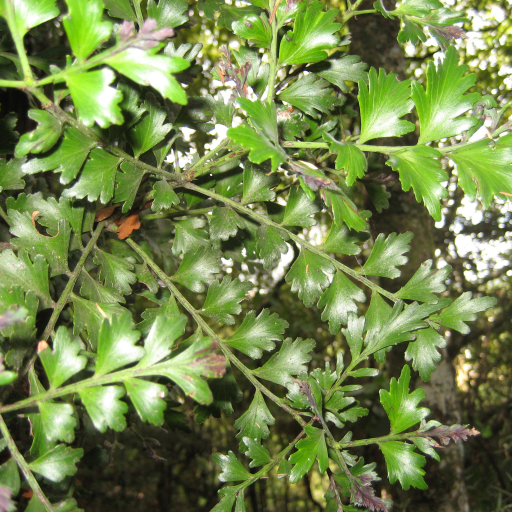
Often called the Tanekaha or New Zealand Celery Pine, this striking conifer is a master of disguise. While it appears to have delicate, serrated leaves, it actually lacks true leaves entirely! It is an ancient lineage of tree, known for its elegant, tiered branching and its historical role as a cornerstone of Māori craft and construction.
🔍 How to Identify
- 🌿 The "Celery" Foliage: What look like leaves are actually phylloclades—flattened, fan-shaped branchlets that have evolved to perform photosynthesis in place of traditional leaves.
- 📐 Tiered Architecture: Young trees grow in incredibly symmetrical, horizontal tiers, giving them a distinct "pagoda-like" or "Christmas tree" silhouette.
- 🌑 Smooth Bark: The trunk is covered in smooth, brownish-grey bark that is rich in tannins and becomes more textured as the tree reaches its full height.
🏡 In Your Garden
- 🪵 Slow and Steady: This is a patient grower that values stability. Because it develops a sensitive root system, it often suffers from "transplant shock." It is best to choose a permanent "forever home" and avoid moving it once planted.
- 💧 Drainage is Key: While it enjoys the humid temperate climates of the Southern Hemisphere, it cannot tolerate "wet feet." It thrives best in acidic, free-draining soil enriched with leaf mulch to mimic a forest floor.
⚠️ Safety & Toxicity
- 🛡️ Safe Status: The Tanekaha is generally considered non-toxic to humans, cats, and dogs.
- 👅 Bitter Defense: The bark and foliage are extremely high in tannins. While not poisonous, they are incredibly astringent and bitter, which usually prevents curious pets or children from taking more than one nibble.
✨ Fun Fact
The name "Tanekaha" translates from Māori to "Strong Man." This refers to the tree’s incredibly tough yet flexible timber, which was historically the preferred material for making canoe masts and fish hooks because it could withstand immense pressure without snapping.

Detailed Care Instructions
To grow Phyllocladus trichomanoides, also known as the mountain celery pine or tanekaha, you can follow these steps:
- Climate and location: This plant is native to New Zealand and thrives in cool, wet climates. It prefers partial shade to full sun. Ensure that your location provides suitable conditions for this plant to grow.
- Soil: Phyllocladus trichomanoides prefers slightly acidic, well-draining soil. It can tolerate different soil types, but rich, loamy soil is ideal. If necessary, amend the soil with organic matter to improve drainage and fertility.
- Planting: Choose healthy, young plants or obtain seeds from a reputable source. Plant them in early spring or autumn. Dig a hole slightly larger than the container the plant comes in. Gently remove the plant from the container, place it in the hole, and backfill with soil, ensuring that the crown of the plant is level with the surrounding soil.
- Watering: Water the plant thoroughly after planting and keep the soil consistently moist. Regularly check the moisture level by sticking your finger into the soil. If it feels dry 1-2 inches below the surface, it's time to water. Be careful not to overwater, as excessive moisture can lead to root rot.
- Mulching: Apply a layer of organic mulch around the base of the plant to help retain moisture, suppress weeds, and protect the roots from extreme temperatures.
- Pruning: Minimal pruning is required for Phyllocladus trichomanoides. Remove any dead, damaged, or diseased branches to maintain its overall health and appearance.
- Fertilizing: This plant generally does not require heavy fertilization. However, in early spring, you can apply a slow-release, balanced fertilizer to encourage healthy growth. Follow the instructions on the fertilizer packaging for dosage and application.
- Pests and diseases: Phyllocladus trichomanoides is relatively resistant to pests and diseases. However, it can be susceptible to root rot in poorly drained soil. Ensure proper soil drainage to prevent this issue.
- Monitoring: Regularly inspect the plant for any signs of distress, damage, or insect infestations. Promptly address any issues to prevent them from spreading or impacting the plant's growth.
Remember, growing plants can be a process that requires patience. Provide appropriate care and adequate time for your Phyllocladus trichomanoides to grow and establish itself.

Place in a bright room that is sun drenched almost all day. Or directly in a south-facing window.

This plant prefers moist soil, so it is important to water it regularly. However, it is also important not to overwater it, as this can lead to root rot. The best way to water this plant is by thoroughly soaking the soil and allowing any excess water to drain out of the pot or planting area. It is important to avoid getting water on the foliage, as this can lead to fungal diseases. Additionally, it is best to use room temperature or lukewarm water, rather than cold water from the tap. Finally, during periods of drought or heat stress, it may be necessary to water this plant more frequently to ensure that it stays healthy and hydrated.
To fertilize this plant, use a balanced fertilizer with equal parts nitrogen, phosphorous, and potassium. Apply the fertilizer in early spring before new growth emerges. Use a slow-release fertilizer to avoid burning the roots. Water the plant thoroughly after fertilizing to help the nutrients reach the roots. Avoid over-fertilizing as it can cause excess growth and weaken the plant.
Phyllocladus Trichomanoides plant prefers well-draining soil that is rich in nutrients, preferably slightly acidic in pH. The soil should be able to retain moisture but not be waterlogged as the plant is sensitive to root rot. A mixture of organic matter, such as compost or leaf mold, and sand or perlite can help improve drainage and create a suitable environment for the plant to grow. Additionally, adding a slow-release fertilizer can provide the necessary nutrients for healthy growth. It is important to ensure the soil is free of pests and diseases before planting as this can affect the health of the plant.
To propagate this plant, you will need to collect stem cuttings that are at least 6 inches long and have several nodes on them. Prepare a mix of well-draining soil and perlite, and fill a small container with the mixture. Strip the lower leaves from the cutting and dip the cut end in rooting hormone powder. Make a hole in the soil mixture and insert the cutting, gently pressing the soil around it. Water the cutting thoroughly and cover the container with a plastic bag or dome to create a humid environment. Place the container in a bright, but indirect light. Keep the soil moist and mist the cutting occasionally to maintain humidity. After a few weeks, carefully check the cutting for roots. Once the roots have formed, remove the plastic cover and gradually increase the amount of light the new plant receives.
Common pests of the celery pine include Scale insect, mealybugs, aphids, thrips. Make a habit of checking your celery pine frequently for pests so that any infestations can be caught and managed early.


