Plant Overview
Known as the "Moon Valley" Pilea, this Central and South American native looks like it was plucked straight from a lunar landscape. Its deeply cratered leaves and vibrant burgundy veins make it a favorite for those who want a plant that feels like a piece of living texture. It is often grouped under the "Friendship Plant" umbrella because it is incredibly easy to propagate and share with fellow gardeners.
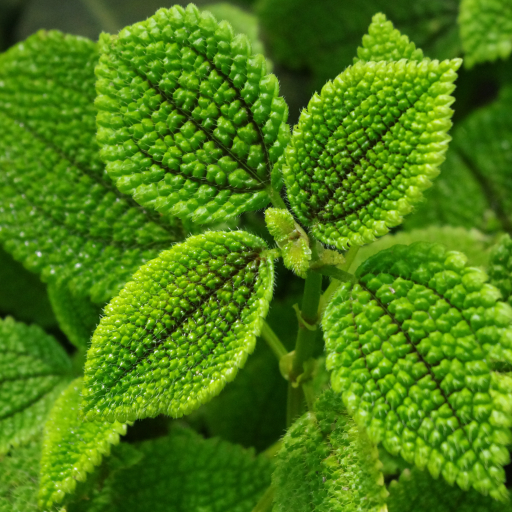
🔍 How to Identify
- 🍃 Deeply Textured Foliage: The most striking feature is the corrugated, "quilted" leaf surface that resembles the rough, cratered topography of the moon.
- 🎨 Contrast Coloring: While the base of the leaf is a bright apple-green, the deep valleys and veins are often a rich bronze or chocolate-burgundy.
- 📐 Saw-Toothed Edges: The oval-shaped leaves feature delicate, serrated edges that give the plant a slightly wild, jagged appearance.
🏡 In Your Garden
- ☁️ Humidity is Key: Because its leaves are so thin and textured, they lose moisture quickly. This plant thrives in high-humidity environments like terrariums or steamy bathrooms.
- 💧 Avoid "Wet Feet": While it loves moisture, its delicate root system is prone to rot. Always use a well-draining potting mix (like a peat-perlite blend) to ensure oxygen reaches the roots.
- ☀️ Light Sensitivity: The unique "craters" on the leaves catch light from every angle, making them sensitive to burning. Keep it in bright, filtered light to maintain its deep colors without scorching the foliage.
⚠️ Safety & Toxicity
- 🐾 Non-Toxic: Good news for pet owners! The Pilea Mollis is considered non-toxic to cats, dogs, and horses.
- 👶 Safe for Humans: It is also safe for curious children, though the heavily textured leaves are best enjoyed with the eyes rather than the hands to avoid damaging the plant.
✨ Fun Fact
The Pilea Mollis is part of the Urticaceae (Nettle) family, but unlike its stinging cousins, it lacks the irritating hairs that cause skin rashes, making it a perfectly "friendly" member of the group!

Detailed Care Instructions
| Soil Ph | 5-6 |
| Lighting | Part Sun |
| Soil Type | Average, Well-Draining |
| Bloom Time | Spring |
| Mature Size | Won't Reach Over 12” |
| Sun Exposure | From Bright Indirect Light To Medium Light |
| Hardiness Zones | 9-11 |
To grow a Pilea Mollis plant successfully, follow these steps:
- Environment: Provide the plant with bright, indirect light. Avoid direct sunlight as it can scorch the leaves. Pilea Mollis prefers a temperature range between 60-75°F (15-24°C).
- Watering: Water the plant thoroughly when the top inch (2.5 cm) of soil feels dry. Ensure proper drainage to prevent root rot. Over-watering can be harmful, so allow the soil to dry out slightly between waterings.
- Humidity: Pilea Mollis prefers humid conditions. Increase humidity by misting the leaves regularly or placing the plant on a tray filled with water and pebbles.
- Soil: Use well-draining soil to avoid waterlogging the roots. A mix that includes potting soil, perlite, and peat moss works well. Ensure the pot has drainage holes to prevent excessive moisture.
- Fertilizer: Feed the plant with a balanced houseplant fertilizer once a month during the growing season (spring and summer). Follow the package instructions for the proper dilution and frequency.
- Pruning: Trim any leggy or dead growth to maintain a compact and healthy plant. Regular pruning also encourages branching and promotes fuller growth.
- Propagation: Pilea Mollis can be propagated through stem or leaf cuttings. Take a 3-4 inch (7-10 cm) cutting from a healthy plant, remove the lower leaves, and root it in well-draining soil or water. Keep the cutting moist and in a warm location until roots form.
- Repotting: If the plant outgrows its current pot or the roots are congested, repot it into a slightly larger container with fresh soil. Repotting is typically done in spring.
By providing these care tips, you can successfully grow and maintain a Pilea Mollis plant. Keep an eye on its growth and adjust care as needed.

Place in a window with dappled sun or a spot in the middle of a room. Or directly in a window facing west or east.

To water this particular type of plant, it is important to first check the soil moisture level by inserting your finger about an inch deep into the soil. If the soil feels dry, it is time to water the plant. However, if it feels moist, it is better to wait a few more days before watering again.
When watering, make sure to use room temperature water and pour it slowly and evenly onto the soil until it comes out through the drainage hole at the bottom of the pot. It is important not to overwater the plant, as it can lead to root rot.
During the summer months, the plant may require more frequent watering as the weather is warmer and the soil dries out faster. However, during the winter months, the plant may require less watering as it enters a dormant phase.
It is also important to note that this plant prefers well-draining soil that is slightly acidic, so avoid using tap water that is high in minerals. Instead, use filtered or distilled water to prevent build up of chemicals in the soil.
To fertilize this plant, use a balanced fertilizer with equal amounts of nitrogen, phosphorus, and potassium. Apply the fertilizer every 2-3 weeks during the growing season (spring and summer). During the dormant season (fall and winter), cut back on fertilizing to once a month or stop altogether. Dilute the fertilizer to half strength before applying it to the soil. Make sure to water the plant before and after application to avoid stressing the roots. Avoid over-fertilizing, as this can cause damage to the plant.
Pilea Mollis plant prefers to grow in well-draining soil that is rich in nutrients. The ideal soil for this plant can be made using a mixture of organic materials such as peat moss, cocoa peat, and perlite. The soil should be moist but not waterlogged, and it should allow air to circulate freely around the roots. Pilea Mollis plant needs a slightly acidic pH level, between 5.5 and 6.5, to thrive. The soil should be changed every two years or when the plant outgrows its container. It is important to ensure that the soil does not become compacted, as this can lead to root rot. A quality potting mix for indoor plants can also be used for Pilea Mollis plant.
Pilea mollis can be propagated by stem cuttings. Select a healthy stem with leaves and use a clean, sharp pair of scissors or pruning shears to make a clean cut. Remove any leaves from the bottom third of the stem to prevent them from rotting. Dip the cut end in rooting hormone powder. Fill a small pot with moist soil and make a hole with a pencil. Insert the cutting into the hole and press the soil around it firmly. Water the soil to evenly moisten it and cover the pot with a clear plastic bag to make a mini greenhouse. Keep the soil moist and the cutting in bright, indirect light. Rooting should occur within 4-6 weeks and new growth will indicate a successful propagation.


