Plant Overview
Often called the "Florida Pennyroyal," this resilient little evergreen shrub is a staple of the southeastern coastal scrub and pine flatwoods. When you brush against its needle-like foliage, it releases a potent, spicy-mint fragrance that can perfume an entire garden path. While it looks like a delicate wildflower, it is actually a rugged, woody perennial that thrives in the harsh, sandy conditions where few other plants survive.
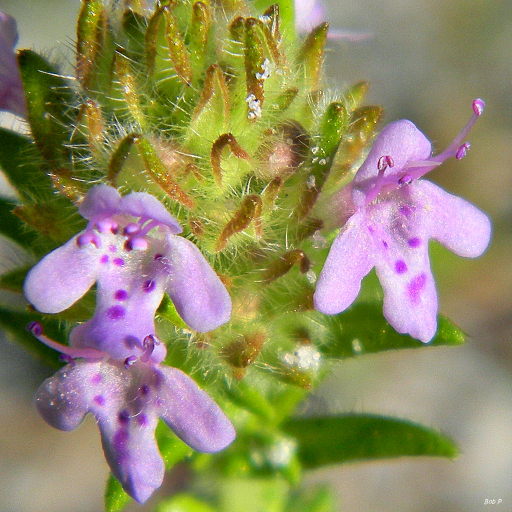
🔍 How to Identify
- 🍃 Needle-like Foliage: The leaves are small, stiff, and linear, resembling rosemary but with a much softer, more flexible texture.
- 🌸 Lavender Clusters: It produces terminal clusters of tubular, two-lipped flowers that range from pale lavender to white, often decorated with tiny purple "nectar guide" spots.
- 🌿 Prostrate Habit: The plant usually grows in a low, mounding fashion, rarely exceeding two feet in height, with square-ish stems that become woody at the base as they age.
🏡 In Your Garden
- ☀️ The Sun Worshiper: This plant is a true child of the sun. It requires bright, direct light to maintain its compact shape; in the shade, it can become "leggy" and lose its aromatic potency.
- 🏜️ Sugar Sand Specialist: It is perfectly adapted to nutrient-poor, sandy soils. Because it evolved in well-draining environments, it is extremely drought-tolerant but will suffer from root rot if left in standing water or heavy clay.
- 🦋 Pollinator Magnet: It serves as a vital nectar source during the cooler months when other flowers are dormant, making it a favorite for native bees and the rare Miami Blue butterfly.
⚠️ Safety & Toxicity
- ✅ Generally Safe: Wild Pennyroyal is not considered a high-risk toxic plant for humans when touched.
- 🐾 Pet Caution: While the plant is aromatic and generally avoided by grazers, the concentrated essential oils in the leaves can cause stomach upset or skin irritation in curious cats and dogs if consumed in large quantities.
- 🚫 The "Two Pennyroyals" Warning: Do not confuse this native Florida plant with Mentha pulegium (European Pennyroyal). The European variety contains high levels of pulegone, which is a potent liver toxin. While Piloblephis rigida has been used in folk teas, it should always be used with caution and proper identification.
✨ Fun Fact
Early Floridians and indigenous tribes used bunches of Wild Pennyroyal as a natural insect repellent. They would hang dried bundles in their homes or rub the crushed leaves directly on their skin to ward off mosquitoes and fleas!

Detailed Care Instructions
To grow Piloblephis rigida plants, follow these steps:
- Choose a suitable location: Select a spot with partial shade or filtered sunlight. The plant can tolerate full shade but prefers some light. Ensure the soil is well-draining and rich in organic matter.
- Prepare the soil: Amend the soil by adding compost or well-rotted manure. This will improve the soil structure and fertility. Avoid heavy clay or waterlogged soil as it can harm the plant.
- Planting: Dig a hole slightly larger than the nursery container or root ball of the plant. Place the plant into the hole, making sure it sits at the same depth as it was in the container. Backfill the hole with soil, gently firming it around the roots. Water the plant thoroughly after planting.
- Watering: Keep the soil consistently moist but not waterlogged. Water whenever the top inch of soil feels dry. Avoid overwatering, as it can cause root rot. Mulching around the plant can help retain soil moisture.
- Fertilization: Fertilize the Piloblephis rigida plant during its active growing season (spring and summer) with a balanced, slow-release fertilizer. Follow the package instructions for proper dosage. Avoid fertilizing during winter when the plant is dormant.
- Pruning: Prune the plant to maintain its shape and size. This can be done in early spring before new growth starts. Remove old or dead branches, and trim back any excessive growth.
- Pests and diseases: Keep an eye out for common pests like aphids or spider mites. If needed, use an appropriate insecticidal soap or neem oil to control them. Ensure good air circulation around the plant to prevent fungal diseases.
- Winter care: In colder regions, protect the Piloblephis rigida plant from freezing temperatures by covering it with a layer of mulch or moving it indoors. This will help it survive the winter.
Remember, Piloblephis rigida is native to warm, tropical regions, so it may require extra care or protection in cooler climates.

Place in a bright room that is sun drenched almost all day. Or directly in a south-facing window.

Watering Piloblephis Rigida plant requires a careful approach to ensure optimal growth and development. This particular plant thrives in well-draining soil that allows for good air circulation and easy water flow. To water this plant, one should first make sure that the soil is dry to the touch, but not completely devoid of moisture. This can be accomplished by lightly brushing the soil surface with a finger or using a moisture meter to measure the soil's moisture level.
When watering, it is important to avoid overwatering, as this can lead to rot or fungal growth. Instead, use a watering can or hose to slowly and evenly saturate the soil, taking care not to splash water onto the leaves or stems. Watering should be infrequent, but deep, allowing the soil to fully absorb the water before the next watering.
In addition, it is important to consider the plant's placement and environmental conditions when deciding how often to water. Plants in sunny, dry locations may require more water than those in shadier spots, while those in humid environments may need less. By considering these factors and adjusting watering frequency accordingly, one can help ensure that their Piloblephis Rigida plant thrives and flourishes.
To fertilize this plant, choose a balanced liquid fertilizer with equal amounts of nitrogen, phosphorus, and potassium. Dilute the fertilizer according to the package instructions. Apply the fertilizer once every two weeks during the growing season, which is typically from spring to fall. Avoid fertilizing during the winter months when the plant is dormant. Be careful not to over-fertilize, as this can damage the plant. Always water the plant thoroughly before and after fertilizing.
The optimal soil for Piloblephis Rigida plant is a well-draining, porous soil that is rich in nutrients. This type of soil will help the plant to grow and thrive in ideal conditions. It is recommended to use a mix of soil that is composed of peat moss, perlite, and pine bark. This soil mixture will provide the necessary nutrients while also allowing for proper drainage and aeration. It is important to maintain proper watering habits, as over-watering or under-watering the plant can negatively impact its growth and health. Additionally, adding organic matter, such as compost or leaf litter, can help to improve soil fertility and overall plant health.
To propagate this plant, you will need to identify a healthy and mature stem from the parent plant. Take a sharp and clean cutting tool, such as pruning shears or a knife, and cut a 4-6 inch stem from the bottom of the parent plant. Ensure that the cutting has at least two to three leaf nodes.
Remove the bottom leaves of the cutting, leaving only the top two to three leaves intact. Dip the cut end of the stem into rooting hormone powder to encourage root growth. Then, place the stem into a well-draining potting mix that has been pre-moistened with water.
Cover the pot with a clear plastic bag or a clear plastic wrap to create a humid environment. Place the pot in a bright location with indirect sunlight and ensure the soil remains moist but not waterlogged. Check weekly for any signs of new growth and remove the plastic covering after about four weeks once there is evidence of new sprouts.
After eight to ten weeks, carefully remove the rooted stem from the pot and transplant it into a larger container or into the ground in a location with partial shade. Keep the new plant well-watered until it becomes established.


