Plant Overview
Meet the Pariparoba, a lush, tropical shrub native to the rainforests of South America. Often admired for its broad, velvety foliage, this member of the Pepper family is a staple in Brazilian folk medicine and shaded ornamental gardens. With its unique "rat-tail" flower spikes and deep green presence, it brings an immediate sense of the deep jungle to any plant collection.
🔍 How to Identify
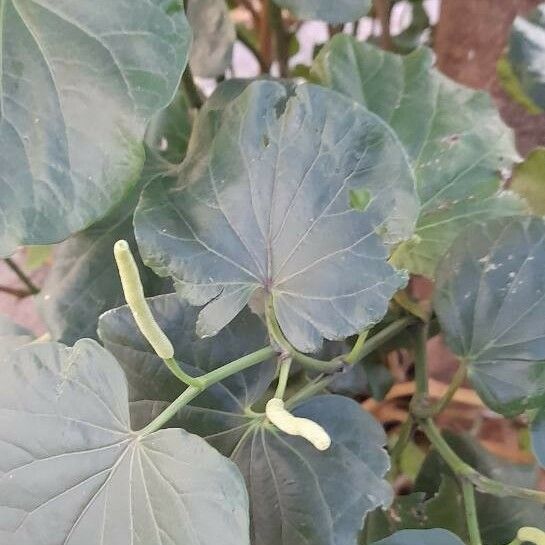
- 🍃 Heart-Shaped Leaves: The foliage is the star—large, broad, and distinctly heart-shaped (cordate) with a soft, matte texture and prominent veins that radiate from the base.
- 🕯️ Candle-like Spikes: Instead of traditional petals, it produces "spadices"—slender, creamy-white or pale green spikes that stand upright like tiny candles among the leaves.
- 🎋 Jointed Stems: Like its cousin the Black Pepper plant, the stems feature swollen "nodes" or joints, giving the branches a slightly zigzagged, architectural appearance.
🏡 In Your Garden
- ☁️ Humidity is Key: Because it originates in the moist understory of Brazilian forests, this plant thrives on high humidity. If the air is too dry, the edges of those beautiful heart-shaped leaves will quickly turn brown and crispy.
- 🌳 Shadow Dweller: It is a true shade-lover. In your garden or home, avoid direct afternoon sun, which can scorch the foliage; instead, aim for "dappled" light, mimicking the sun filtering through a forest canopy.
⚠️ Safety & Toxicity
- 🐾 Mild Caution: While Piper regnellii is used in traditional herbalism, it contains essential oils and compounds that can cause stomach upset if ingested by curious cats, dogs, or toddlers.
- 🧴 Skin Sensitivity: The crushed leaves release a spicy aroma, but the sap can occasionally cause mild skin irritation for those with sensitive skin. It is best to wear gloves when pruning heavily.
✨ Fun Fact
Piper regnellii is a close botanical relative to Piper nigrum—the plant that provides the world with black, white, and green peppercorns! While you can't harvest kitchen pepper from this specific variety, its spicy, aromatic scent reveals its famous family lineage.

Detailed Care Instructions
To grow Piper regnellii plants, also known as Regnell's pepper or Brazilian pepper, you can follow these steps:
- Choose a suitable location: Select a spot with indirect sunlight or partially shaded area for your plant. Piper regnellii prefers a warm and humid environment.
- Prepare the soil: Pepper plants prefer well-draining soil. Mix organic matter, such as compost or peat moss, into the soil to improve drainage and fertility. Aim for a slightly acidic soil with a pH between 5.5 and 6.5.
- Start from seeds: Soak the pepper seeds in warm water for a few hours before planting. This helps speed up germination. Sow the seeds in small pots or seed trays, approximately ¼ inch deep in the soil, and cover lightly with soil. Alternatively, you can buy young Piper regnellii plants from a nursery.
- Warmth and humidity: Since Piper regnellii prefers warm environments, ensure the temperature around the plants is consistent and warm. You can keep the pots or trays in a greenhouse or provide bottom heat using a heat mat.
- Watering: Pepper plants need regular watering, but make sure the soil doesn't become waterlogged. Keep the soil consistently moist but not overly wet. Aim to water the plants regularly, allowing the soil to dry slightly between watering.
- Fertilization: Once the plants have established a few true leaves, start fertilizing them every two weeks with a balanced, water-soluble fertilizer. Follow the instructions on the fertilizer packaging for the proper dilution and application.
- Pruning: Piper regnellii plants can get bushy, so occasional pruning is recommended to maintain their shape and promote airflow. Remove any dead or damaged leaves and trim back any excessive growth.
- Pests and diseases: Keep an eye out for common pepper plant pests like aphids, whiteflies, or spider mites. Treat infestations with appropriate insecticidal soap or natural remedies like neem oil. Ensure good air circulation to discourage fungal diseases.
- Transplanting: If you started your plants from seeds, once they reach a reasonable size, typically around 6-8 weeks, you can transplant them into larger pots or directly into the ground. Space the plants approximately 18-24 inches apart.
- Harvesting: Piper regnellii plants produce small peppers that ripen from green to red or black. Harvest the fruits when fully matured and use them in cooking or as ornamental peppers.
Remember, growing plants can vary depending on your specific climate, so observing your plant's needs and adjusting accordingly is important for successful growth.
To properly water Piper Regnellii, you will need to consider a few specific factors. Start by using well-draining soil tailored to the plant's moisture requirements. Before watering, assess the moisture level of the soil by inserting your finger one to two inches below the surface. If it feels moist, delay watering as the plant prefers slightly dry conditions.
When it comes to the watering schedule, it is best to establish a balance. Piper Regnellii benefits from regular watering, while also avoiding overwatering, which can lead to root rot or other moisture-related issues. One way to achieve this balance is by adopting the "soak and dry" method.
To water the plant, thoroughly saturate the entire root ball. Avoid watering the leaves as it may invite the growth of fungal diseases. Allow the excess water to drain out from the bottom of the pot. After watering, wait until the soil has dried out partially before watering again. This allows the roots to absorb oxygen and prevents waterlogging.
Keep in mind that environmental conditions also play a role in the watering needs of Piper Regnellii. Higher temperatures and increased exposure to direct sunlight can lead to faster moisture evaporation, requiring more frequent watering. Similarly, lower humidity levels may necessitate more regular watering sessions.
Additionally, consider the size of the pot and the plant's growth stage. Smaller pots tend to dry out faster, requiring more frequent watering. Newly potted or recently propagated Piper Regnellii may need more attention and moisture until they establish firm roots.
In conclusion, maintaining proper moisture balance and a consistent watering schedule for Piper Regnellii is crucial for its health and growth. Monitoring the soil's moisture level, practicing the "soak and dry" method, considering environmental factors, and adjusting watering frequency accordingly will help ensure optimal hydration for the plant.
To fertilize the Piper Regnellii plant, you can follow these instructions:
- Choose a balanced fertilizer with equal amounts of nitrogen, phosphorous, and potassium (N-P-K ratio of 10-10-10 or 20-20-20) suitable for indoor plants.
- Dilute the fertilizer according to the manufacturer's instructions. Typically, a ratio of 1 teaspoon per gallon of water should suffice.
- Water the plant thoroughly before applying fertilizer to ensure the soil is moist.
- Pour the diluted fertilizer solution evenly onto the soil around the base of the plant, avoiding direct contact with the leaves or stems.
- Use caution not to over-fertilize, as excessive nutrients can harm the plant. Follow the recommended dosage and frequency on the fertilizer package.
- After fertilizing, water the plant again to help distribute the nutrients throughout the soil.
- Monitor the plant for any signs of fertilizer burn, such as leaf discoloration or wilting. If observed, flush the soil with water to remove excess nutrients.
- Fertilize the Piper Regnellii plant every 4 to 6 weeks during the growing season, which typically occurs in spring and summer, to promote healthy growth.
- During the plant's dormant period in fall and winter, reduce or stop fertilization, as the plant's nutrient requirements are lower.
Remember to always read and follow the instructions provided on the fertilizer packaging, as various products may have specific guidelines.
The ideal soil composition for Piper Regnellii plant should promote optimal root development and overall plant growth. It is recommended to use a well-draining soil mixture that is rich in organic matter.
The soil should have a slightly acidic to neutral pH level, preferably around 6.0 to 7.0, to meet the plant's preferred growing conditions. A pH tester can be used to ensure the soil acidity is within the desired range.
The soil should be loose and friable, allowing for good airflow and preventing excessive water retention. This will help prevent waterlogged conditions that can lead to root rot.
Adding organic matter such as compost or well-rotted manure to the soil can enhance its fertility and moisture retention capacity. This will provide the plant with essential nutrients and ensure consistent moisture levels.
It is advisable to mix perlite or coarse sand into the soil to improve drainage and create a looser texture. This will prevent the soil from becoming compacted and promote healthy root growth.
Regularly amending the soil with organic matter and ensuring proper drainage will help maintain the health and vitality of the Piper Regnellii plant, allowing it to thrive in its optimal growing conditions.
To propagate this particular plant, you can follow these steps:
- Start by selecting a healthy parent plant with vibrant foliage and strong stems.
- Prepare a rooting medium consisting of a combination of well-draining soil, peat moss, and perlite.
- Take a cutting from the parent plant. Use a clean and sharp pruner or scissors to make a clean cut just below a node (the point where leaves are attached to the stem). The cutting should ideally be around 4-6 inches long.
- Remove the lower leaves from the cutting, leaving only a few leaves at the top intact.
- Dip the cut end of the cutting into a rooting hormone powder or gel. This will help stimulate root growth.
- Make a hole in the prepared rooting medium and gently insert the cutting, ensuring that at least one or two leaf nodes are submerged in the medium.
- Water the newly planted cutting thoroughly, ensuring that the soil remains consistently moist but not waterlogged.
- Place the cutting in a warm and well-lit location, but avoid direct sunlight which can scorch the delicate foliage.
- Mist the cutting regularly to maintain high humidity around the plant. You can also cover the cutting with a clear plastic bag or use a propagator to create a greenhouse-like environment.
- Monitor the cutting for root development. After a few weeks, gently tug on the cutting to check for resistance, which indicates root growth.
- Once the cutting has developed a sufficient root system, you can transplant it into a larger pot or directly into the ground, using well-draining soil mix.
Remember to provide the newly propagated plant with proper care, including adequate light, regular watering, and occasional fertilization, to ensure healthy growth.


