Plant Overview
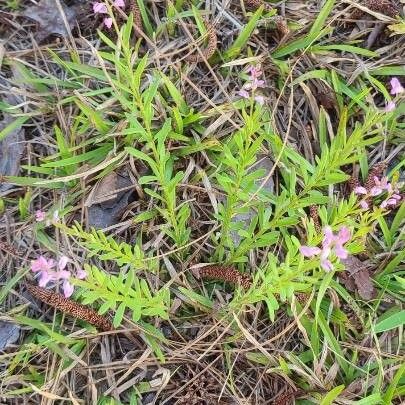
Often called the Bitter Milkwort, this unassuming wildflower holds a clever secret hidden beneath the soil. While it paints North American prairies with delicate pink-purple spikes, its name "Milkwort" stems from an ancient European belief that plants in this genus could increase milk production in nursing mothers and livestock. It is a resilient survivor, often found in the sandy "barrens" where other plants struggle to grow.
🔍 How to Identify
- 🌸 Showy Flower Spikes: The plant produces terminal clusters (racemes) of small, pea-like flowers that range from a soft rose-pink to a deep, royal purple.
- 🍃 Narrow Foliage: Slender, lance-shaped leaves are arranged alternately along the stem, giving the plant a delicate, airy appearance.
- 🕵️ The "Secret" Flowers: Look at the very base of the plant or just under the leaf litter; it produces a second set of inconspicuous, greenish flowers that never open and self-pollinate in secret.
🏡 In Your Garden
- 🏜️ Sandy Soil Specialist: This isn't a plant for rich, loamy garden beds. It craves well-drained, sandy, or gravelly soil and is an excellent choice for a native "sand garden" or a restoration project.
- 🚫 Disturbance Sensitive: While it is a hardy perennial, it has a delicate root system that dislikes being moved. Once you plant it in a sunny, open spot, avoid transplanting it.
- 🌾 Space Gracious: Because it is a low-grower and not a vigorous spreader, it won't bully your other plants, but it does require "breathing room" from thick, mat-forming grasses.
⚠️ Safety & Toxicity
- 👅 Bitter Defense: As the name suggests, the plant contains saponins that make it intensely bitter. This is a natural defense mechanism to stop animals from grazing on it.
- 🐾 Mild Irritant: While not considered deadly, the saponins can cause mild stomach upset or mouth irritation in pets or children if ingested in significant quantities.
- 🧴 Skin Sensitivity: Some sensitive individuals may experience minor skin irritation when handling the roots or crushed stems.
✨ Fun Fact
Polygala polygama is a master of "reproductive insurance." By growing showy flowers above ground to attract bees and "hidden" (cleistogamous) flowers underground that self-pollinate, the plant ensures it will produce seeds even if a late frost kills the top growth or if pollinators are scarce that year!

Detailed Care Instructions
To grow Polygala polygama, also known as racemed milkwort or bouquet milkwort, you can follow these steps:
- Choose the right location: Polygala polygama requires full sun to partial shade to thrive. Make sure the area you select receives at least 6-8 hours of sunlight per day.
- Prepare the soil: This plant prefers well-draining soil. Loosen the soil in the planting area using a garden fork or tiller. If the soil is heavy or clayey, incorporate organic matter such as compost or peat moss to improve drainage.
- Planting: Dig a hole slightly larger than the root ball of the Polygala polygama plant. Place the plant in the hole, backfill with soil, and gently firm it around the roots. Make sure the plant is at the same level as it was in the container or nursery.
- Watering: Water the plant thoroughly after planting, and then maintain regular watering to keep the soil lightly moist. Avoid overwatering, as it can lead to root rot. Mulching around the base of the plant can help retain moisture.
- Fertilization: Polygala polygama generally does not require heavy fertilization. However, you can apply a balanced, slow-release fertilizer in early spring to promote healthy growth.
- Pruning: This plant benefits from pruning to maintain shape and encourage branching. Trim back any dead, damaged, or overgrown branches in early spring.
- Pest and disease control: Polygala polygama is relatively pest-resistant. However, it can sometimes be affected by fungal diseases. To prevent this, avoid overhead watering and ensure adequate air circulation around the plant. If necessary, treat any pest or disease issues with appropriate organic or chemical treatments.
- Propagation: Polygala polygama can be propagated through both seeds and cuttings. Collect seeds from mature plants in the fall and sow them in a well-draining potting mix. Cuttings can be taken in late spring or early summer and rooted in a soilless rooting medium.
Remember to check for specific growing requirements for your particular region or climate, as they may have an impact on the success of your Polygala polygama plant.

Place in a bright room that is sun drenched almost all day. Or directly in a south-facing window.

Polygala Polygama plant should be watered regularly, but make sure to allow the top inch of soil to dry out before watering. When watering, avoid getting the leaves wet and instead target the soil directly at the base of the plant. It is important not to overwater as this can lead to root rot. The plant prefers well-draining soil, so make sure the pot has drainage holes. In the winter months, reduce the watering frequency.
To fertilize this plant, you should first identify the soil type it is planted in. Using a balanced fertilizer with equal parts nitrogen, phosphorus and potassium, apply it to the soil once every three to four weeks during the growing season. Avoid fertilizing during dormancy or during periods of drought. Follow the instructions on the fertilizer package for the appropriate amount to use based on the plant size and age. Additionally, be sure to water the plant thoroughly before and after fertilizing to prevent the roots from burning.
Polygala Polygama plant prefers a well-draining soil that is rich in nutrients. A mix of sandy loam and compost is ideal for this plant. The pH of the soil should be slightly acidic to neutral, between 5.5 and 7.0. It is important to avoid using heavy clay soils or soil that does not drain well, as this can lead to root rot and other issues. Adding perlite or sand to the soil can improve drainage. The plant also benefits from regular fertilization with a balanced fertilizer during the growing season.
Polygala Polygama can be propagated through several methods. The easiest way is by taking stem cuttings from an existing plant.
Select a healthy stem that is between 4-6 inches long and has at least three sets of leaves. Using a sharp, clean pair of scissors or pruning shears, make a clean cut just below a node (where a leaf meets the stem). Remove any leaves that are within an inch of the bottom of the stem.
Dip the cut end of the stem into rooting hormone powder, shaking off any excess. Plant the stem in a pot filled with well-draining soil or a soilless seed starting mix. Make a small hole in the soil, place the stem into the hole, and gently press the soil around it to hold it in place.
Water the cutting thoroughly and place a clear plastic bag over the pot to create a mini greenhouse. This will help to retain moisture and create a humid environment for the cutting to root. Place the pot in a bright, warm location but out of direct sunlight.
Check the cutting regularly and water as needed to keep the soil moist but not waterlogged. After 3-4 weeks, gently tug on the cutting. If it resists, it has likely rooted and can be removed from the plastic bag. If it comes out easily, it needs more time to root.
Once the cutting has rooted, it can be transplanted into a larger pot or into the ground in a well-draining location with partial shade.


