Plant Overview
Often called the Common Solomon's Seal, this elegant woodland perennial is a staple of shaded European and Asian gardens. Its graceful, arching stems create a rhythmic pattern that seems to float above the forest floor, making it a favorite for adding height to darker corners. Steeped in folklore, it has been prized for centuries not just for its architectural beauty, but for the mysterious "seals" hidden beneath the soil.
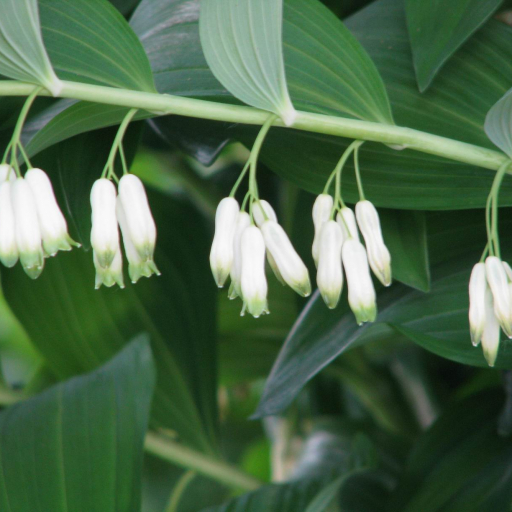
🔍 How to Identify
- 🌿 Arching Stems: The plant produces smooth, unbranched stems that curve elegantly to one side, typically reaching between 2 to 3 feet in height.
- 🍃 Alternating Leaves: Broad, oval leaves with distinct parallel veins grow in two neat rows along the top of the stem, pointing upward and outward.
- 🔔 Pendulous Flowers: Small, creamy-white, bell-shaped flowers with green tips hang in clusters of two to six from the undersides of the leaf joints.
🏡 In Your Garden
- 🌑 The Shade Solution: This is a true "woodland spirit" that thrives in deep shade. It is one of the few plants that can tolerate "dry shade"—the difficult areas under large trees where soil moisture is often scarce.
- 🌱 Rhizome Resilience: Because it grows from thick, fleshy underground rhizomes, it is very hardy but dislikes being moved. It’s best to choose a permanent spot where it can slowly colonize and form a lush, prehistoric-looking thicket over several years.
⚠️ Safety & Toxicity
- 🚫 Toxic Status: All parts of the plant, particularly the attractive blue-black berries that appear in late summer, are poisonous if ingested.
- 🐾 Risk to Pets & Kids: The berries can look tempting to children, and the leaves can be harmful to curious cats or dogs. Ingestion typically leads to severe stomach upset, vomiting, and slowed heart rate. It is best planted toward the back of a border where it is less accessible.
✨ Fun Fact
The name "Solomon's Seal" refers to the circular scars left on the plant's horizontal roots (rhizomes) after the stems die back in the winter. Ancient herbalists believed these scars resembled the wax seal of the biblical King Solomon, signaling that the plant had divine medicinal properties.

Detailed Care Instructions
| Lighting | Part Sun |
To grow Polygonatum multiflorum, also known as Solomon's seal, follow these steps:
- Obtaining seeds or rhizomes: You can purchase seeds or rhizomes (underground stems) of Polygonatum multiflorum from a local nursery or online seed supplier.
- Choosing the right location: Solomon's seal requires partial to full shade, making it suitable for shady gardens, woodland areas, or under trees. It prefers moist, well-draining soil rich in organic matter.
- Soil preparation: Before planting, prepare the soil by removing weeds and loosening it with a garden fork or tiller. Add compost or well-rotted manure to enhance soil fertility and moisture retention.
- Planting seeds: If you have seeds, soak them in water overnight to improve germination. Sow the seeds in early spring, 1/4 inch deep, and cover them lightly with soil. Space the seeds about 8-12 inches apart.
- Planting rhizomes: If you have rhizomes, plant them horizontally in the prepared soil, about 2-3 inches deep. Space each rhizome 12-18 inches apart to allow for growth and expansion.
- Watering: Keep the soil consistently moist but not waterlogged. Regularly water the plants during dry spells, ensuring the soil does not dry out completely.
- Mulching: Apply a layer of organic mulch around the plants to help retain moisture in the soil, suppress weed growth, and provide nutrients as it breaks down.
- Fertilization: Once the plants are established, you can feed them with a balanced organic or slow-release fertilizer in early spring.
- Maintenance: Remove weeds regularly to prevent competition for nutrients and water. Additionally, inspect the plants for pests or diseases and take necessary measures to control them.
- Division: After a few years, Solomon's seal may become crowded. You can divide the clumps in early spring or fall to maintain their vigor. Carefully dig up the clump, separate the rhizomes with a clean sharp knife, and replant them at the desired spacing.
By following these steps, you can successfully grow Polygonatum multiflorum plants in your garden.

Place in a window with dappled sun or a spot in the middle of a room. Or directly in a window facing west or east.

The best way to water this plant is to ensure that the soil remains consistently moist, but not waterlogged. Avoid allowing the soil to dry out completely between waterings. It is important to water the plant deeply, allowing the water to penetrate the soil to the root level. This can be achieved by watering slowly and deeply, or by allowing the plant to sit in a saucer of water for a short period of time. It is also important to avoid getting water on the leaves of the plant, as this can increase the risk of fungal infections. Watering in the morning or early afternoon is best, as this allows the plant to dry off before cooler evening temperatures set in.
- Start by selecting a well-draining pot or preparing a garden bed with nutrient-rich soil.
- Before planting, mix organic matter or compost with the soil to improve fertility.
- When the plant is established, apply a balanced slow-release fertilizer according to the package instructions. This will provide a consistent supply of nutrients over time.
- Alternatively, use a liquid fertilizer diluted to half strength and apply it every 2-4 weeks during the growing season. Ensure you water the plant before applying liquid fertilizer to avoid burning the roots.
- During the dormant season, reduce fertilization or stop it altogether as the plant's nutrient requirements decrease.
- Be cautious not to over-fertilize, as excess nutrients can damage the plant and lead to poor growth.
- To maximize the benefits of fertilizers, make sure the plant receives adequate sunlight and water regularly.
- Consider conducting a soil test to determine any specific nutrient deficiencies and adjust your fertilization accordingly.
- Regularly monitor the plant's overall health and growth, adjusting fertilization practices as needed based on its response and appearance.
- Remember to follow any specific instructions provided by the manufacturer of the fertilizer you choose for your Polygonatum Multiflorum plant.
The optimal soil type for Polygonatum Multiflorum plant should be well-draining and rich in nutrients. It needs a neutral to slightly acidic soil pH of around 6.5-7.5 for healthy growth. The soil should be loose, and loamy soil texture should be preferred over sandy soil. The plant thrives in a moist environment, so the soil should be kept consistently moist but not waterlogged. Organic matter-rich soil can be used to enhance the fertility and water-retention capacity of the soil. Adding compost, leaf mold, or well-rotted manure to the soil can improve its texture and fertility. However, the plant is adaptable and can grow in a wide range of soil types, but it requires good drainage and a steady supply of moisture to thrive.
Propagating Polygonatum multiflorum can be done through several methods. Here's a step-by-step guide on how to propagate the plant:
- Begin by identifying healthy and mature Polygonatum multiflorum plants in your garden or local area. Look for plants that have strong stems, vibrant leaves, and well-established root systems.
- Choose a suitable time for propagation, preferably in early spring or late autumn when the plant is dormant.
- Prepare the propagation site by clearing the area of weeds and other competing plants. Ensure that the soil is well-drained and rich in organic matter.
- One commonly used propagation method is through division. Gently dig around the plant's base, taking care not to damage the roots. Lift the plant from the ground, and using a sharp and clean knife, divide the clump into smaller sections. Each section should have a good amount of rhizome and several healthy shoots.
- Before planting the divided sections, it's important to prepare them for optimal root development. Trim any damaged or excessively long roots, and remove any unnecessary foliage to reduce water loss during the establishing phase.
- Choose an appropriate location for planting the divided sections. Polygonatum multiflorum thrives in partial to full shade, so select a spot with indirect sunlight or dappled shade. Dig a hole large enough to accommodate the divided sections, ensuring that the rhizome is planted at the same depth as it was growing previously.
- Place each divided section in the prepared hole, ensuring that the roots are well-spread and not crowded. Gently backfill the hole with soil, firming it down to eliminate any air pockets.
- Water the newly planted divisions thoroughly, ensuring that the soil is moist but not waterlogged. Maintain regular watering throughout the first growing season to aid in their establishment.
- Mulch the newly planted divisions using organic matter such as compost or leaf mold. This helps retain soil moisture, suppress weed growth, and provides additional nutrients as it breaks down over time.
- Over the next few weeks, monitor the newly propagated Polygonatum multiflorum plants for signs of growth. Once new shoots emerge, it indicates successful establishment and growth.
By following these steps, you can successfully propagate Polygonatum multiflorum and expand your plant collection.
Common pests of the solomon's seal include Spider mites, aphids, thrips. Make a habit of checking your solomon's seal frequently for pests so that any infestations can be caught and managed early.


