Plant Overview
Often called the Sun-bird Sugarbush, Protea coronata is a royal resident of South Africa’s fynbos. While it may not boast the neon colors of its more famous cousins, its elegant, crown-like flowers and silvery foliage make it a subtle masterpiece of the Cape. It is a plant that tells a story of wind-swept hills and the busy chatter of nectar-seeking birds.
🔍 How to Identify
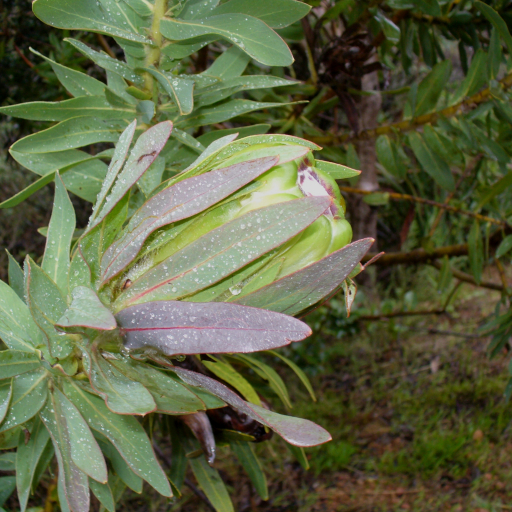
- 👑 The Crowned Bracts: The flower head is surrounded by creamy-green bracts that curve inward at the tips, creating a literal crown shape that protects the delicate flowers inside.
- 🌬️ Silky Fringes: Look closely at the edges of the bracts; they are lined with fine, translucent white hairs that give the bloom a shimmering, velvet-like texture.
- 🍃 Upright Foliage: The leaves are lance-shaped and a soft grayish-green, often curving slightly upward along the reddish stems.
🏡 In Your Garden
- 🦅 A Bird’s Buffet: This plant is a "keystone" species for pollinators. It produces copious amounts of nectar, making it a primary landing pad for Cape Sugarbirds and Sunbirds, who act as its personal couriers for pollen.
- 🏜️ Tough Love Soil: Protea coronata thrives on what most gardeners call "poor" soil. It has specialized "proteoid" roots that are highly efficient at scavenging nutrients; because of this, heavy fertilizers (especially those with phosphorus) can actually be fatal to the plant.
- 💨 Coastal Guardian: Unlike many delicate garden flowers, this Protea loves a breeze. It is wind-tolerant and thrives in coastal gardens where the air is salty and moving.
⚠️ Safety & Toxicity
- 🐾 Pet Friendly: Protea coronata is generally considered non-toxic to cats, dogs, and horses. It is a safe choice for a wildlife-friendly backyard.
- 🧤 Skin Protection: While not poisonous, the foliage can be quite stiff and leathery. It is always wise to wear gardening gloves when pruning to avoid minor scratches or irritation from the plant's natural resins.
✨ Fun Fact
Protea coronata is one of the fastest-growing members of the Protea family. In the right conditions, it can jump from a seedling to a tall, 4-meter shrub in just a few years, making it the perfect choice for a "quick-start" privacy screen in Mediterranean climates!

Detailed Care Instructions
To grow a Protea Coronata plant, also known as the Green Sugarbush, you should follow these steps:
- Climate suitability: Protea Coronata plants are native to South Africa. They thrive in Mediterranean climates with mild, wet winters and warm, dry summers. Make sure your location has similar conditions or can provide a microclimate that is suitable for this plant.
- Soil requirements: Protea Coronata prefers well-draining soil with a pH of 6.5 to 7.5. Use a mix of sandy and loamy soil to ensure good drainage. Avoid heavy clay soils.
- Planting time: The best time to plant Protea Coronata is in late winter or early spring, just before the growing season. This gives the plant enough time to establish its roots before the summer heat arrives.
- Choose a sunny location: Protea Coronata plants require full sun exposure, preferably for at least 6 to 8 hours a day. Choose a spot in your garden where the plant can receive the maximum amount of sunlight.
- Watering: Protea Coronata plants are drought-tolerant, but they still need regular watering during their initial growth phase. Water deeply but infrequently, allowing the top inch of soil to dry out between waterings.
- Mulching: Apply a layer of organic mulch around the base of the plant to retain moisture in the soil and suppress weed growth. Take care not to pile the mulch against the stem, as it can lead to rot.
- Pruning: Prune your Protea Coronata plant annually in late winter or early spring to promote bushier growth and maintain its desired shape. Remove any dead, damaged, or diseased branches.
- Fertilizing: Protea Coronata plants are adapted to nutrient-poor soils. Use a low-phosphorus, slow-release fertilizer specifically formulated for Proteas. Apply it in spring and autumn, following the manufacturer's instructions.
- Protect from frost: If you live in a cold climate, consider growing Protea Coronata in a pot that can be moved indoors during winter or provide protection from frost using frost cloth or a horticultural fleece.
- Pest and disease control: Protea Coronata is generally resistant to pests and diseases. However, keep an eye out for any signs of fungal diseases, aphids, or spider mites. Treat them promptly with appropriate methods or consult a local garden center for guidance.
Remember that growing Protea Coronata may require some additional effort and specific conditions, so it's important to do thorough research and understand the unique needs of this plant before you start cultivating it.

Place in a bright room that is sun drenched almost all day. Or directly in a south-facing window.

To water Protea Coronata, it is important to consider its specific water requirements. Below are detailed instructions on how to water this plant:
1. Determine the watering schedule: Protea Coronata prefers a watering schedule that replicates its natural growing conditions. The plant is native to regions with Mediterranean-like climates, characterized by mild, wet winters and dry summers. As such, it is best to water less frequently during the summer and increase watering during the cooler months.
2. Check the soil moisture: Before watering, check the moisture level of the soil. Insert your finger about 1-2 inches into the soil near the plant's base. If the soil feels dry at this depth, it is an indication that watering is needed.
3. Water deeply and thoroughly: When watering, ensure that the water reaches the root zone of the plant. Slowly apply water directly at the base of the plant, avoiding wetting the foliage. Water should penetrate the soil to a depth of at least 6 inches. This encourages the development of deep and strong roots.
4. Use the right watering method: To prevent overwatering and promote optimal drainage, it is recommended to use a drip irrigation system or a watering can with a narrow spout. These methods allow you to water the base of the plant while avoiding excess moisture on the leaves and flowers, which can lead to fungal diseases.
5. Consider the climate and season: Adapt your watering routine based on the climate and season. During the summer, when temperatures are high, reduce the frequency of watering but ensure that the plant receives deep watering to sustain it through dry spells. In the winter or cooler months, decrease watering frequency to avoid waterlogged soil or causing root rot.
6. Monitor the plant's response: Observe the plant for signs of over or under-watering. Wilting or yellowing leaves can indicate under-watering, while drooping or discolored foliage may be a sign of over-watering. Adjust your watering routine accordingly to maintain optimal soil moisture for healthy growth.
Remember, providing appropriate water management is essential for the well-being of Protea Coronata, as it helps promote its overall health and longevity.
- Choose a well-draining pot or planting location for your Protea Coronata plant.
- Prepare the soil mixture by combining equal parts of coarse sand, perlite, and peat moss.
- Fill the pot or planting hole with the soil mixture, leaving enough space for the plant's roots.
- Place the Protea Coronata plant into the prepared soil, ensuring that it is at the same level as it was in its previous container.
- Water the plant thoroughly after planting to settle the soil and provide initial hydration.
- Apply a slow-release, low-phosphorus fertilizer to the soil surface in early spring, following the manufacturer's recommended dosage.
- Water the plant lightly before applying the fertilizer to prevent any potential root burning.
- Scratch the fertilizer into the soil surface using a fork or small rake, taking care not to damage the plant's roots.
- Water the plant deeply after fertilizing to ensure proper nutrient absorption.
- Repeat the fertilization process once every six months or as directed by a horticulturist.
- Monitor the plant's growth and appearance regularly to evaluate its nutrient requirements and adjust the fertilization schedule if needed.
Protea Coronata plants have specific soil requirements to thrive and grow successfully. The ideal soil for these plants should have the following characteristics:
- Well-Draining: Protea Coronata plants prefer soil that is well-draining to prevent waterlogged conditions. It is important to avoid heavy clay or compacted soil that retains water for extended periods.
- Sandy or Loamy: These plants prefer sandy or loamy soil that is light and well-aerated. These soil types allow for good water drainage and root development.
- Acidic to Neutral pH: Protea Coronata plants prefer slightly acidic to neutral soil with a pH range of 5.5 to 7.0. Soil with this pH range ensures optimal nutrient availability and absorption.
- Low in Nutrients: These plants are adapted to low-nutrient environments, so the soil should be relatively low in nutrients. Excessive nitrogen can promote leafy growth at the expense of flowering. Avoid using high-nutrient or heavily fertilized soils.
- Organic Matter: While Protea Coronata plants prefer low-nutrient soil, they can benefit from a small amount of organic matter. Adding some well-rotted compost or leaf mold can enhance soil structure, water-holding capacity, and micronutrient availability.
- Free from Soil-Borne Pathogens: It is crucial to use soil that is free from any soil-borne pathogens or diseases. This ensures the plant's health and prevents any potential problems.
To summarize, Protea Coronata plants require well-draining, sandy or loamy soil with a slightly acidic to neutral pH and low nutrient content. Adding a small amount of organic matter can be beneficial. Be sure to opt for soil free from diseases or pathogens.
To propagate the Protea Coronata plant, follow these steps:
- Preparing the soil: Use a well-draining, sandy soil mixture. Ensure it is fertile and free from any pests or diseases.
- Harvesting seeds: Collect mature seed pods from the plant. Look for pods that have turned brown and dried naturally on the plant. Avoid collecting pods that have opened or started to release their seeds.
- Processing seeds: Gently break open the seed pods to extract the seeds. The seeds are small and dark brown in color. Discard any damaged or malformed seeds.
- Seed treatment: Soak the seeds in water for 24 hours to improve germination rates. Alternatively, you can also lightly scarify the seeds using sandpaper or a file to enhance water absorption.
- Planting seeds: Fill small pots or seed trays with the prepared soil mix. Sow the seeds on the soil surface, spacing them evenly. Lightly press the seeds into the soil but avoid burying them too deep.
- Watering and care: Moisten the soil gently with mist or by using a fine spray bottle. Place the pots or trays in a warm, bright location, but protect them from direct sunlight.
- Germination: Keep the soil consistently moist while the seeds germinate. Germination typically takes around 4-6 weeks.
- Transplanting: Once the seedlings develop their first true leaves, carefully transfer them into larger pots or individual containers. Use the same soil mixture as before.
- Growing conditions: Provide the seedlings with plenty of sunlight, preferably 4-6 hours of direct sunlight each day. Continue to water them regularly and maintain good air circulation.
- Hardening off: After the seedlings have reached a suitable size and are well-established, gradually expose them to outdoor conditions. Start by placing them in a sheltered, shady spot and gradually increase their exposure to sunlight and wind over a few weeks.
- Transplanting to the garden: When the seedlings have acclimated to outdoor conditions, choose a well-drained, sunny spot in the garden to plant them. Ensure there is enough spacing between plants to allow for proper air circulation. Dig holes wide and deep enough to accommodate the root ball without overcrowding or damaging the roots. Carefully transfer the plant into the hole, backfill with soil, and gently firm it around the base of the plant.
- Maintenance: Water the newly transplanted plants regularly until they establish a strong root system. Once fully grown, Protea Coronata plants are generally drought-tolerant, but occasional watering during dry periods may be required. Prune the plants after flowering to maintain their shape and remove any dead or diseased growth.
By following these steps, you can successfully propagate Protea Coronata plants and enjoy their unique beauty in your garden.


