Plant Overview
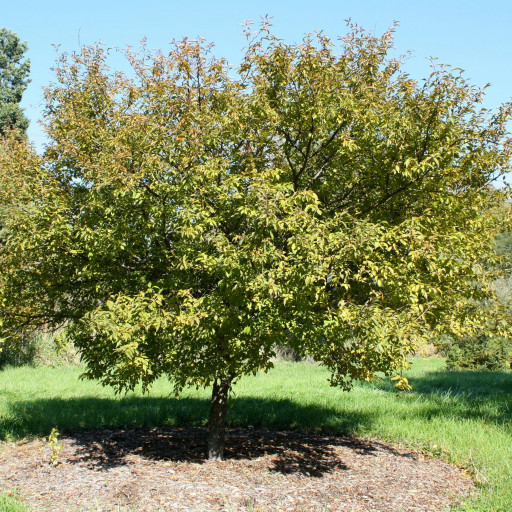
Known as the Fuji Cherry, this delicate beauty originates from the volcanic slopes of Mount Fuji in Japan. It is often the first to announce the end of winter, draping itself in clouds of pale, nodding blossoms while other trees are still dormant. In Japanese culture, it is highly admired for its resilience and naturally compact form, making it a centerpiece for both traditional gardens and the intricate art of bonsai.
🔍 How to Identify
- 🍃 The Leaves: The "incisa" in its name refers to the deeply cut, jagged edges of the leaves. They are small, oval, and turn a brilliant fiery orange or red in the autumn.
- 🌸 The Blooms: Small, bell-shaped flowers that hang downward. They typically start as dark pink buds and open into white or pale blush petals with a distinctive red center (calyx).
- 🎋 The Stems: Its branches often grow in a subtle zig-zag pattern, giving the tree a textured, architectural look even when it has lost its leaves in winter.
🏡 In Your Garden
- 🌱 Compact Versatility: Unlike its massive cousins, the Fuji Cherry stays relatively small. This makes it a perfect "specimen tree" for tiny urban courtyards or even large decorative pots on a sunny patio.
- ✂️ Pruning Nuance: This plant is incredibly forgiving of the shears. Because it flowers on the previous year's wood, you should wait until the blossoms have faded before pruning to ensure you don't "cut off" next year's display.
- 💧 Root Resilience: It is tougher than it looks. While it prefers moist, well-drained soil, it is more tolerant of wind and cold than many other ornamental cherry varieties.
⚠️ Safety & Toxicity
- 🐾 Pet Warning: Like many members of the Prunus genus, the leaves, stems, and pits contain cyanogenic glycosides. While the fleshy fruit isn't usually an issue, keep curious dogs or cats from chewing on fallen branches or swallowing the pits.
- 👶 Kid-Friendly Petals: The flowers themselves are non-toxic to touch, making it a safe visual addition to family gardens. However, always discourage children from eating any decorative berries or seeds.
✨ Fun Fact
The Fuji Cherry is the "parent" of many famous dwarf cherry hybrids. Because it is genetically programmed to stay small and flower at a very young age, it is considered the gold standard species for creating flowering Bonsai masterpieces.

Detailed Care Instructions
To grow Prunus incisa plants, also known as Fuji Cherry or Dwarf Fuji Cherry, follow these steps:
- Choose a suitable location: Select a planting spot that receives full sun to partial shade. Prunus incisa prefers well-draining soil that is fertile and slightly acidic.
- Prepare the soil: Dig a hole that is slightly wider and deeper than the root ball of the plant. Amend the soil with organic matter, such as compost, to improve drainage and nutrient content.
- Planting: Place the Prunus incisa plant in the hole, making sure the top of the root ball is level with or slightly above the ground. Backfill the hole with soil, gently firming it around the plant to remove any air pockets.
- Watering: After planting, thoroughly water the plant to help settle the soil and promote root establishment. Prunus incisa has average water needs, so water regularly, especially during dry periods. Avoid overwatering, as this can lead to root rot.
- Mulching: Apply a layer of organic mulch around the base of the plant to conserve moisture, suppress weeds, and regulate soil temperature. Leave a small gap between the mulch and the trunk to prevent the development of rot or pests.
- Pruning: Prune Prunus incisa in early spring before new growth emerges to shape the plant and remove any dead or diseased branches. This will also encourage the growth of new blossoms.
- Fertilization: Fertilize the plant in early spring and late summer with a balanced slow-release fertilizer or a specific cherry tree fertilizer. Follow the package instructions for application rates.
- Pest and disease control: Prunus incisa is generally relatively resistant to pests and diseases. However, keep an eye out for common cherry tree pests like aphids, tent caterpillars, or borers. Treat any infestations promptly with appropriate insecticides or insecticidal soaps.
- Protection from extreme weather: In colder climates, consider providing winter protection for young Prunus incisa plants, such as covering them with burlap or providing windbreaks. This will prevent damage from frost or harsh winds.
By following these steps, you can successfully grow and maintain a healthy Prunus incisa plant. Remember to regularly monitor the plant's health, adjust watering and fertilization as needed, and seek professional advice if you encounter any specific issues.

Place in a bright room that is sun drenched almost all day. Or directly in a south-facing window.

To water this plant, wait until the top inch of soil feels dry to the touch before giving it a thorough watering. Use lukewarm or room temperature water and ensure that it is evenly distributed around the plant. Avoid getting water on the leaves as this can increase the risk of disease. Ensure that the soil has proper drainage to prevent waterlogging, which can also harm the plant. Monitor the plant's water needs and adjust your watering schedule as necessary based on environmental factors such as temperature and humidity.
For optimal growth and health, fertilize your Prunus Incisa plant every spring with a balanced, slow-release fertilizer. Spread the fertilizer evenly around the base of the plant, being careful not to allow any to come into contact with the trunk of the plant. Water thoroughly after fertilizing to allow the nutrients to reach the root system. Avoid fertilizing during periods of drought or extreme heat, as this can damage the roots of the plant.
The ideal soil for Prunus Incisa should be well-draining and fertile with a pH level between 5.5 to 7.5. It should be rich in organic matter and nutrients with good water retention capacity. The soil should not be compacted and should have good aeration to allow for healthy root growth. The plant prefers soil that is slightly acidic to neutral and sandy or loamy soils work best. Heavy clay soils should be avoided as they can lead to poor drainage and root rot. It is important to ensure that the soil does not remain consistently wet or waterlogged as this can also lead to root rot. Overall, the soil should provide the plant with a stable foundation for healthy growth and development.
To propagate this plant, you will need to take softwood cuttings in the early summer months. Select a healthy stem that is approximately 6 inches long and remove all of the leaves from the bottom 3 inches. Dip the cut end into rooting hormone and plant it into a pot filled with well-draining soil. Place the pot in a warm, bright area, avoiding direct sunlight. Keep the soil moist but not waterlogged and mist the cutting regularly. After several weeks, the cutting should develop roots. You can then transplant it into a larger pot or into the ground.
Common pests of the fuji cherry include Scale insect, aphids, larvae. Make a habit of checking your fuji cherry frequently for pests so that any infestations can be caught and managed early.


