Plant Overview
Often called the Japanese Plum, Prunus salicina is actually a native of China that has been cultivated for thousands of years. Known for its incredibly juicy, heart-shaped fruits and cloud-like spring blossoms, this tree is the ancestor of most "supermarket" plums we enjoy today. In many cultures, its early spring blooming is celebrated as a symbol of resilience and the coming of warmer days.
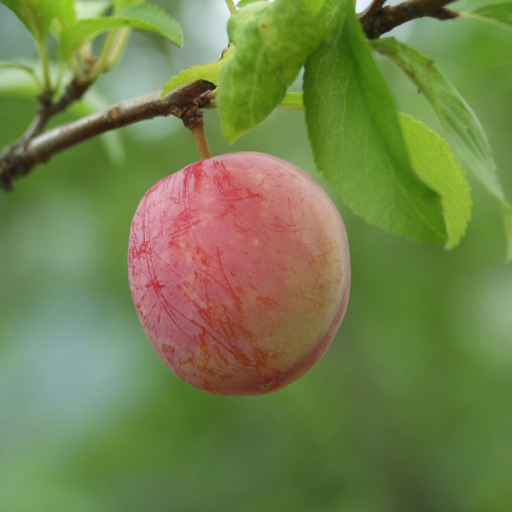
🔍 How to Identify
- 🌸 Early Blooms: One of the first trees to wake up in spring, it produces clusters of pure white, five-petaled flowers that often appear before the leaves emerge.
- 🍃 Slender Leaves: The foliage is bright green and lance-shaped with finely serrated (saw-toothed) edges, tapering to a sharp point.
- 🍑 Smooth Fruit: Unlike the fuzzy peach, these plums have smooth, waxy skin that ranges from bright yellow to deep crimson or purple, often featuring a distinct "heart" shape.
🏡 In Your Garden
- ☀️ Sun & Space: This tree is a sun-worshipper and requires full exposure to develop the sugars in its fruit. Because it blooms so early, it should be planted in a spot protected from "frost pockets" to prevent the flowers from freezing.
- 💧 Drainage is Key: While it loves consistent moisture, it cannot tolerate "wet feet." If your soil is heavy clay, consider planting it on a slight mound to ensure the roots don't rot.
- 🐝 Pollination Partners: Many varieties of Japanese Plum are not self-fertile. To get a harvest, you’ll often need a second, different variety nearby so the bees can carry pollen between them.
⚠️ Safety & Toxicity
- 🍎 Fruit Safety: The fleshy part of the plum is delicious and safe for humans and most pets to eat in moderation.
- 🚫 Toxic Pits & Leaves: Like many members of the Prunus family, the pits (seeds), stems, and leaves contain cyanogenic glycosides. If chewed or crushed, these can release cyanide.
- 🐾 Pet Warning: Keep fallen leaves and pits away from dogs and horses, as ingesting them in quantity can lead to serious respiratory distress.
✨ Fun Fact
The Japanese Plum is a master of disguise! Through the work of legendary horticulturist Luther Burbank, this species was used to create the Pluot—a complex hybrid that is part plum and part apricot, designed to maximize sweetness and shelf life.

Detailed Care Instructions
| Humidity | Normal |
| Lighting | Full Sun |
| Difficulty | Easy |
| Hibernation | Cold Period |
| Hardiness Zones | 5A - 9A |
To grow a Prunus salicina plant, also known as a Japanese plum or Satsuma plum, follow these steps:
- Choose the right location: Prunus salicina plants require full sun to grow and produce fruit. Select a spot in your garden where the plant will receive at least six hours of direct sunlight daily.
- Prepare the soil: Japanese plums prefer well-draining soil that is slightly acidic with a pH level of 5.5 to 6.5. Amend the soil with organic matter like compost or well-rotted manure to improve its fertility and drainage.
- Plant the tree: Dig a hole that is wider and deeper than the plant's root ball. Gently remove the plant from its container and place it in the hole, ensuring that the top of the root ball is level with or slightly higher than the ground level. Backfill the hole with soil, firming it gently around the roots.
- Water regularly: Water the plant deeply immediately after planting and then regularly thereafter. Japanese plums need consistent watering, especially during dry periods. Aim to keep the soil moist but not saturated.
- Mulch around the tree: Apply a layer of organic mulch, such as wood chips or straw, around the base of the tree. Mulching helps retain moisture, suppresses weeds, and regulates the soil temperature.
- Prune properly: Prune your Prunus salicina plant during the dormant season, which is typically in late winter or early spring, before new growth starts. Remove any dead, diseased, or damaged branches and thin out overcrowded areas to promote better airflow and sunlight penetration.
- Fertilize as needed: Japanese plums usually benefit from an annual application of balanced fertilizer in early spring before new growth emerges. Follow the manufacturer's instructions for application rates and methods.
- Pest and disease control: Monitor your plant regularly for signs of pests or diseases, such as aphids, scale insects, or fungal infections. Treat any problems promptly using appropriate organic or chemical control methods.
- Harvesting: Prunus salicina plants typically produce fruit in summer to fall, depending on the variety and climate. Harvest the ripe fruit by gently twisting it off the stem. The plum should be slightly soft and have a good color and fragrance.
With proper care and attention, your Prunus salicina plant should grow and produce delicious plums for you to enjoy!

Place in a window with dappled sun or a spot in the middle of a room. Or directly in a window facing west or east.

Prunus salicina is a plant that requires regular watering to maintain its growth and health. When watering this plant, it is important to ensure that the soil is thoroughly moistened without becoming waterlogged.
To water Prunus salicina, first, check to see if the top inch of soil is dry. If it is, then it is time to water the plant. Using a watering can or hose, water the plant's base slowly and evenly, ensuring that the water soaks into the soil and does not run off.
It is important to avoid getting water on the plant's leaves, as this can promote the growth of fungal diseases. Additionally, it is recommended to water the plant early in the morning to allow time for the leaves to dry before the sun comes out.
During periods of prolonged drought or hot weather, it may be necessary to water Prunus salicina more frequently. However, it is important not to overwater the plant, as this can lead to root rot and other issues.
In summary, watering Prunus salicina involves checking the soil for dryness, thoroughly moistening the soil without waterlogging it, avoiding getting water on the leaves, and watering early in the morning to allow time for the leaves to dry.
To fertilize this plant, it is recommended to use a balanced fertilizer with equal parts of nitrogen, phosphorus, and potassium. Apply the fertilizer in early spring, just before new growth appears, and again in early summer. Be sure to follow the instructions on the fertilizer package for the correct application rate and frequency. It is also important to water the plant immediately after fertilizing to help activate the nutrients.
Prunus Salicina plants prefer a well-draining soil that is rich in nutrients. The best soil for these plants consists of a mixture of loam, sand, and organic matter. The soil pH should be around 6.0 to 7.0. Avoid using heavy clay soils as they can retain too much moisture and lead to root rot. It is also important to ensure that the soil is not too acidic as this can result in poor growth and development of the plant. Adding a slow-release fertilizer to the soil can also help provide the necessary nutrients for the plant to thrive.
Prunus salicina can be propagated through softwood cuttings. Select a healthy, disease-free young stem and cut it into a 6 to 8 inch long stem with a sharp, clean cutting tool. Remove the leaves from the bottom third of the stem and dip the cut end into rooting hormone powder. Plant the stem in a well-draining planting medium, ensuring that at least half of the stem is buried. Water the cutting thoroughly and place a plastic bag over the pot to create a mini greenhouse. Keep the cutting in a shaded area and maintain moisture in the soil. In about four to six weeks, the roots will form, and the new plant can be transplanted into a pot or your garden.
Common pests of the plum include Scale insect, aphids, larvae. Make a habit of checking your plum frequently for pests so that any infestations can be caught and managed early.


