Plant Overview
Known as the "Apple of the Tropics," Psidium guajava is a sun-loving fruit bearer that has traveled from its native Caribbean roots to gardens across the globe. It is famous for its intoxicating fragrance—a single ripe fruit can perfume an entire room with its musky, sweet scent. In many cultures, it is considered the ultimate "homestead" tree, cherished for its resilience and the shade it provides.
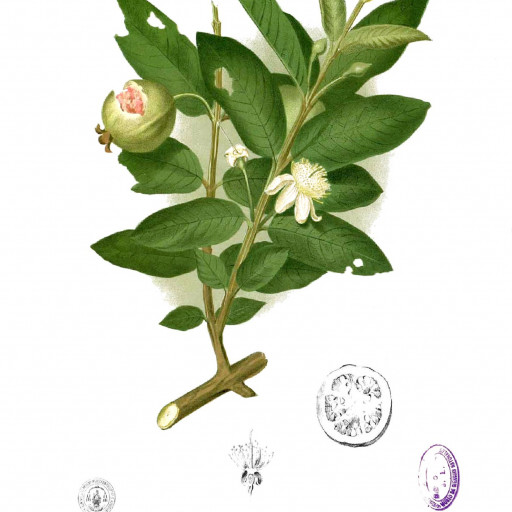
🔍 How to Identify
- 🌳 The Bark: The most striking visual feature is its smooth, copper-colored bark that peels away in thin, papery flakes, revealing a pale green layer beneath.
- 🍃 The Foliage: The leaves are stiff, leathery, and oblong, featuring very deep, parallel veins that give the underside a "ribbed" or corrugated texture.
- 🌸 The Blooms: It produces delicate white flowers with a central "pom-pom" of many long, fuzzy stamens that look like tiny bursts of white fireworks.
🏡 In Your Garden
- ✂️ Pruning for Productivity: Guava fruit grows exclusively on new wood. To ensure a massive harvest, gardeners should use a "tough love" approach by pruning older branches to stimulate fresh, fruit-bearing growth.
- 🌱 Root Sensitivity: While the tree is incredibly hardy once established, it possesses a shallow and sensitive root system. It hates being transplanted once it has settled and prefers a thick layer of mulch rather than having the soil around it tilled or dug up.
⚠️ Safety & Toxicity
- ✅ Status: Generally safe and highly edible.
- 🐾 Details: Guava is non-toxic to humans, dogs, and cats. In fact, the leaves are often used in traditional teas. However, excessive consumption of the fruit by pets can lead to mild stomach upset due to the high fiber and sugar content.
✨ Fun Fact
The guava is a true nutritional powerhouse; by weight, a single common guava contains approximately four times as much Vitamin C as a medium-sized orange!

Detailed Care Instructions
| Color | White |
| Soil Ph | 4.5-7.0 |
| Lighting | Full Sun |
| Soil Type | Rich, Well-Draining Soil |
| Bloom Time | Usually Spring |
| Plant Type | Broadleaf Evergreen Shrub Or Tree |
| Mature Size | 4–20 Feet (Indoor Plants Will Be Smaller) |
| Native Area | Caribbean, Central And South America |
| Sun Exposure | Full Sun |
| Hardiness Zones | 9–11 |
To grow a Psidium Guajava plant, also known as a Guava plant, you can follow the following steps:
- Propagation: Choose a healthy guava fruit and collect the seeds. Rinse the seeds to remove any pulp, and then soak them in water for 2-3 days to help with germination.
- Germination: Fill a pot with well-draining soil mix, such as a mixture of potting soil and perlite. Plant the seeds about half an inch deep and water the soil lightly. Cover the pot with a plastic wrap or put it in a plastic bag to create a humid environment. Place the pot in a warm area with indirect sunlight.
- Transplanting: After a few weeks, when the seedlings have developed a few true leaves, they can be transplanted to individual pots. Choose a pot with drainage holes and fill it with a well-draining soil mix. Gently remove the seedlings from the original pot and place them in the new pots, making sure not to damage the delicate roots. Water the new pots thoroughly but be careful not to overwater.
- Light and temperature: Psidium Guajava plants thrive in full sun, so choose a spot where they will receive at least 6-8 hours of direct sunlight. They prefer temperatures between 68-86°F (20-30°C), but they can tolerate cooler temperatures briefly if needed.
- Watering: Guava plants prefer regular watering, but they don't like to be waterlogged. Allow the top inch of soil to dry out before watering again. Water deeply, soaking the soil until water drains out of the bottom of the pot, but avoid leaving the plant sitting in standing water.
- Fertilization: Guava plants benefit from regular feeding. Use a balanced, slow-release fertilizer, following the instructions on the package. Apply the fertilizer every 2-3 months during the growing season.
- Pruning: Regular pruning can help stimulate growth and maintain a healthy shape for your guava plant. Trim back any dead or damaged branches, and prune to control its size and shape. Pruning should ideally be done during the dormant season.
- Pests and diseases: Guava plants can be susceptible to pests such as aphids, mealybugs, and fruit flies. Keep an eye out for any signs of pests and treat them accordingly with organic insecticides or by using natural methods like neem oil. Also, ensure good air circulation around the plant to prevent fungal diseases.
By following these steps, you can successfully grow a Psidium Guajava plant and enjoy its delicious and nutritious fruits.

Place in a window with dappled sun or a spot in the middle of a room. Or directly in a window facing west or east.

To water this plant properly, it is important to take into consideration the soil type, age of the plant, humidity levels, and weather conditions. Young plants typically need more frequent watering than mature ones, as their roots have not yet established themselves fully in the soil.
The frequency of watering can vary depending on the climate and weather, so it is important to check the soil regularly. Over-watering can lead to root rot, so it is important to let the soil dry out slightly in-between waterings. The plant prefers well-draining soil and should not be left in standing water.
In dry environments, it may be necessary to mist the leaves or use a humidifier to maintain proper humidity levels, as too low humidity can cause leaf drop and other stress symptoms.
Overall, it is important to monitor the plant closely and adjust watering frequency as needed to promote healthy growth and development.
To properly fertilize this plant, you should begin by selecting a balanced fertilizer with an N-P-K ratio of 8-8-8 or 10-10-10. This should be applied to the soil around the base of the plant once every three months during the growing season, and once during the dormant season. Be careful not to over-fertilize, as excess nutrients can harm the plant. It's also important to ensure that the soil is consistently moist, as overly dry soil can inhibit nutrient uptake.
The optimal soil type for the Psidium Guajava plant should be well-draining and aerated, with a neutral pH level. It should have a good mix of organic matter like humus, compost, or manure to provide essential nutrients to the plant. Heavy or clayey soils should be avoided as they can retain too much moisture, leading to waterlogging in the plant's roots. Additionally, the soil should be free from contaminants and pollutants, including heavy metals, oil, or chemicals. It is advisable to use a soil mix specifically formulated for fruit plants or create a mixture of perlite or sand, peat moss/compost, and garden soil in a 1:1:2 ratio.
The propagation of this plant involves several steps. First, you will need to select a healthy parent plant from which to take cuttings. Once you have selected a suitable parent plant, you will need to obtain a sharp, sterilized cutting tool. Using the cutting tool, take several cuttings from the parent plant, making sure to include a node or two on each cutting.
Next, you will need to prepare a rooting hormone solution. This solution will help to promote root growth in the cuttings. Dip the cuttings in the rooting hormone solution and then insert them into a well-draining potting mix. Make sure the potting mix is moist but not waterlogged.
Cover the pot with a plastic bag or a plastic dome to help create a humid environment for the cuttings. This will help prevent the cuttings from drying out while they establish roots. Place the pot in a warm, bright location, but out of direct sunlight, and avoid moving it until the cuttings have rooted.
After a few weeks, check the cuttings for root growth by gently tugging on them. If they resist your tug, roots have likely formed. At this point, you can remove the plastic bag or dome and begin to acclimate the young plants to their new environment.
Once you see significant growth in the young plants, including the development of new leaves and stems, you can transplant them into larger pots or into the garden. Remember to keep them in a warm, bright location with good drainage and to water them regularly until they are well established.
Common pests of the guava include Scale insect, mealybugs, spider mites, aphids. Make a habit of checking your guava frequently for pests so that any infestations can be caught and managed early.


