Plant Overview
The Pyrus communis, or European Pear, is the grandmother of almost every sweet pear you find in a grocery store today. From the buttery 'Anjou' to the elegant 'Bosc,' these trees have been cultivated for millennia, even featuring in Homer’s Odyssey as a "gift of the gods." They are the quintessential symbol of a temperate orchard, beloved as much for their snowy spring blossoms as for their heavy, bell-shaped late-summer fruits.
🔍 How to Identify
- 🌸 Floral Display: Clusters of creamy white, five-petaled flowers with distinct purple or red-tipped stamens that appear in early spring before or with the leaves.
- 🍃 Foliage: Simple, alternate leaves that are glossy dark green on top, oval-shaped, and usually feature very fine, rounded serrations along the edges.
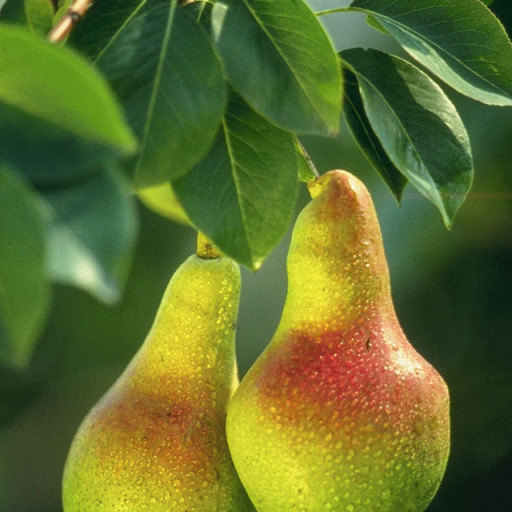
- 🍐 Fruit Profile: The classic "pyriform" (pear-shaped) fruit which is wider at the base and narrower at the neck, though some heirloom varieties can appear more rounded like an apple.
🏡 In Your Garden
- 🌳 The Taproot Factor: European Pears develop deep, sturdy taproots. This makes them quite drought-tolerant once they are established, but it also means they absolutely hate being moved. Choose their "forever home" in your garden carefully!
- ❄️ The Chilling Requirement: These trees are clock-watchers. They need a specific number of "chill hours" (temperatures between 32-45°F) during winter to reset their internal biological clock and produce fruit the following year.
- 🌬️ Disease Prevention: They are prone to "Fire Blight," a bacterial disease that makes branches look like they’ve been scorched by a flame. To prevent this, ensure they have plenty of elbow room for air to circulate and avoid over-fertilizing with nitrogen.
⚠️ Safety & Toxicity
- 🐾 Pet Safety: While the fruit flesh is a healthy snack for dogs in moderation, the seeds (pips) contain small amounts of amygdalin, which can release cyanide during digestion. Always remove the core before sharing.
- 🧒 Child Safety: The plant is non-toxic to touch and the fruit is a childhood favorite. However, older "feral" pear trees can sometimes develop sharp, thorn-like spurs on their lower branches that can catch a climbing child.
✨ Fun Fact
Pears are one of the few fruits that do not ripen successfully on the tree. If left to hang until soft, they develop a "gritty" or "woody" texture caused by stone cells. For the perfect buttery consistency, they must be picked while still hard and allowed to ripen in a cool, dark place.

Detailed Care Instructions
| Color | Yellow, White |
| Soil Ph | 6.0-7.0 |
| Toxicity | Non-Toxic |
| Soil Type | Loamy, Clay, Moist But Well-Drained |
| Bloom Time | Spring |
| Plant Type | Perennial |
| Mature Size | 20 Feet Tall And 10 Feet Wide (Standard), 15 Feet Tall And 10 Feet Wide (Dwarf) |
| Native Area | Europe |
| Sun Exposure | Full Sun |
| Hardiness Zones | 4-8 |
To grow a Pyrus communis plant, commonly known as the pear tree, follow these steps:
- Choose a suitable location: Pear trees require full sun exposure for at least 6-8 hours a day. Select an area that has well-draining soil and enough space for the tree to grow to its full size.
- Prepare the soil: Pear trees prefer soil with a pH level between 6.0 and 7.0. If needed, adjust the pH level using soil amendments like lime or sulfur. Ensure that the soil is enriched with organic matter by adding compost or aged manure.
- Select a healthy tree: Purchase a pear tree sapling from a reputable nursery. Look for a healthy tree with no signs of pests or diseases. Choose a cultivar that suits your climate and taste preferences.
- Plant the sapling: Dig a hole that is wider and deeper than the root ball of the sapling. Place the sapling in the hole, ensuring that the bud union (knob on the trunk) is at least 2 inches above the soil level. Fill the hole with soil, firming it gently around the sapling.
- Water the sapling: After planting, water the sapling thoroughly to settle the soil and eliminate air pockets. Provide regular watering throughout the growing season, ensuring that the soil remains moist but not waterlogged.
- Prune and train the tree: Pear trees require annual pruning to maintain shape, remove dead or damaged branches, and encourage fruitful growth. Train the central leader (main trunk) by removing competing branches and creating a well-balanced shape.
- Fertilize appropriately: Pear trees benefit from fertilization in early spring before new growth appears and in late spring or early summer before fruiting begins. Use a balanced fertilizer, following the package instructions for the appropriate amount to apply.
- Monitor and prevent pests and diseases: Regularly inspect the tree for any signs of pests or diseases. Practice good garden hygiene by cleaning fallen leaves and debris to reduce the risk of infections. Use organic or chemical controls as necessary.
- Harvest and enjoy: Pear trees typically start producing fruit within 3-5 years. Harvest the pears when they are mature, depending on the variety, by gently twisting or cutting them from the tree. Allow the harvested pears to ripen off the tree before consuming.
Remember, growing a pear tree requires patience and consistent care. Regularly monitor the tree's health, provide adequate water and nutrients, and protect it from adverse weather conditions to ensure successful growth.

Place in a bright room that is sun drenched almost all day. Or directly in a south-facing window.

The Pyrus Communis plant refers to a species of fruit-bearing trees that produce a certain type of fruit often found in grocery stores and widely enjoyed for their sweet flavor, juicy texture, and various culinary applications. When watering this plant, it is essential to keep in mind certain procedures to ensure optimal growth and development of the tree.
To start, it is crucial to water the Pyrus Communis plant regularly, especially during dry periods, as water is essential for the tree to thrive. Before watering, make sure to feel the soil around the plant to see if it is dry or moist. If the upper layer of soil feels dry, then it is time to water.
When watering, it is important to pour water slowly over the root zone and apply enough water to wet the soil thoroughly. However, you should not saturate the soil too much as this can lead to over-watering, root rot, and other issues.
One way to determine if the plant has received adequate water is to check the soil's moisture level. Place your finger about an inch or two into the soil and feel the amount of moisture present. If the soil is dry, then it needs more water, while if it feels moist, then you can hold off on watering until the soil dries up.
Also, make sure to avoid getting water on the plant's leaves, as this can lead to fungal diseases. Instead, water the plant from the base and avoid getting water on the stem or trunk as this can lead to rot.
Overall, proper watering is critical to ensure the health and vitality of the Pyrus Communis plant, so be sure to follow these guidelines to keep it growing strong.
To provide adequate nutrients for the Pyrus Communis plant, use a balanced fertilizer with equal amounts of nitrogen, phosphorus, and potassium. Apply the fertilizer in early spring and late fall, avoiding the summer months when the plant is actively growing. Spread the fertilizer evenly around the base of the plant and water thoroughly to help distribute the nutrients throughout the soil. Avoid over-fertilization, which can lead to excessive growth and weaker branches.
The ideal soil for the plant belonging to the species Pyrus Communis is one that is well-draining but also retains enough moisture for the plant. A soil that is slightly acidic with a pH between 5.5 and 7 is suitable, with good levels of organic matter to promote healthy root growth. The soil should also be rich in nutrients like nitrogen, phosphorus, and potassium. A sandy to loamy soil texture is preferred over clay soils to prevent waterlogging and promote adequate aeration. The soil should be deep enough to accommodate the plant’s extensive root system. To promote healthy growth, regular fertilization and regular irrigation are recommended.
To propagate this plant, start by selecting a young healthy shoot from the main plant that has a few leaves attached to it. Using a sharp and sterilized cutting tool, cut the shoot at a 45-degree angle just below the node where the lowest leaves meet the stem.
Next, remove the lower leaves from the stem leaving at least two or three leaves at the top. Dip the cut end of the stem into rooting hormone powder or liquid to promote root growth. Then, place the stem into a pot filled with well-draining soil or a sterile rooting medium such as perlite or vermiculite.
After planting, water the cutting thoroughly and keep it in a warm and humid environment, preferably with a plastic bag covering the top of the pot to maintain high humidity levels. Place the pot in a bright, indirect light, but avoid direct sunlight.
Monitor the moisture level in the soil and add water when it feels dry. After a few weeks, you should start to see new growth on the cutting, which indicates that it has started rooting. Once the roots are established, you can transplant the cutting into a larger pot or directly into the garden.
It is important to note that not all cuttings will root successfully, so it is best to take several cuttings at once to increase your chances of success.
Common pests of the pear include Aphids, larvae. Make a habit of checking your pear frequently for pests so that any infestations can be caught and managed early.


