Plant Overview
Known affectionately as the Goldilocks Buttercup, this charming perennial is a staple of ancient European woodlands. Its name, auricomus, translates from Latin to "golden-haired," referring to its bright, sunny blooms that peek through the forest floor in early spring. Unlike its more symmetrical cousins, Goldilocks is famous for its "imperfect" appearance, often looking like a wildflower that hasn't quite finished getting dressed for the day.
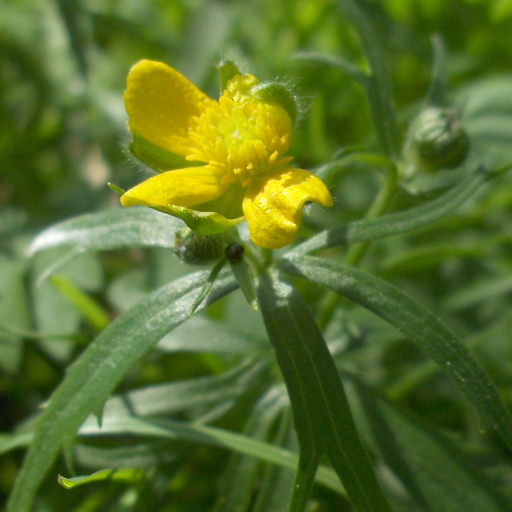
🔍 How to Identify
- 🌼 The Petals: Unlike the perfectly round meadow buttercup, Goldilocks often has "incomplete" flowers. You may find some with five petals, others with only two or three, and some with no petals at all, leaving only the yellow center.
- 🍃 Leaf Shapes: This plant displays "heterophylly," meaning it has different leaf shapes on the same plant. The leaves at the base are rounded and kidney-shaped, while the leaves higher up the stem are deeply divided into narrow, finger-like segments.
- 🌱 Growth Habit: It is a low-growing, clumping herb that usually reaches about 10–12 inches in height, featuring smooth, hairless stems that distinguish it from the "hairy" buttercup varieties.
🏡 In Your Garden
- 🌳 Woodland Preference: This plant is an "ancient woodland indicator." If you find it growing naturally, it’s a sign that the land has been forested for a very long time. In a garden setting, it thrives in the dappled shade under deciduous trees.
- 💧 Moisture and Soil: It prefers heavy, slightly damp, or clay-based soils. It isn't a fan of dry, sandy spots and will likely go dormant early if it gets too thirsty during the summer heat.
- 🐝 Early Pollinators: Because it blooms so early (often starting in April), it serves as a critical nectar source for solitary bees and early-season hoverflies when few other forest flowers are active.
⚠️ Safety & Toxicity
- 🚫 Status: Toxic if ingested. Like most members of the Ranunculus family, Goldilocks Buttercup contains a compound called protoanemonin.
- 🐾 Details: This chemical can cause blistering of the mouth and digestive upset if eaten by pets, livestock, or humans. Handling the plant can sometimes cause mild skin irritation or "buttercup itch," so it is best to wear gloves if you have sensitive skin.
✨ Fun Fact
The Goldilocks Buttercup is "apomictic," meaning it can produce seeds without fertilization or pollination. Essentially, it creates little clones of itself! This has led to the development of over 600 slightly different "microspecies" across Europe, making it a favorite puzzle for botanists to solve.

Detailed Care Instructions
To grow the Ranunculus auricomus plant, follow these steps:
- Choose a suitable location: Select a spot in your garden or a container where the plant will receive at least 6-8 hours of direct sunlight daily. Ensure that the soil is well-draining, as the plant prefers slightly moist but not waterlogged conditions.
- Prepare the soil: The plant thrives in rich, fertile soil. Before planting, loosen the soil up to a depth of around 6-8 inches and remove any weeds or rocks that may hinder root growth. Incorporate some organic matter like compost to improve soil fertility.
- Plant the tubers: Ranunculus auricomus is grown from tubers, which are swollen underground stems. Plant these tubers in the prepared soil around 2-3 inches deep and space them about 4-6 inches apart. Place them with the "claw" side down and the pointy side facing up.
- Watering: After planting, water the tubers thoroughly to encourage root development. Keep the soil consistently moist but not overly wet. Water whenever the top inch of soil feels dry.
- Mulching: Apply a layer of organic mulch like straw or shredded leaves around the plants to conserve moisture, suppress weed growth, and keep the soil temperature steady.
- Fertilize: Once the plants start growing, feed them with a balanced, water-soluble fertilizer every 3-4 weeks during the growing season. Follow the package instructions for proper dosage.
- Support: As the plants grow, they may require support to prevent the heavy blooms from falling over. Place plant stakes or install a trellis near the plants to provide support when needed.
- Pruning: Remove any dead or yellowing foliage to improve airflow and prevent the spread of diseases. Deadheading spent flowers can also encourage continuous blooming.
- Pest and disease control: Monitor the plants regularly for pests like aphids, snails, or slugs. Use organic pest control methods or insecticidal soap to manage infestations. Watch out for common diseases like powdery mildew and treat accordingly with an appropriate fungicide if necessary.
- Overwintering: In areas with cold winters, ranunculus tubers are usually lifted and stored indoors during the dormant period. Once the foliage turns yellow and dies back in the fall, carefully dig up the tubers, brush off the excess soil, and allow them to dry in a cool, dry, well-ventilated area for a few days. Store the tubers in a paper bag or a container with dry peat moss or vermiculite at a temperature between 45-55°F (7-13°C) until spring.
By following these steps, you can successfully grow the Ranunculus auricomus plant and enjoy its beautiful blooms.

Place in a bright room that is sun drenched almost all day. Or directly in a south-facing window.

Ranunculus Auricomus plant belongs to the family Ranunculaceae. This plant requires moderate watering, which means the soil should be neither too dry nor too wet. It is essential to water the plant deeply but less frequently rather than frequent, shallow watering. Overwatering can lead to root rot, and underwatering can cause the plant to wilt and die.
One way to check the soil moisture level is to stick a finger about an inch deep into the soil. If it feels dry, it's time to water the plant. Another indicator is when the leaves start to wilt, indicating a lack of water.
When watering, make sure to pour the water directly at the base of the plant. Avoid splashing water onto the foliage, as this can promote the growth of fungal diseases. Use a watering can or a hose with a narrow nozzle to avoid drenching the soil and damaging the roots.
Water the plant until the soil is moist but not waterlogged. Drain away any excess water that accumulates in the saucer or pot tray to prevent waterlogging.
During the growing season, when the plant is busy producing its flowers, it may require more frequent watering. Adjust the watering schedule according to the needs of the plant and the soil moisture level.
To promote healthy growth and blooming of this plant, apply a balanced fertilizer with equal parts of nitrogen, phosphorus, and potassium. Fertilize the plant during its active growing season, starting in early spring until the end of the summer. Use a fertilizer with a slow-release formula, following the manufacturer's instructions for dilution and application. Apply the fertilizer around the base of the plant, avoiding contact with the leaves and flowers. Water the plant generously after fertilizing to help the nutrients seep into the soil.
When cultivating the botanical species known as Ranunculus Auricomus, it is recommended to use a suitable soil mixture to promote healthy growth. This type of plant requires well-draining soil with a neutral to slightly acidic pH level. A soil mixture containing loam, sand, and perlite is ideal for this plant. Loam provides nutrients and helps retain moisture, while sand and perlite improve drainage and prevent waterlogging. It is important to ensure that the soil is not too heavy and compacted as this can cause root rot and hinder growth. The soil should also be rich in organic matter, such as compost or peat moss, to further enhance its nutrient content. Overall, a loose, well-draining, and nutrient-rich soil mixture is essential for the successful cultivation of Ranunculus Auricomus.
- Select healthy parent plant: Choose a mature and healthy Ranunculus Auricomus plant with strong stems and healthy foliage.
- Preparation of soil: Prepare suitable soil mix, with a good drainage, and a slightly acidic pH level for the Ranunculus Auricomus cuttings.
- Take cuttings: Select a few healthy stems of the parent plant with a pair of sharp, sterilized gardening shears. Cut the stems at a 45-degree angle, just below a leaf node.
- Remove lower leaves: Trim off the lower leaves of the cuttings, leaving only a few leaves at the top.
- Dip the cuttings: Dip the cut end of the stem into a rooting hormone for better root formation.
- Plant the cuttings: Plant the cuttings in the soil mix, insert the stem into the soil about two inches deep, and make sure that the soil is in contact with the stem base.
- Watering: Water the cuttings well after planting and provide adequate moisture and warmth.
- Provide suitable environment: cover the planter with plastic film to maintain the humidity levels. Place the planter in a warm, bright location with indirect sunlight.
- Care for the cuttings: Keep the soil moist and avoid letting it dry out. Remove any diseased or discoloured leaves to prevent the spread of any disease.
- Transplantation: The cuttings should be ready for transplantation when new growth appears on the cuttings, indicating the formation of roots underneath. Carefully remove the plantlets and transplant to their individual pots.
- Continue care: Continue caring for the new plants in their pots until they are strong enough to be planted in the garden.


