Plant Overview
Often called the Purple Bell Vine or "Black Man’s Hoop," this Mexican native looks like something straight out of a gothic fairytale. It is a vigorous climber known for its striking, two-tone flowers that dangle elegantly from slender stems. While it originated in the cloud forests of Mexico, it has become a cherished ornamental for those looking to add vertical drama and a touch of mystery to their garden.
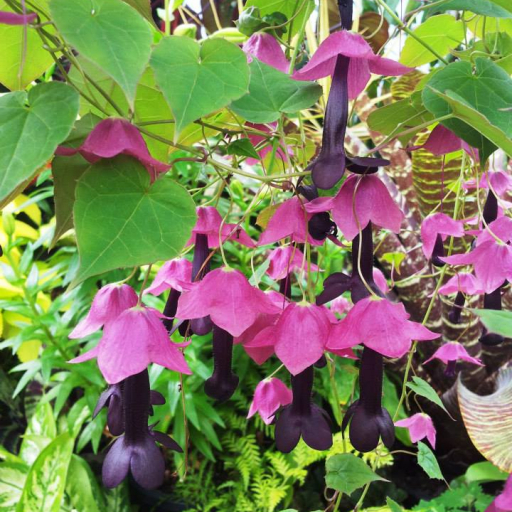
🔍 How to Identify
- 🔔 The "Bells": The most striking feature is the large, rose-pink or purple umbrella-shaped calyx (the "hood") that stays on the plant for months.
- 🎺 The Trumpets: Peeking out from under the pink hood is a long, tubular flower of such deep purple that it often appears almost black.
- 🍃 The Foliage: It features delicate, heart-shaped green leaves that are often tinged with burgundy, especially along the veins and edges.
🏡 In Your Garden
- 🧗 The Leaf-Climber: This vine doesn't use traditional tendrils; instead, it climbs by wrapping its sensitive leaf stalks (petioles) around any thin support it can find, like twine or wire mesh.
- 💧 Thirsty but Picky: It thrives in consistently moist, well-draining soil but absolutely hates "wet feet." In hanging baskets, it may need daily watering during the peak of summer to keep its lush look.
- ⛅ Light Preferences: While it loves the sun, it prefers "cool roots." In hotter climates, it appreciates some afternoon shade to prevent the delicate bells from scorching.
⚠️ Safety & Toxicity
- 🟢 Safe for Families: Rhodochiton is generally considered non-toxic to humans.
- 🐾 Pet Safety: There are no recorded reports of high toxicity for cats or dogs, though as with any ornamental plant, ingestion can cause mild stomach upset. It is a safe, "pet-friendly" choice for vertical gardening.
✨ Fun Fact
The name Atrosanguineus literally translates to "dark blood-red," describing the moody, wine-soaked color of the inner flower. Despite its exotic look, it was a staple in Victorian-era conservatories, where it was prized for its "graceful gloom."

Detailed Care Instructions
Growing Rhodochiton atrosanguineus, commonly known as Purple Bell Vine or Black-Eyed Susan Vine, can be a rewarding experience as this plant offers striking bell-shaped flowers with deep purples and blacks. Here are the steps to grow this beautiful climber successfully:
Starting from Seeds
- Seed Selection & Timing:
- Obtain fresh seeds from a reliable source.
- The ideal time to start seeds indoors is about 8-10 weeks before the average last frost date in your area.
- Obtain fresh seeds from a reliable source.
- Seed Preparation:
- Soak the seeds in lukewarm water for 24 hours to improve germination rates.
- Soak the seeds in lukewarm water for 24 hours to improve germination rates.
- Sowing Seeds:
- Use seed trays or small pots filled with a high-quality seed-starting mix.
- Sow the seeds on the surface of the soil and lightly cover them with a thin layer of vermiculite or soil.
- Use seed trays or small pots filled with a high-quality seed-starting mix.
- Germination:
- Place the trays in a warm, bright location where temperatures are consistently around 70-75°F (21-24°C).
- Keep the soil moist but not waterlogged.
- Germination typically takes 14-21 days.
Transplanting Seedlings
- Place the trays in a warm, bright location where temperatures are consistently around 70-75°F (21-24°C).
- Preparing for Transplant:
- Once the seedlings have developed a couple of true leaves, they are ready to be transplanted into larger pots or directly into the garden.
- Gradually acclimate the seedlings to outdoor conditions by placing them outside for a few hours each day over the course of a week (hardening off).
- Once the seedlings have developed a couple of true leaves, they are ready to be transplanted into larger pots or directly into the garden.
- Choosing a Location:
- Select a location with full sun to partial shade.
- Ensure the spot has well-draining, fertile soil. You can amend the soil with compost to improve its condition.
- Select a location with full sun to partial shade.
- Transplanting:
- Plant the seedlings at the same depth they were growing in their pots.
- Space the plants about 12-18 inches apart to give them room to grow.
Care and Maintenance
- Plant the seedlings at the same depth they were growing in their pots.
- Watering:
- Keep the soil consistently moist, especially during dry periods. Water at the base of the plant to avoid wetting the foliage too much, which can lead to fungal diseases.
- Keep the soil consistently moist, especially during dry periods. Water at the base of the plant to avoid wetting the foliage too much, which can lead to fungal diseases.
- Support:
- Provide a trellis, arbor, or other structures for the vines to climb. Rhodochiton atrosanguineus will readily climb once it finds support.
- Provide a trellis, arbor, or other structures for the vines to climb. Rhodochiton atrosanguineus will readily climb once it finds support.
- Fertilizing:
- Feed the plants with a balanced, water-soluble fertilizer every 4-6 weeks during the growing season.
- Feed the plants with a balanced, water-soluble fertilizer every 4-6 weeks during the growing season.
- Pruning:
- Remove spent flowers to encourage more blooms and to keep the plant tidy.
- Trim back any overly long or unruly vines as needed.
Overwintering
- Remove spent flowers to encourage more blooms and to keep the plant tidy.
- Indoors Protection:
- In colder climates where frost is a concern, you can grow Rhodochiton atrosanguineus as an annual or try to overwinter it indoors.
- Before frost arrives, cut back the plant and move it into a bright, cool indoor location.
- Reduce watering during the winter months, but don’t let the soil dry out completely.
By following these steps, you'll provide the right conditions for your Rhodochiton atrosanguineus plant to thrive and showcase its beautiful, unique flowers. Happy gardening!
- In colder climates where frost is a concern, you can grow Rhodochiton atrosanguineus as an annual or try to overwinter it indoors.

Place in a bright room that is sun drenched almost all day. Or directly in a south-facing window.

Watering Rhodochiton atrosanguineus requires careful attention to ensure the plant thrives. This climbing perennial vine prefers consistently moist, well-draining soil, so it's important to follow these guidelines:
1. Consistent Moisture: Aim to keep the soil consistently moist but not waterlogged. Check the top inch of soil; if it feels dry to the touch, it's time to water.
2. Watering Schedule: During the growing season (spring and summer), you may need to water more frequently, possibly every few days, depending on your climate and the size of the pot or garden bed. In cooler months or when the plant is dormant, reduce watering.
3. Deep Watering: When watering, do so thoroughly. This means allowing the water to penetrate deeply into the soil. Deep watering encourages the roots to grow down rather than remaining on the surface, which enhances the plant's resilience to drought.
4. Drainage: Ensure the plant is in a container or a garden location with good drainage. Standing water can lead to root rot, which can be detrimental to the plant's health.
5. Avoid Water on Foliage: Try to water the soil directly and avoid splashing water on the leaves, as excessive moisture on foliage can lead to fungal diseases.
6. Mulching: Applying a layer of mulch around the base of the plant can help retain soil moisture and regulate soil temperature, reducing the need for frequent watering.
By paying close attention to these watering practices, you can help ensure that your Rhodochiton atrosanguineus remains healthy and vigorous throughout its growing season.
Here are fertilizing instructions for Rhodochiton atrosanguineus:
- Soil Preparation: Begin by ensuring that the soil is well-draining and rich in organic matter. You can achieve this by adding compost or well-rotted manure to the planting site before planting.
- Initial Fertilization: When planting Rhodochiton atrosanguineus, mix a balanced, slow-release granular fertilizer into the soil. A balanced fertilizer, such as a 10-10-10 (N-P-K) ratio, works well to provide an even supply of nutrients over time.
- Feeding Schedule:
- Spring: As new growth starts in the spring, apply a balanced liquid fertilizer every 4-6 weeks. A water-soluble fertilizer with a balanced ratio like 20-20-20 can promote healthy growth.
- Summer: Continue to fertilize every 4-6 weeks throughout the growing season. If the plant shows signs of specific nutrient deficiencies (e.g., yellowing leaves), you might need to supplement with additional micronutrients.
- Spring: As new growth starts in the spring, apply a balanced liquid fertilizer every 4-6 weeks. A water-soluble fertilizer with a balanced ratio like 20-20-20 can promote healthy growth.
- Application Method: When using liquid fertilizer, dilute it according to the manufacturer’s instructions. Water the plant thoroughly before and after applying the fertilizer to avoid root burn.
- Organic Alternatives: If you prefer organic options, consider using fish emulsion, seaweed extract, or compost tea. These organic fertilizers can be applied every 2-4 weeks during the growing season.
- End of Season: Reduce fertilization as you approach the end of the growing season. For outdoor plants, this corresponds to late summer to early fall. Indoor or greenhouse plants may have an extended growing season and might not require the same reduction.
- Monitoring and Adjustment: Always observe your plant for signs of over-fertilization (e.g., leaf burn, excessive growth) or under-fertilization (e.g., stunted growth, pale leaves). Adjust your fertilization schedule accordingly.
- Watering: Remember that proper watering complements fertilization. Ensure the soil is consistently moist but not waterlogged to help the plant take up nutrients effectively.
By following these guidelines, you can help ensure that your Rhodochiton atrosanguineus thrives with healthy growth and vibrant blooms.
Rhodochiton atrosanguineus thrives best in well-draining, fertile soil. Here are the key features to consider:
- Soil Mix: A high-quality potting mix that incorporates both organic and inorganic materials is ideal. A typical mix might include components like peat moss, perlite, and vermiculite.
- pH Level: Aim for a slightly acidic to neutral pH, in the range of 6.0 to 7.0. This pH range helps the plant's roots to access the nutrients efficiently.
- Drainage: Ensure excellent drainage to prevent waterlogging, which can cause root rot. Incorporating perlite or coarse sand can help improve drainage.
- Nutrients: Rhodochiton atrosanguineus benefits from a nutrient-rich medium. Adding well-composted organic matter, such as leaf mould or compost, can boost the soil's fertility.
- Soil Texture: A light, fluffy soil texture is preferable, as it allows for good air circulation around the roots. A compacted, heavy soil can hinder root growth and drainage.
By providing these soil conditions, you will create an optimal environment for your Rhodochiton atrosanguineus to flourish.
Propagating Rhodochiton atrosanguineus can be achieved through both seeds and cuttings. Here are the detailed steps for both methods:
From Seeds:
- Seed Collection:
- Obtain mature seeds from the plant after the flowering season. Ensure the seeds are dry before storage.
- Obtain mature seeds from the plant after the flowering season. Ensure the seeds are dry before storage.
- Seed Preparation:
- Soak the seeds in warm water for about 24 hours to help improve germination rates.
- Soak the seeds in warm water for about 24 hours to help improve germination rates.
- Soil Preparation:
- Prepare a well-draining seed-starting mix. A mix of peat moss and perlite works well.
- Prepare a well-draining seed-starting mix. A mix of peat moss and perlite works well.
- Sowing Seeds:
- Fill a seed tray or pots with the prepared soil mix.
- Sow the seeds on the surface of the soil and gently press them down to ensure good contact.
- Do not bury the seeds too deep; a light covering of soil is sufficient.
- Fill a seed tray or pots with the prepared soil mix.
- Watering:
- Mist the soil lightly to keep it moist but not waterlogged.
- Cover the seed tray or pots with a clear plastic lid or plastic wrap to create a humid environment.
- Mist the soil lightly to keep it moist but not waterlogged.
- Light and Temperature:
- Place the seed tray in a warm location with indirect sunlight.
- Maintain a temperature between 20-25°C (68-77°F) for optimal germination.
- Place the seed tray in a warm location with indirect sunlight.
- Germination:
- Germination usually occurs within 2-3 weeks. However, this can vary.
- Germination usually occurs within 2-3 weeks. However, this can vary.
- Transplanting Seedlings:
- Once the seedlings have developed a few true leaves, they can be carefully transplanted into individual pots.
- Continue to grow them in a warm, well-lit area.
From Cuttings:
- Once the seedlings have developed a few true leaves, they can be carefully transplanted into individual pots.
- Selecting Cuttings:
- Choose healthy, non-flowering stems from the parent plant.
- The best time to take cuttings is in late spring or early summer.
- Choose healthy, non-flowering stems from the parent plant.
- Preparing Cuttings:
- Cut a 4-6 inch (10-15 cm) section of the stem just below a node.
- Remove the leaves from the lower half of the cutting.
- Cut a 4-6 inch (10-15 cm) section of the stem just below a node.
- Rooting Hormone (Optional):
- Dip the cut end of the stem in rooting hormone to promote faster root development.
- Dip the cut end of the stem in rooting hormone to promote faster root development.
- Planting Cuttings:
- Prepare a pot with a mixture of peat moss and perlite or a similar well-draining substrate.
- Insert the cuttings into the soil, ensuring at least one node is buried.
- Prepare a pot with a mixture of peat moss and perlite or a similar well-draining substrate.
- Watering and Humidity:
- Water the cuttings thoroughly, ensuring the soil remains moist but not waterlogged.
- Cover the pot with a plastic bag or a clear plastic bottle to retain humidity, creating a mini greenhouse effect.
- Water the cuttings thoroughly, ensuring the soil remains moist but not waterlogged.
- Light and Temperature:
- Place the pot in a warm area with bright, indirect light.
- Maintain a temperature of 20-25°C (68-77°F).
- Place the pot in a warm area with bright, indirect light.
- Root Development:
- Over the next few weeks, roots will begin to develop.
- You can tug gently on the cuttings to check for resistance, indicating root growth.
- Over the next few weeks, roots will begin to develop.
- Transplanting:
- Once the cuttings have established roots, they can be transplanted into larger pots or directly into the garden.
- Continue to care for them as mature plants, providing them with appropriate light and water.
By following these steps, you can successfully propagate Rhodochiton atrosanguineus and enjoy this beautiful plant in your garden or indoor spaces.
- Once the cuttings have established roots, they can be transplanted into larger pots or directly into the garden.
Common pests of the mexican shell vine include Scale insect, mealybugs, spider mites, fungus gnats, thrips, springtails. Make a habit of checking your mexican shell vine frequently for pests so that any infestations can be caught and managed early.


