Plant Overview
Known affectionately as the Roseshell Azalea, this deciduous beauty is a crown jewel of the eastern North American woodlands. Unlike many scentless modern hybrids, this wild-type azalea fills the spring air with a spicy, clove-like perfume that can be smelled from yards away. Its delicate, tissue-paper blooms and rugged endurance make it a favorite for those looking to add a touch of "wild elegance" to their landscape.
🔍 How to Identify
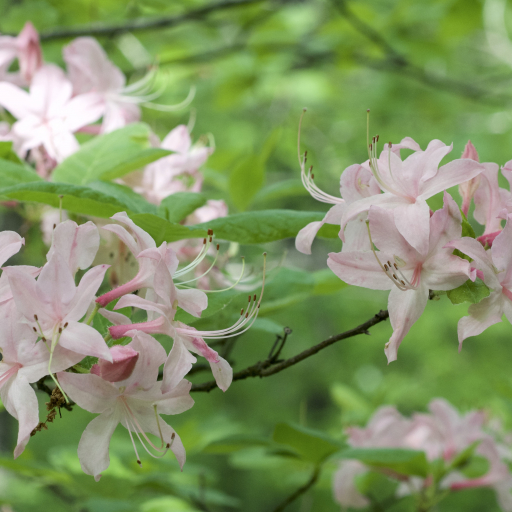
- 🌸 The Blooms: Funnel-shaped flowers that range from soft shell-pink to deep rose. They usually appear in clusters of 4 to 9 before the leaves have fully expanded.
- 🍃 Fuzzy Foliage: The leaves are oblong and notably "pubescent" (hairy) on the undersides, giving them a soft, velvety texture compared to the smooth leaves of other azaleas.
- 👃 The "Clove" Test: If you aren't sure, follow your nose! It possesses a distinct, spicy fragrance reminiscent of cloves or cinnamon, which sets it apart from the "Early Azalea" (R. periclymenoides).
🏡 In Your Garden
- 🍂 The Acid Factor: Like most of its kin, the Roseshell Azalea is an "acid-lover." It requires a low soil pH to uptake nutrients. If your leaves start turning yellow while the veins stay green, your soil is likely too alkaline.
- 💧 Drainage is Key: This plant has a shallow, fibrous root system. It craves consistent moisture but will perish quickly in standing water. Think "moist sponge," not "puddle."
- 🌳 Woodland Roots: Because it naturally grows on rocky slopes and ridges, it prefers dappled sunlight. Too much direct afternoon sun can scorch the delicate petals and stress the plant.
⚠️ Safety & Toxicity
- 🐾 Toxic to Pets: High Risk. All parts of the plant contain grayanotoxins. If ingested by dogs, cats, or horses, it can lead to vomiting, drooling, and in severe cases, heart failure.
- 👶 Child Safety: The nectar and leaves are toxic. Ensure children do not attempt to "suck the honey" from the flowers, a common but dangerous practice with wild blooms.
- 🐝 "Mad Honey": Honey produced by bees that frequent Rhododendrons can technically be toxic to humans, leading to a condition historically known as "Mad Honey Disease."
✨ Fun Fact
The Roseshell Azalea is one of the hardiest species in the genus. It can survive bone-chilling temperatures as low as -25°F (-31°C), making it a tough-as-nails survivor that brings a tropical fragrance to even the coldest northern climates.

Detailed Care Instructions
To grow Rhododendron prinophyllum, also known as the early azalea or roseshell azalea, you should follow these steps:
- Site selection: Choose a location for your plant that receives partial shade to full sun. Rhododendron prinophyllum prefers dappled sunlight or a maximum of 4-6 hours of direct sunlight per day. The soil should be well-draining and acidic, with a pH between 4.5 and 6.0.
- Soil preparation: Amend the soil with organic matter such as compost or peat moss to improve drainage and acidity. Avoid heavy clay soils. Rhododendrons prefer moist but well-drained soil.
- Planting: Dig a hole that is 2-3 times wider than the root ball and slightly shallower. Gently remove the plant from its container and loosen the roots. Place the plant in the hole, making sure the top of the root ball is level with or slightly above the soil surface. Backfill with the amended soil, firming it gently around the roots. Water thoroughly after planting.
- Watering: Keep the soil consistently moist but not waterlogged. Deep watering is preferable to frequent shallow watering. Rhododendrons have shallow root systems that can dry out quickly, so monitor the moisture levels regularly, especially during hot, dry periods.
- Mulching: Apply a layer of organic mulch around the base of the plant, such as bark chips or pine needles. Mulching helps retain moisture, suppresses weed growth, and moderates soil temperature.
- Fertilization: Rhododendrons are relatively light feeders, but they benefit from occasional fertilization. Apply a balanced acid-loving fertilizer in early spring before new growth begins, following the manufacturer's instructions. Avoid over-fertilizing, as this can burn the roots.
- Pruning: Minimal pruning is usually required for Rhododendron prinophyllum. Remove dead or damaged branches as needed. Lightly shape the plant after flowering to maintain its desired form.
- Protection: Protect your plant from extreme heat, frost, and drying winds. Consider covering it with burlap or providing some shade during hot summer days to prevent stress.
- Pest and disease control: Monitor your plant for common pests like aphids, thrips, and spider mites. Use insecticidal soap or neem oil as necessary. Rhododendrons can also be susceptible to various diseases, such as powdery mildew and root rot. Proper watering, good airflow, and regular inspection can help prevent or address these issues.
By following these guidelines, you can successfully grow Rhododendron prinophyllum and enjoy its beautiful blooms.

Place in a window with dappled sun or a spot in the middle of a room. Or directly in a window facing west or east.

It is recommended to water this plant using a gentle watering technique, such as a soaker hose, to avoid damaging its delicate root system. Ensure that the soil is consistently moist but not waterlogged, as this can lead to root rot. Avoid overhead watering, as this can promote the growth of fungal diseases. During the hotter months, the plant may require more frequent watering, while less water is needed during cooler periods. Check the soil regularly to maintain proper moisture levels.
To fertilize this plant, apply a slow-release, acid-forming fertilizer in early spring before new growth appears. Make sure the fertilizer is specifically formulated for acid-loving plants. Follow the manufacturer's instructions for application rates based on the plant's size and age. Avoid over-fertilizing, as this can damage the plant. Water the plant thoroughly after application to help the fertilizer dissolve and reach the roots.
Rhododendron Prinophyllum requires a specific type of soil that is acidic, well-draining, and rich in organic matter. The soil should be moist, but not waterlogged, and should have a pH between 4.5 and 6.0. It is important to avoid using soil that is high in calcium or alkaline, as this can cause nutrient deficiencies and other issues with the plant. A mix of peat moss, perlite, and vermiculite is often recommended for growing Rhododendron Prinophyllum in containers, while a mix of peat moss, pine bark, and sand can be used in outdoor settings. It is also important to regularly feed the plant with a fertilizer specifically formulated for acid-loving plants.
To propagate this plant, you will need to take stem cuttings from a mature and healthy plant. Choose a stem that is at least six inches long, with healthy leaves and no signs of damage or disease. Cut the stem at a 45-degree angle using a sharp, clean pair of shears. Dip the cut end of the stem into a rooting hormone powder to encourage root growth.
Prepare a pot or container filled with moist, well-draining potting mix. Make a hole in the center of the potting mix using a pencil or your finger, and insert the cut end of the stem into the hole. Gently press the soil around the stem to hold it in place.
Cover the pot or container with a plastic bag to create a humid environment for the cutting. Place the pot in a bright, indirect light. Keep the soil moist but not waterlogged. Check the cutting regularly for signs of root growth, which should occur within several weeks.
Once the cutting has rooted and has started to grow new leaves, it can be transplanted into a larger pot or planted directly in the ground. Be sure to water it regularly and fertilize it as needed to help it thrive.


