Plant Overview
Known as the "Swamp Rose," Rosa palustris is a romantic native of North American wetlands. Unlike its fussy garden cousins that demand perfectly drained soil, this resilient shrub thrives where other roses would drown. It is often found framing the edges of quiet ponds and misty marshes, offering a vibrant splash of pink against the deep green of the swamp.
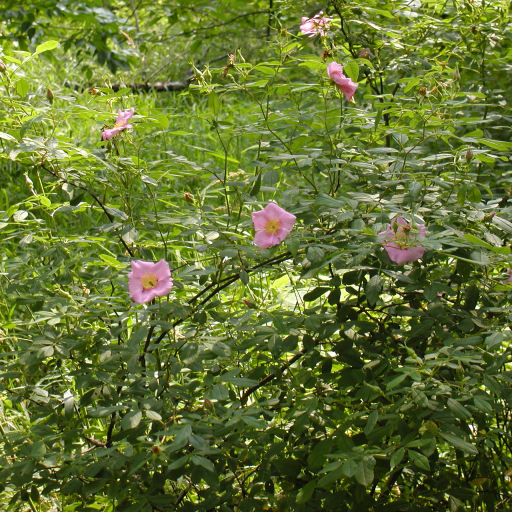
🔍 How to Identify
- 🌸 The Bloom: Five delicate, heart-shaped petals in shades of deep pink, surrounding a bright cluster of golden-yellow stamens.
- 🌿 The Foliage: Fine-toothed, dull green leaves that are arranged in groups of seven; they often turn a striking red or purple in the autumn.
- ⚔️ The Thorns: Distinctive, hooked thorns that usually appear in pairs at the base of each leaf stalk, helping the plant "climb" over neighboring vegetation.
🏡 In Your Garden
- 💧 Wet Feet Welcome: This is the ultimate "problem solver" plant for soggy areas. While most roses suffer from root rot in standing water, the Swamp Rose craves moisture and is perfect for rain gardens or pond edges.
- 🦋 Pollinator Buffet: Because it blooms slightly later than many other native roses (mid-to-late summer), it provides a critical nectar source for bumblebees and butterflies when other spring flowers have already faded.
⚠️ Safety & Toxicity
- ✅ Safe for All: The Swamp Rose is non-toxic to humans, cats, and dogs. In fact, the "hips" (fruit) are technically edible and rich in nutrients.
- 🧤 Physical Hazard: While not chemically dangerous, its hooked thorns are incredibly sharp and efficient at snagging skin or clothes. Always wear heavy-duty gardening gloves when pruning or transplanting.
✨ Fun Fact
The bright red fruits, known as "rose hips," act as a natural winter pantry. They stay on the bush long after the leaves have fallen, providing a high-vitamin food source for songbirds like Northern Cardinals and Cedar Waxwings during the coldest months of the year.

Detailed Care Instructions
To grow Rosa palustris, also known as the swamp rose or wild rose, follow these steps:
- Location: Choose a planting location that receives at least six hours of full sunlight daily. Ideally, it should have well-draining soil.
- Soil preparation: Improve the soil by adding organic matter such as compost, well-rotted manure, or peat moss. This helps with drainage and nutrient retention.
- Planting: Dig a hole slightly larger than the root ball of the rose plant. Place the rose in the hole at the same planting depth it was growing previously. Backfill the hole with soil, firming gently around the roots.
- Watering: Water the plant thoroughly after planting to settle the soil. Afterward, water deeply and regularly, keeping the soil moist but not waterlogged. Avoid watering from above to prevent wetting the leaves, which can cause disease.
- Mulching: Apply a layer of organic mulch around the base of the plant, but keep it away from the stems. Mulch helps retain moisture, suppress weeds, and insulate the roots.
- Pruning: Prune your Rosa palustris in late winter or early spring to remove dead, damaged, or crossing branches. Pruning helps maintain a healthy shape and promotes new growth and flowering.
- Fertilizing: Apply a balanced, slow-release fertilizer in early spring or use a rose-specific fertilizer following package instructions. Avoid over-fertilizing, as it can lead to excessive leaf growth at the expense of flower production.
- Pest and disease control: Keep an eye out for common rose pests such as aphids, spider mites, and rose chafer beetles. Use organic or chemical controls as necessary. Monitor for diseases like powdery mildew or black spot, and treat promptly with appropriate fungicides if needed.
- Support: Rosa palustris tends to have arching, sprawling branches, so consider providing support like a trellis or stakes. This can help keep the plant upright and improve its appearance.
- Enjoy: Rosa palustris produces single, fragrant pink flowers in late spring or early summer, followed by small, red rose hips. Admire the beauty of the flowers and provide regular care to ensure continued growth and health of the plant.

Place in a bright room that is sun drenched almost all day. Or directly in a south-facing window.

To properly water this particular type of plant, it's important to consider the conditions of its natural habitat. Rosa Palustris plants are typically found in wetland areas, so they require a consistent source of moisture. One way to ensure proper watering is to provide a slow and steady drip irrigation system or place the plant in a location where it will receive consistent rainfall. It's important not to let the soil dry out completely, otherwise, this can harm the plant. However, overwatering can also be detrimental, so careful monitoring of the soil moisture level is necessary. If the soil feels soggy or waterlogged, it's likely the plant is receiving too much water. Alternatively, if the soil feels dry to the touch, it's important to water the plant thoroughly until the soil is evenly moist but not waterlogged. It's also important to avoid getting water on the leaves or flowers of the plant, as this can make it more susceptible to diseases and pests.
Fertilize the plant by applying a slow-release fertilizer in early spring after the last frost. Make sure to follow the instructions on the package for the correct amount to use. Apply the fertilizer evenly around the plant, keeping it at least 6 inches away from the base of the stem. Water the plant thoroughly after fertilizing. Repeat the application in late summer or early fall if desired. Avoid fertilizing in winter or during periods of drought.
It is recommended to use a well-draining soil for this plant, with a pH of around 6.5-7.5. Soil should be rich in organic matter and provide adequate nutrients to promote healthy growth. It is important to avoid soil that is too compact or heavy as this can lead to waterlogging and root rot. Sandy loam or loamy soil that is fertile and has good drainage is ideal for this plant.
To propagate this plant, first select a healthy and mature stem that is approximately 6-8 inches in length. Use a sharp and sterilized pruning shears to cut the stem at a 45-degree angle just below a node. Remove all the leaves from the lower two-thirds of the stem, leaving only the top leaves intact.
Next, dip the cut end of the stem into rooting hormone powder to enhance the chances of successful rooting. Then, prepare a pot with a well-draining soil mix and make a hole in the center using a pencil or similar tool.
Insert the stem into the soil, making sure that the leaf nodes are covered by the soil. Firmly press the soil around the stem to ensure it is stable and doesn't move. Water it thoroughly and cover the pot with a plastic bag to create a humid environment that will encourage rooting.
Place the pot in a warm, bright spot with indirect sunlight to provide the ideal growing conditions for the new plants. Check the soil regularly and water the plant when the top inch of soil feels dry.
After about four to six weeks, gently tug on the stem to see if it has rooted. If it resists being pulled, roots have formed and the bag can be removed. Wait a few more weeks before transplanting the plant into a larger pot or garden bed.
Common pests of the swamp rose include Spider mites, aphids, larvae. Make a habit of checking your swamp rose frequently for pests so that any infestations can be caught and managed early.


